There’s something undeniably comforting about the smell of homemade banana bread wafting through the kitchen. Whether you’re trying to use up overripe bananas or simply craving a sweet, cozy treat, banana bread is a timeless classic. This article will guide you through everything you need to know about making the perfect banana bread at home using simple ingredients you probably already have in your pantry.
From choosing the right bananas to mastering the baking technique, we’ll break down the steps in a way that’s easy to follow, even if you’re new to baking. You’ll also get tips on storage, common mistakes to avoid, nutrition facts, and even ways to personalize your loaf for different dietary needs. Let’s get started with the basics in Part 1.
Understanding the Basics of Banana Bread
What Makes Banana Bread So Popular?
Banana bread isn’t just a go-to for using up ripe fruit. It’s beloved because it’s easy to make, budget-friendly, and incredibly versatile. You don’t need any special equipment or hard-to-find ingredients. It’s the perfect entry-level recipe for beginners and a nostalgic staple for seasoned bakers.
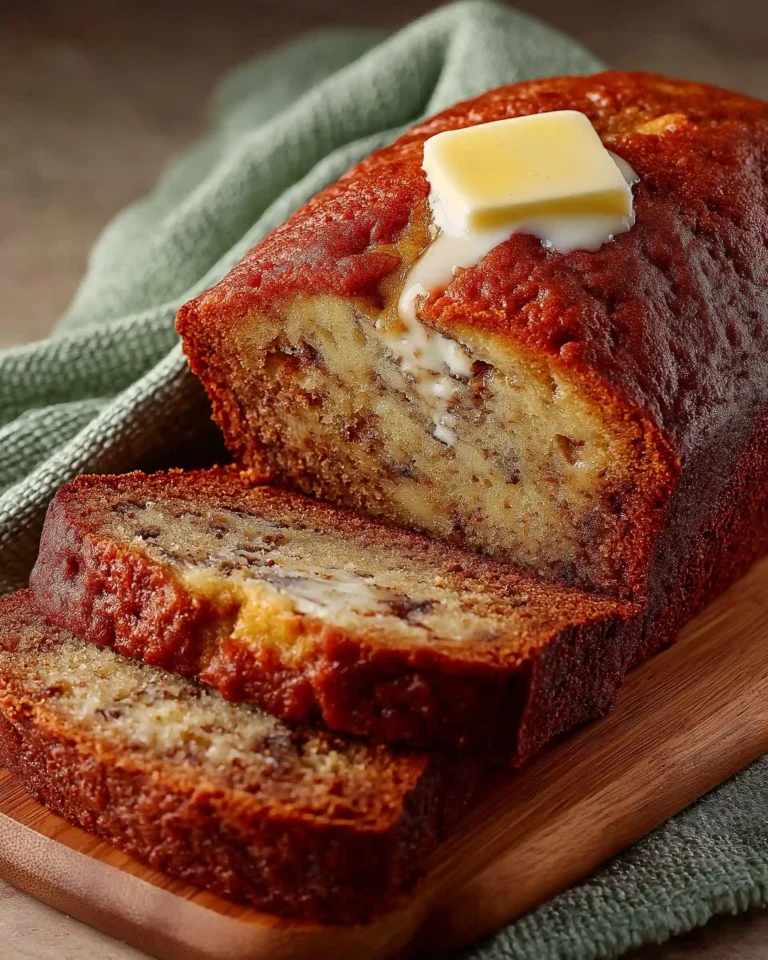
The best banana bread recipes yield a moist, dense loaf that’s sweet but not overly sugary, with a tender crumb and golden crust. When done right, each slice is satisfying on its own but can also be enjoyed with toppings like nut butter, a touch of honey, or even a light spread of cream cheese.
Essential Ingredients and Why They Matter
Let’s take a closer look at what each ingredient in this banana bread recipe does and why it’s important:
- All-purpose flour (2 cups): This gives the bread structure. It creates the base for all the other ingredients to bind together. For a slightly lighter loaf, you could try substituting half with whole wheat flour.
- Baking soda (1 teaspoon): This is your leavening agent. It reacts with the acid in the bananas to help the bread rise and become fluffy instead of dense.
- Salt (¼ teaspoon): A small amount enhances all the other flavors. It balances the sweetness and brings out the richness of the butter and bananas.
- Brown sugar (¾ cup): Unlike white sugar, brown sugar adds moisture and a subtle hint of molasses. It deepens the flavor of the banana bread.
- Butter (½ cup): Butter contributes richness and moistness. It also helps create a tender texture.
- Eggs (2 large, beaten): Eggs act as a binder and provide structure. They also help the bread rise and stay moist.
- Mashed bananas (2 ⅓ cups): The star of the show. Overripe bananas are naturally sweet and soft, which is exactly what you need for that signature banana bread flavor and moisture.
Choosing the Right Bananas
The best banana bread starts with the right bananas. Here’s what to look for:
- Color: Go for bananas that are deep yellow with lots of brown or black spots. The darker the peel, the sweeter and softer the banana will be.
- Texture: They should be mushy and easy to mash with a fork. If they’re still firm, let them ripen for a few more days.
- Tip: If you’re in a rush, you can speed up ripening by placing bananas in a paper bag with an apple or by baking them in the oven at 300°F for about 15 minutes until the skin turns black.
Recommended Equipment
You don’t need fancy gadgets to make banana bread, but having a few kitchen basics will make your baking process smoother:
- A 9×5-inch loaf pan
- Mixing bowls (preferably one large and one medium)
- Electric mixer or hand whisk
- Measuring cups and spoons
- Spatula or wooden spoon
- Wire cooling rack
- Toothpick or cake tester for doneness check
These items help ensure your batter mixes evenly, your loaf bakes properly, and your bread cools without getting soggy.
Step-by-Step Guide to Making the Best Banana Bread Recipe
Step 1: Prepare Your Oven and Loaf Pan
Before mixing your ingredients, preheat your oven to 350°F (175°C). This ensures that the oven reaches the correct temperature by the time your batter is ready. Baking in a preheated oven helps the loaf rise evenly and prevents it from becoming too dense.
Next, lightly grease a 9×5-inch loaf pan with butter or a non-stick cooking spray. Make sure to coat the corners and sides thoroughly to prevent the bread from sticking after baking. You can also line the bottom with parchment paper for easy removal.
Step 2: Mix Dry Ingredients
In a large bowl, whisk together:
- 2 cups all-purpose flour
- 1 teaspoon baking soda
- ¼ teaspoon salt
Mix these dry ingredients thoroughly to ensure the baking soda is evenly distributed. This helps the bread rise uniformly and prevents any unpleasant salty or bitter spots.
Step 3: Cream Butter and Sugar
In a separate large bowl, use an electric mixer to beat together:
- ½ cup butter (softened)
- ¾ cup brown sugar
Beat on medium speed until the mixture is light and smooth, which takes about 2–3 minutes. This step incorporates air, giving your banana bread a lighter texture. If you don’t have an electric mixer, a hand whisk will do, though it may take a little longer.
Step 4: Add Eggs and Bananas
To the butter-sugar mixture, stir in:
- 2 large eggs, beaten
- 2 ⅓ cups mashed overripe bananas
Use a spoon or spatula to gently mix until everything is well combined. The batter may look slightly lumpy because of the mashed bananas — that’s okay. Do not overmix, as this can cause the final bread to become dense or chewy.
Step 5: Combine Wet and Dry Mixtures
Gradually stir the banana mixture into the bowl of dry ingredients. Use a spatula to fold the ingredients together just until blended. Overmixing at this point will develop the gluten in the flour, leading to tough banana bread.
The final batter should be thick, moist, and slightly lumpy. If desired, you can fold in optional add-ins at this stage like chopped nuts or chocolate chips, but the base recipe stands strong on its own.
Step 6: Pour and Bake
Pour the batter into your prepared loaf pan and smooth the top with a spatula. Gently tap the pan on the counter to remove any air bubbles.
Place the pan in the preheated oven and bake for about 60 minutes, or until a toothpick inserted into the center of the loaf comes out clean. Every oven is a little different, so start checking around the 55-minute mark. If the top browns too quickly while the center remains underdone, loosely cover it with aluminum foil for the final 10-15 minutes.
Step 7: Cool and Remove
Once baked, remove the loaf from the oven and let it cool in the pan for 10 minutes. This allows the bread to firm up slightly, making it easier to remove. After that, turn the loaf out onto a wire rack to cool completely before slicing. If you cut it too early, it may crumble or be too sticky inside.
Print
The Best Banana Bread Recipe
Description
A moist and classic banana bread recipe made with simple pantry ingredients and overripe bananas. Perfect for breakfast, snacks, or dessert.
Ingredients
2 cups all-purpose flour
1 teaspoon baking soda
¼ teaspoon salt
¾ cup brown sugar
½ cup butter
2 large eggs, beaten
2 ⅓ cups mashed overripe bananas
Instructions
1. Preheat the oven to 350°F (175°C). Lightly grease a 9×5-inch loaf pan.
2. In a large bowl, mix together the flour, baking soda, and salt.
3. In a separate bowl, beat the brown sugar and butter until smooth.
4. Stir in the eggs and mashed bananas until well blended.
5. Combine the banana mixture with the flour mixture and stir just until combined.
6. Pour the batter into the prepared loaf pan.
7. Bake in the preheated oven for about 60 minutes, or until a toothpick inserted into the center comes out clean.
8. Let the bread cool in the pan for 10 minutes, then remove and cool completely on a wire rack.
Notes
For best results, use very ripe bananas with brown spots.
To store, wrap the cooled loaf in plastic wrap and keep at room temperature for up to 3 days.
Freeze individual slices for up to 3 months.
- Category: Bread
Common Banana Bread Mistakes and How to Avoid Them
Mistake 1: Using Underripe or Overripe Bananas Incorrectly
Banana bread depends on the natural sweetness and softness of overripe bananas. Using bananas that are just yellow or firm won’t give you the rich flavor and moist texture this recipe needs. On the other hand, bananas that are too far gone—blackened, fermented, or leaking—can ruin the taste or texture.
Solution: Use bananas that are heavily speckled with brown spots and very soft to the touch. They should mash easily with a fork and have a rich aroma. If your bananas aren’t quite ready, speed up ripening by placing them in a paper bag or roasting them in the oven for a few minutes.
Mistake 2: Overmixing the Batter
One of the biggest pitfalls in banana bread baking is overmixing. When flour is mixed too vigorously, gluten forms, which can result in a dense, rubbery loaf instead of the tender, moist bread you want.
Solution: After combining the wet and dry ingredients, gently fold the mixture using a spatula. Stop mixing as soon as you no longer see streaks of flour. A few small lumps are perfectly fine.
Mistake 3: Not Measuring Ingredients Properly
Too much flour, not enough butter, or an imbalanced amount of sugar can dramatically affect the final result. Measuring by eye or skipping the level-off method can throw off your ratios.
Solution: Use proper measuring cups and spoons. Spoon flour into your measuring cup, then level it off with the back of a knife. Avoid packing it down. For butter, use a standard stick measurement or weigh it using a kitchen scale if needed.
Mistake 4: Baking at the Wrong Temperature
Baking at too high or too low a temperature can lead to a burnt crust and an undercooked center. A fluctuating oven can also cause the loaf to collapse in the middle.
Solution: Preheat your oven fully to 350°F (175°C) and avoid opening the oven door too often during baking. Use an oven thermometer if you’re unsure about your oven’s accuracy.
Mistake 5: Not Checking Doneness Properly
Underbaked banana bread may look golden outside but can be wet or gooey inside. Relying only on bake time can mislead you.
Solution: Use the toothpick test. Insert a toothpick into the center of the loaf. If it comes out clean or with only a few moist crumbs, your bread is done. If it comes out with batter, bake for another 5–10 minutes and check again.
Mistake 6: Removing the Loaf Too Soon
Taking the bread out of the pan right after baking can cause it to break apart or stick.
Solution: Let the bread cool in the pan for 10 minutes after baking. Then, gently run a butter knife around the edges before turning it out onto a wire rack. Let it cool fully to room temperature before slicing.
Mistake 7: Storing It Improperly
Banana bread can become dry if not stored correctly, or even spoil faster if kept too warm.
Solution: Once fully cooled, wrap the bread in plastic wrap or store in an airtight container. Keep it at room temperature for up to 3 days or refrigerate for up to a week. For longer storage, freeze individual slices in freezer-safe bags and thaw as needed.
Healthy Swaps and Dietary Adaptations for Banana Bread
Why Make Substitutions in Banana Bread?
Traditional banana bread is delicious, but you might want to adjust it for dietary preferences or health goals. Whether you’re reducing sugar, avoiding dairy, or adding more fiber, there are several easy swaps that keep the flavor and texture intact.
Healthy banana bread can still be indulgent and moist. The key is knowing which ingredients to switch and how they affect the final result. Let’s look at some of the best ways to tweak the recipe while keeping it satisfying.
1. Lowering Sugar Without Sacrificing Flavor
The original recipe uses ¾ cup of brown sugar, which adds depth and sweetness. However, bananas themselves are naturally sweet, especially when overripe.
Smart swaps:
- Use ½ cup of coconut sugar or pure maple syrup for a less processed option.
- Substitute unsweetened applesauce for half the sugar to reduce calories and add moisture.
- Rely on extra ripe bananas—the riper they are, the sweeter they’ll taste.
Note: If you reduce sugar too much, your bread may become bland. A small amount is still needed to balance the flavors.
2. Making It Dairy-Free
Butter gives banana bread richness, but it can be replaced if you’re avoiding dairy.
Dairy-free swaps:
- Use ½ cup of coconut oil, melted and cooled.
- Try vegan butter for a similar taste and texture.
- Use unsweetened applesauce as a low-fat alternative to butter (though this may make the bread denser).
These options still provide moisture and tenderness without compromising structure.
3. Going Gluten-Free
To make banana bread gluten-free, you need to substitute the flour with a safe alternative without losing texture.
Best gluten-free flour options:
- 1-to-1 gluten-free flour blend (most reliable)
- Oat flour (adds a nutty flavor and fiber)
- Almond flour (use with caution, needs adjustments due to its density)
Always check the label for “certified gluten-free,” and consider adding an extra egg or a tablespoon of flaxseed meal to help bind the loaf.
4. Boosting Nutrition with Add-ins
You can pack in extra nutrients without changing the taste too much.
Nutritional add-ins:
- Ground flaxseeds or chia seeds for fiber and omega-3s
- Chopped walnuts or pecans for healthy fats and crunch
- Dark chocolate chips for antioxidants and sweetness
- Shredded zucchini or carrot for moisture and hidden veggies
Just be sure not to overload the batter. A total of ½ to ¾ cup of add-ins is plenty.
5. Making It Egg-Free (Vegan-Friendly)
Banana bread can still be delicious without eggs if you use the right plant-based binder.
Egg replacements (for 2 eggs):
- 2 tablespoons flaxseed meal + 6 tablespoons water (let sit 5 minutes)
- ½ cup mashed avocado or additional mashed banana
- ½ cup plain dairy-free yogurt
These swaps will slightly change the texture but still hold the loaf together beautifully.
6. Using Whole Grains for Added Fiber
Refined flour gives banana bread its classic softness, but you can boost the health factor by mixing in whole grains.
Whole grain options:
- Replace up to 50% of all-purpose flour with whole wheat flour
- Use spelt flour or white whole wheat flour for a lighter texture
- Add a tablespoon of oat bran or wheat germ for fiber
Keep in mind, these substitutions may require a splash of extra liquid like milk or plant-based milk to maintain the right batter consistency.
How to Store, Freeze, and Reheat Banana Bread
Storing Banana Bread at Room Temperature
Banana bread stays freshest when stored properly. Once your loaf has cooled completely, you can store it at room temperature to enjoy over a few days.
Best practices for storage:
- Wrap the loaf tightly in plastic wrap or aluminum foil to lock in moisture.
- Alternatively, place it in an airtight container lined with a paper towel to absorb excess moisture and prevent sogginess.
- Store in a cool, dry spot away from direct sunlight or heat.
Shelf life: Up to 3 days at room temperature.
Important: Never refrigerate banana bread unless you live in a hot, humid climate, as refrigeration tends to dry it out faster.
How to Freeze Banana Bread Properly
Freezing is the best way to extend the shelf life of banana bread without sacrificing texture or flavor.
Steps for freezing:
- Allow the banana bread to cool completely after baking.
- Wrap the entire loaf or individual slices in plastic wrap, followed by a layer of aluminum foil or a freezer-safe zip-top bag.
- Label the bag with the date to track storage time.
Freezer life: Banana bread can be frozen for up to 3 months.
Tip: Freeze in slices if you plan to eat a little at a time. This way, you can thaw just what you need without defrosting the entire loaf.
Reheating Banana Bread for Fresh-Baked Taste
Whether it’s been stored on the counter or frozen, banana bread reheats beautifully with the right approach.
For room temperature bread:
- Warm slices in the microwave for 10–15 seconds.
- Toast in a toaster oven for a lightly crisp edge and warm center.
For frozen bread:
- Let it thaw at room temperature (about 1 hour for slices).
- Or place a wrapped slice in the microwave for 30–45 seconds.
To reheat a full frozen loaf, remove all wrapping, place it in the oven at 350°F for about 10–15 minutes until warm.
Avoiding Common Storage Mistakes
- Never store banana bread while warm. Trapped steam leads to soggy bread and possible mold.
- Don’t leave it uncovered. Exposure to air dries out the loaf quickly.
- Avoid the fridge. The cold air alters texture and pulls out moisture.
Pro Tip: Make Banana Bread Ahead of Time
Banana bread freezes so well that it’s perfect for meal prep or make-ahead baking. You can bake multiple loaves and freeze them for holidays, guests, or busy mornings.
Label each frozen loaf with the baking date and reheating instructions so it’s ready when you are.
Conclusion
Making banana bread at home is one of the simplest and most rewarding baking projects you can do. With just a few pantry staples and ripe bananas, you can create a moist, flavorful loaf that brings warmth to any kitchen. Whether you stick to the classic recipe or make healthy adaptations, banana bread offers flexibility, comfort, and taste in every bite.
By following the steps in this guide, avoiding common mistakes, and using smart storage methods, you’ll be able to enjoy your loaf fresh for days or even freeze it for future cravings. So the next time you spot a bunch of overripe bananas, don’t toss them — turn them into a delicious homemade banana bread that you can feel proud of.


