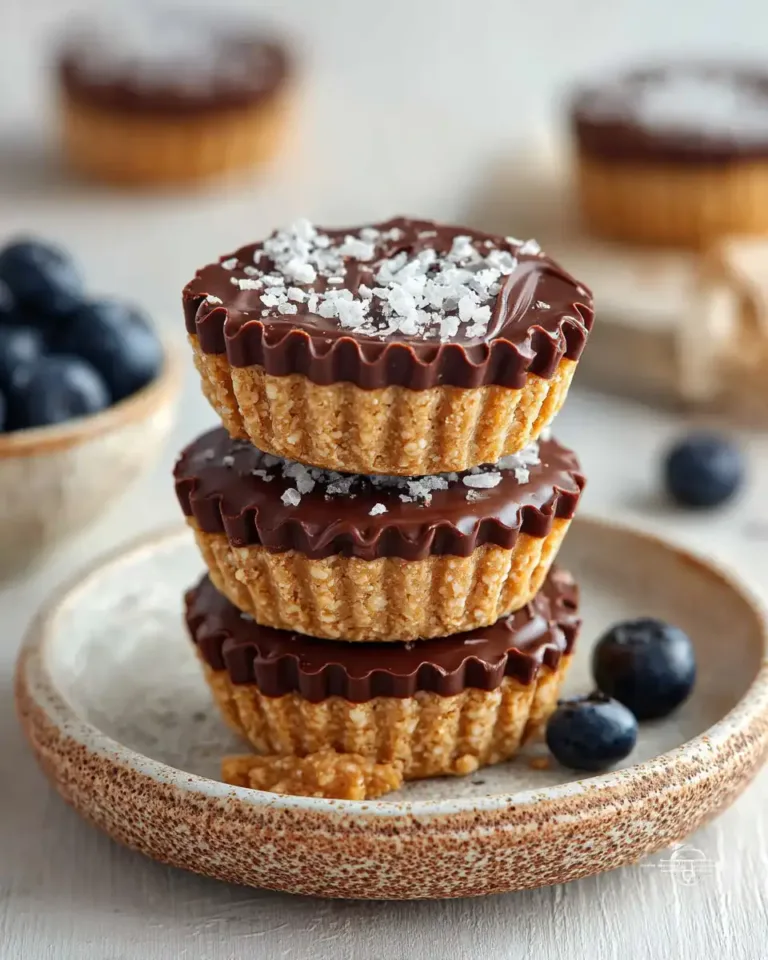
Peanut Butter Cups are one of the most loved sweet treats in American kitchens, and for good reason. The combination of smooth chocolate and creamy peanut butter creates an irresistible balance of flavor and texture. This homemade Peanut Butter Cups recipe takes that classic idea and turns it into a cleaner, naturally sweetened dessert that still feels indulgent. Using simple ingredients like cashews, dates, natural peanut butter, and quality chocolate, these Peanut Butter Cups are easy to prepare and perfect for anyone looking to enjoy a better-for-you snack without sacrificing taste.
Equipment
A food processor with a sharp blade
Microwave safe glass bowl or jug
Mini muffin tray
Mini muffin paper liners
Measuring cups and measuring spoons
Teaspoon and small spatula
Ingredients List
1 block sugar free milk chocolate, about 100 g or 3.5 oz, broken into small pieces
½ cup plain unsalted cashews, about 70 g or 2.5 oz
4 Medjool dates, pitted and at room temperature, about 90 g or 3 oz
5 tablespoons natural peanut butter with no added sugar, divided, about 80 g
Optional pinch of fine sea salt to enhance flavor
Step by Step
Begin by preparing the base of your Peanut Butter Cups. Add the cashews to a food processor and pulse for several seconds until they break down into small crumbs. The texture should resemble coarse sand rather than a fine flour. This gives the cups structure and a satisfying bite.
Next, add the pitted Medjool dates to the processor along with three tablespoons of the natural peanut butter. Process again, stopping occasionally to scrape down the sides. The mixture should start to clump together and form a sticky, crumbly dough. If it seems too dry, pulse a little longer until the natural oils release.
Line a mini muffin tray with paper liners. Using a teaspoon or your fingers, distribute the nut mixture evenly into each liner. Press the mixture down firmly so it covers the base and slightly up the sides, filling each cup about two thirds full. This creates space for the creamy center and chocolate topping.
Using a clean teaspoon, add a small dollop of the remaining peanut butter into the center of each nut base. Try to keep it centered so it does not spread to the edges. This hidden layer is what gives Peanut Butter Cups their signature surprise when you bite into them.
Place the chocolate pieces into a microwave safe bowl. Microwave at 50 percent power for about two minutes, stopping every 30 seconds to stir gently. The chocolate should be just melted with a few small pieces still visible. Stirring will finish the melting process without overheating.
Working quickly, spoon the melted chocolate over each cup, covering the peanut butter center completely. Gently tap the tray on the counter to smooth the tops and remove air bubbles. Make sure the chocolate reaches the edges so the filling is fully sealed.
Transfer the tray to the refrigerator and let the Peanut Butter Cups chill for about one hour, or until the chocolate is fully set. Once firm, remove them from the tray and enjoy or store for later.
Tips and Tricks
For the best Peanut Butter Cups texture, always use plain unsalted cashews. Roasted or salted varieties can overpower the sweetness of the dates and chocolate. If cashews are unavailable, raw hazelnuts can be used, but they will give a slightly stronger flavor.
Medjool dates are essential for this recipe because of their softness and natural caramel taste. If your dates feel dry, soak them in warm water for ten minutes, then drain well before using. This helps the mixture bind smoothly.
When melting chocolate, patience is key. Lower heat prevents burning and keeps the chocolate glossy. Stirring frequently ensures even melting and a smooth finish on your Peanut Butter Cups.
If you prefer a stronger peanut flavor, lightly warm the peanut butter before adding it to the center. This makes it easier to portion and enhances its aroma. Adding a tiny pinch of sea salt on top of the chocolate before chilling can also elevate the overall taste.
Notes
Natural peanut butter works best in this recipe. The ingredient list should contain only peanuts. Avoid varieties with added oils or sweeteners, as they can affect both texture and flavor.
Sugar free milk chocolate provides a balanced sweetness, but sugar free dark chocolate can be used if you enjoy a more intense cocoa taste. Make sure the chocolate melts smoothly and does not contain unnecessary additives.
Pressing the nut base firmly into the liners is important. A compact base prevents crumbling when the Peanut Butter Cups are removed from the tray.
These cups are meant to be enjoyed chilled. At room temperature, the peanut butter center will soften slightly, which some people enjoy, but refrigeration keeps them neat and firm.
Storage
Store the Peanut Butter Cups in an airtight container in the refrigerator for up to seven days. Keeping them chilled helps preserve the texture of both the chocolate shell and the peanut butter filling.
For longer storage, these Peanut Butter Cups can be frozen for up to one month. Place them in a freezer safe container with parchment paper between layers. Thaw in the refrigerator for about thirty minutes before eating.
Avoid storing them at room temperature for extended periods, especially in warm environments, as the chocolate may soften and lose its shape.
Benefits
Peanut Butter Cups made with dates and cashews offer more than just great taste. Dates provide natural sweetness along with fiber and minerals like potassium. Cashews contribute healthy fats and plant based protein, making these cups more satisfying than traditional candy.
Natural peanut butter adds protein and healthy fats that help keep you full longer. This makes these Peanut Butter Cups a smart option for people looking to reduce refined sugar while still enjoying dessert.
They are suitable for individuals who prefer minimally processed ingredients. However, those with nut allergies should avoid this recipe entirely. Because the recipe is rich in healthy fats, portion control is recommended for anyone watching calorie intake.
Variations
You can customize Peanut Butter Cups in several ways. Swap the cashews for almonds or hazelnuts for a different base flavor. Add a teaspoon of cocoa powder to the nut mixture for a chocolatey foundation.
For extra texture, stir finely chopped nuts into the melted chocolate before topping the cups. You can also use crunchy natural peanut butter if you enjoy small bits of peanuts in the center.
Serving Suggestions
Serve Peanut Butter Cups straight from the refrigerator for the best texture. They pair well with a cup of coffee, tea, or a cold glass of milk. Arrange them on a small plate for a simple yet elegant homemade treat.
Conclusion
Peanut Butter Cups do not have to be overly sweet or complicated to be delicious. This homemade version combines simple ingredients with easy steps to create a dessert that feels indulgent yet balanced. With a rich chocolate coating, creamy peanut butter center, and naturally sweet nut base, these Peanut Butter Cups are perfect for everyday enjoyment. Once you try them, they may quickly become a staple in your kitchen.
FAQs
What makes these Peanut Butter Cups healthier than store bought ones
They use dates for natural sweetness and natural peanut butter without added sugar or oils.
Can I use dark chocolate instead of milk chocolate
Yes, sugar free dark chocolate works well and gives a richer cocoa flavor.
Do Peanut Butter Cups need to stay refrigerated
Refrigeration helps maintain their shape and texture, especially in warmer environments.
Can I make these Peanut Butter Cups without a food processor
A food processor is recommended for the best texture, but very finely chopped nuts and dates can work in a pinch.
How many Peanut Butter Cups does this recipe make
It usually makes about twelve mini cups, depending on the size of your muffin tray.
Peanut Butter Cups With a Guilt-Free Twist
- Total Time: 1 hour 20 minutes
- Yield: 12 mini cups
- Diet: Gluten Free
Description
These homemade Peanut Butter Cups are a naturally sweetened take on a classic favorite. Made with cashews, Medjool dates, natural peanut butter, and quality sugar free chocolate, they deliver rich flavor and satisfying texture without refined sugar. Easy to prepare and perfect for a better for you dessert or snack.
Ingredients
Sugar free milk chocolate, broken into small pieces
Plain unsalted cashews
Medjool dates, pitted and at room temperature
Natural peanut butter with no added sugar
Optional pinch of fine sea salt
Instructions
1. Add the cashews to a food processor and pulse until they resemble coarse sand. Avoid overprocessing into flour, as texture is important for structure.
2. Add the dates and a portion of the peanut butter to the processor. Blend until the mixture becomes sticky and crumbly, scraping down the sides as needed.
3. Line a mini muffin tray with paper liners and press the nut mixture firmly into the base and slightly up the sides of each liner.
4. Place a small dollop of the remaining peanut butter in the center of each base, keeping it away from the edges.
5. Melt the chocolate gently in a microwave safe bowl at low power, stirring frequently until smooth and glossy.
6. Spoon the melted chocolate over each cup, covering the peanut butter completely and sealing the edges.
7. Gently tap the tray to smooth the tops and remove air bubbles.
8. Refrigerate until the chocolate is fully set, then remove from the tray and serve chilled.
Notes
Use only natural peanut butter made from peanuts alone. Added oils or sweeteners can affect texture.
Medjool dates are best for their softness and caramel flavor. If dry, soak briefly in warm water and drain well.
Always melt chocolate slowly at low heat to prevent burning and maintain shine.
Press the nut base firmly so the cups hold together when removed.
Store chilled for best texture, especially in warm environments.
- Prep Time: 15 minutes
- Cook Time: 5 minutes
- Category: Dessert
- Method: No Bake
- Cuisine: American


