Making homemade peanut butter is one of the simplest and most rewarding kitchen projects you can try. Unlike store-bought options that often contain added sugars, oils, or preservatives, preparing it at home allows you to keep the ingredient list short, natural, and tailored to your taste. When you make peanut butter yourself, you control the texture, sweetness, and even the amount of salt. Best of all, the process is quick and requires just a few staple ingredients. This guide will walk you through everything you need to know, from the benefits of making your own nut spreads to step-by-step preparation, recipe variations, and storage tips.
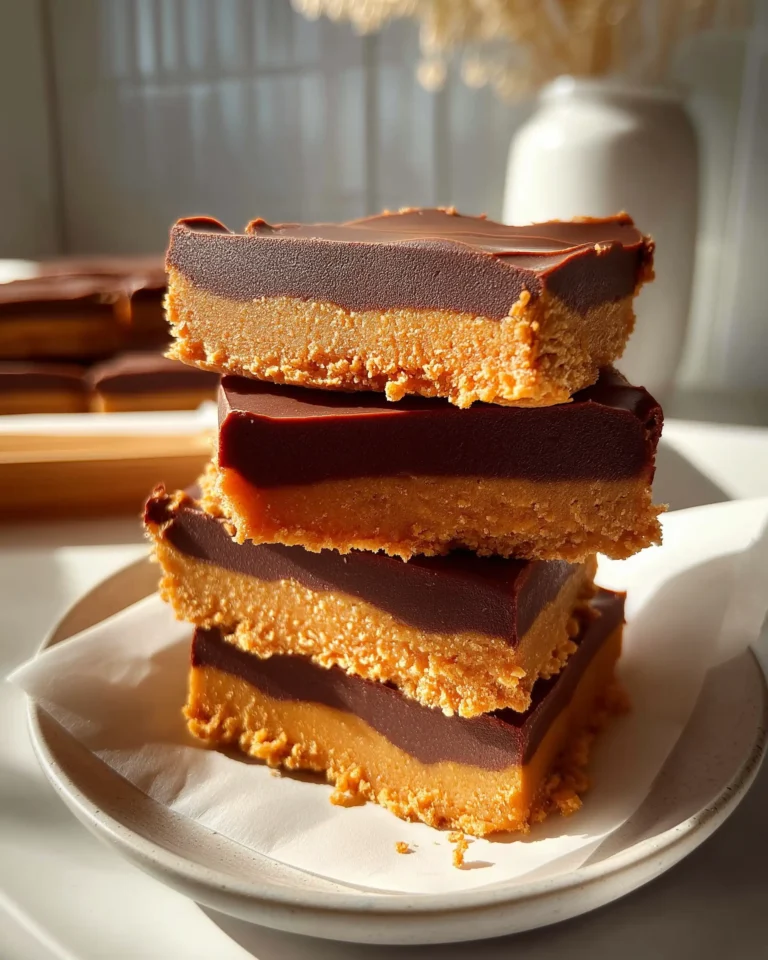
Homemade peanut butter is versatile, too. You can spread it on toast, swirl it into oatmeal, blend it into smoothies, or even use it as a base for decadent desserts. One of the tastiest treats you can create with it is a no-bake chocolate and peanut butter bar that combines simple ingredients into a rich and satisfying snack.
In this article, we will explore five key parts: the nutritional advantages of homemade peanut butter, essential ingredients and tools, a step-by-step recipe with a chocolate topping, creative variations, and expert tips for storage and serving. By the end, you will feel confident making your own batch and even experimenting with new flavors.
Why Choose Homemade Peanut Butter
When most people think of peanut butter, the first image that comes to mind is a jar from the supermarket. While convenient, many of these products include added oils, refined sugar, or hydrogenated fats that take away from the natural simplicity of roasted peanuts. Choosing to make peanut butter at home not only ensures purity but also allows you to create a fresher, tastier, and more nutrient-dense spread.
Healthier Than Store-Bought Options
Homemade peanut butter is naturally packed with protein, fiber, and healthy fats, which help keep you satisfied and energized throughout the day. Unlike commercial brands that often rely on palm oil or other stabilizers, making it at home allows you to skip unnecessary additives. Instead, you get the full benefit of peanuts’ natural nutrients, including vitamin E, magnesium, and potassium. This makes your spread not just tastier but also better for your overall wellness.
Another advantage is the flexibility to adjust sweetness. Many packaged peanut butters contain high amounts of sugar or corn syrup, which can spike blood sugar levels. With your own recipe, you can choose natural sweeteners like honey or maple syrup, or even leave it unsweetened if you prefer a more savory flavor profile.
Fresher Taste and Texture Control
One of the most rewarding aspects of making homemade peanut butter is the ability to control texture. If you enjoy a creamy, silky spread, blend the peanuts longer until smooth. If you love crunch, stop blending earlier and fold in some chopped roasted peanuts at the end. Store-bought jars often come in only a few varieties, but when you prepare it yourself, you can customize it to match your exact taste preferences.
Freshness is another benefit. Peanuts that are freshly roasted and blended create a warm, nutty aroma that is difficult to match with mass-produced products. Homemade peanut butter has a more vibrant flavor and feels more wholesome. This is especially true when you use high-quality peanuts or organic varieties.
Print
Homemade Peanut Butter Recipe
- Total Time: 1 hour
- Yield: 9 bars
- Diet: Vegetarian
Description
No-bake chocolate peanut butter bars made with homemade peanut butter, almond flour, and maple syrup for a rich, healthy dessert.
Ingredients
For the Peanut Butter Base:
1 cup creamy peanut butter
1 cup almond flour (or sub 3/4 cup gluten-free flour)
1/4 cup maple syrup
For the Chocolate Layer:
1 cup dark chocolate chips
1/2 cup creamy peanut butter
Instructions
1. Line an 8×8 baking dish with parchment paper.
2. In a large bowl, mix together the peanut butter, almond flour, and maple syrup until fully combined.
3. Press the mixture firmly into the baking dish using clean hands or a spatula.
4. Melt the chocolate chips and mix in the peanut butter until smooth.
5. Pour the chocolate mixture over the base and spread evenly.
6. Refrigerate for 1-2 hours until set.
7. Slice into 9 bars and serve.
Notes
Store these bars in the fridge for up to 1 week or freeze for up to 2 months.
For best slicing, use a warm knife.
- Prep Time: 5 mins
- Category: Dessert
- Method: No-Bake
- Cuisine: American
Essential Ingredients and Tools
Before diving into the process of making homemade peanut butter, it’s important to gather the right ingredients and kitchen tools. Fortunately, this recipe is incredibly simple and doesn’t require any advanced cooking skills or expensive appliances. Whether you’re creating a basic spread or preparing a chocolate peanut butter dessert bar, these essentials will help you achieve the perfect consistency and flavor.
Key Ingredients for Homemade Peanut Butter
To make a classic peanut butter base, you only need one ingredient: peanuts. However, to enhance flavor and texture, many people add a few more pantry staples. Below are the main ingredients used in homemade peanut butter and in the featured chocolate peanut butter bars.
- Roasted peanuts: Dry-roasted peanuts are ideal, as they bring out a deeper nutty flavor. Avoid salted ones if you want full control over sodium levels.
- Almond flour: This adds density and structure when used in dessert recipes. It also contributes to a softer bite and light nutty undertone.
- Maple syrup: A natural sweetener that balances the richness of peanuts and pairs well with chocolate. Maple syrup is a great alternative to refined sugar.
- Dark chocolate chips: Choose a variety with a cocoa content of 60% or higher. The bittersweet contrast enhances the overall richness of your chocolate layer.
- Optional add-ins: A pinch of sea salt, a dash of cinnamon, or a splash of alcohol-free vanilla flavor can enhance the depth of flavor in your spread or dessert bars.
All ingredients in this recipe are free from alcohol, pork derivatives, and other doubtful items, making them suitable for a wide range of dietary preferences in the USA.
Tools You’ll Need
Making homemade peanut butter doesn’t require a professional kitchen. Here’s what you’ll need to get started:
- Food processor or high-speed blender: This is the most important tool. A good machine will blend roasted peanuts into a creamy butter within a few minutes.
- Mixing bowl: Useful for combining ingredients like almond flour and maple syrup before pressing them into a dish.
- Spatula: Helps in scraping down the sides of the food processor or spreading the mixture into an even layer.
- 8×8-inch baking dish: Ideal for forming the dessert bars. Make sure to line it with parchment paper for easy removal and clean slicing.
- Microwave-safe bowl or double boiler: Required for melting chocolate chips and blending them smoothly with peanut butter.
By keeping the tools simple and the ingredients clean, homemade peanut butter becomes an accessible recipe that anyone can enjoy. Whether you’re preparing it for everyday snacking or for a special dessert, these essentials will help you succeed.
Step-by-Step Recipe With Chocolate Topping
One of the best things about homemade peanut butter is how well it works in both savory and sweet recipes. If you’re in the mood for something rich, indulgent, and still relatively wholesome, these no-bake chocolate peanut butter bars are a must-try. They’re simple, require no oven, and come together in just a few minutes with ingredients you likely already have.
Here’s how to make this satisfying treat from scratch using your homemade peanut butter or a clean, store-bought version.
Ingredients
For the Peanut Butter Base
- 1 cup creamy peanut butter
- 1 cup almond flour (or substitute with ¾ cup gluten-free flour)
- ¼ cup maple syrup
For the Chocolate Layer
- 1 cup dark chocolate chips
- ½ cup creamy peanut butter
These ingredients are carefully chosen for purity and quality. They contain no alcohol, animal-derived gelatin, or any restricted additives, making this dessert approachable and safe for a wide American audience.
Instructions
- Prepare your pan
Line an 8×8-inch baking dish with parchment paper. This makes it easier to remove the bars later and keeps cleanup simple. - Make the base layer
In a large mixing bowl, combine the creamy peanut butter, almond flour, and maple syrup. Stir until the mixture is smooth and fully combined. The dough should be thick and sticky, but workable. - Press the base into the dish
Scoop the peanut mixture into your prepared baking dish. Use clean hands or a spatula to press it down firmly and evenly across the bottom of the pan. This will serve as the foundation of your dessert bars. - Create the chocolate layer
Melt the chocolate chips using a microwave or double boiler, stirring every 20 seconds to prevent burning. Once melted, mix in the remaining ½ cup of peanut butter. Stir until smooth and velvety. - Spread and chill
Pour the chocolate-peanut butter mixture over the base layer in the pan. Use a spatula to spread it evenly across the surface. Place the dish in the refrigerator for 1 to 2 hours, or until the chocolate layer is firm. - Slice and serve
Once set, lift the bars out of the dish using the parchment paper edges. Slice into 9 even squares and enjoy.
Storage Tips
These bars keep well in both the refrigerator and freezer. Store in an airtight container in the fridge for up to 1 week. For longer storage, freeze them for up to 2 months. Allow frozen bars to thaw at room temperature for 15 to 20 minutes before eating.
This nut butter recipe is a great make-ahead snack or dessert. It’s rich, creamy, and perfectly balanced between sweet and salty. Plus, it’s entirely no-bake, saving you time and effort in the kitchen.
Creative Variations and Flavor Twists
One of the biggest advantages of making homemade peanut butter and using it in no-bake treats is how adaptable it is. Once you master the basic recipe, you can easily personalize the flavor profile to match your preferences or dietary needs. From sweet to savory, crunchy to smooth, the possibilities are nearly endless.
Flavor Enhancements for Your Peanut Butter
Peanut butter doesn’t have to be plain. With just a few additional ingredients, you can create exciting versions that are perfect for snacking, spreading, or baking.
- Honey cinnamon swirl: Mix in 1 tablespoon of honey and ½ teaspoon of ground cinnamon while blending. This gives your spread a naturally sweet and cozy flavor.
- Cocoa peanut butter: Add 1 tablespoon of unsweetened cocoa powder and a touch of maple syrup to make a chocolaty variation, great on toast or stirred into warm oats.
- Spicy peanut butter: For those who enjoy heat, a pinch of cayenne or crushed red pepper flakes adds a bold kick. This works especially well in savory sauces and marinades.
- Sea salt crunch: Stir in chopped roasted peanuts and a light sprinkle of flaky sea salt for a rustic, crunchy texture that complements smoothies and desserts.
Each of these variations keeps your peanut butter recipe exciting and dynamic, especially when used as a base for healthy snacks or nut-based desserts.
Unique Twists on Chocolate Peanut Butter Bars
The original no-bake bar recipe is delicious on its own, but you can take it further by experimenting with ingredients or layering methods. Here are some creative ideas to try:
- Nut medley bars: Replace half of the peanut butter with almond or cashew butter for a blended nut flavor. You can also mix in chopped walnuts or pecans into the base for added texture.
- Oatmeal layer: Add a layer of quick oats and shredded coconut between the peanut base and chocolate top. This introduces more chew and fiber.
- Protein boost: Add a scoop of your favorite unsweetened protein powder into the peanut butter base to make the bars more filling and suitable as a post-workout snack.
- Fruit infusion: Press dried cranberries, raisins, or chopped dates into the base before adding the chocolate topping. The natural sweetness of the fruit pairs beautifully with dark chocolate and peanut butter.
- Peanut butter swirl topping: Before chilling, use a spoon to swirl a little extra peanut butter into the chocolate layer for a visually appealing marbled effect.
These variations can be tailored based on what you have in your pantry or what textures you enjoy. Whether you like your snacks crunchy, chewy, rich, or light, these twists offer inspiration for your next batch.
By expanding on the original recipe, you’re not just enjoying one dessert but opening the door to an entire lineup of healthy peanut butter snacks that you can rotate through the week.
Storage, Serving, and Expert Tips
Once you’ve made your homemade peanut butter and possibly turned it into a decadent no-bake dessert, it’s important to store it properly and serve it in ways that preserve both flavor and texture. These practical tips will ensure your efforts pay off and that every spoonful or slice tastes just as good as the first.
How to Store Homemade Peanut Butter
Homemade peanut butter is free from preservatives, so proper storage is essential for freshness and food safety.
- Room temperature: If your peanut butter will be used within a week, you can store it in an airtight jar or container at room temperature in a cool, dark spot. Stir before each use, as natural oils may separate.
- Refrigeration: For longer storage, especially if you’ve added sweeteners like maple syrup or honey, keep it in the refrigerator. It will firm up slightly but remain spreadable. Homemade versions can last up to 4 weeks chilled.
- Freezing: You can also freeze peanut butter in portions. Use silicone molds or ice cube trays to freeze small amounts, then transfer to a sealed bag or container. Thaw at room temperature before use.
Best Ways to Serve Chocolate Peanut Butter Bars
These no-bake bars are incredibly versatile and fit various occasions. Whether you’re making them for an after-school snack, office treat, or a quick bite after dinner, the following tips can help you serve them in creative and practical ways.
- Serve chilled: These bars are best enjoyed cold, straight from the refrigerator. The chocolate layer holds firm and offers a satisfying bite.
- Cut with a warm knife: For clean, precise slices, dip your knife in hot water and dry it before cutting each row. This prevents cracking or sticking.
- Drizzle with toppings: Add a drizzle of melted chocolate, a sprinkle of sea salt, or a few crushed nuts on top right before serving for added flavor and texture.
- Portion for lunchboxes: Wrap individual bars in wax paper or place them in reusable snack containers for easy, packable treats.
Expert Tips for Consistency and Flavor
- Use fresh, quality peanuts: The base of your homemade peanut butter matters. Roasted, unsalted peanuts yield the best results with minimal added salt or sugar.
- Adjust sweetness gradually: Always start with less sweetener, especially if you’re new to homemade spreads. You can add more, but it’s harder to fix if it becomes overly sweet.
- Don’t over-process: For creamy peanut butter, blend just until smooth. Over-processing can lead to oil separation or a thinner texture.
- Use parchment for easy removal: When making bars, parchment paper is your best friend. It makes lifting and cutting easier, especially when the bars are chilled.
These tips not only extend the shelf life of your creations but also help you elevate the final result. Whether you’re storing nut butter for daily use or prepping no-bake bars for the week ahead, these practices ensure your work tastes amazing every time.
Conclusion: Enjoy the Simplicity of Homemade Peanut Butter (With Peanut Butter)
Making your own homemade peanut butter is not just a fun kitchen project, it’s a lifestyle shift toward fresher, more natural food choices. With just a handful of ingredients and a few minutes of prep, you can create a delicious spread that outperforms many store-bought options in both taste and nutrition. From blending your first batch of creamy peanut butter to crafting no-bake chocolate peanut butter bars, each step puts you in control of flavor, texture, and quality.
Whether you’re looking for a healthy snack, an easy dessert, or a versatile ingredient to enhance your meal prep routine, peanut butter offers endless possibilities. You can customize it with spices, cocoa, fruit, or different nuts, turning a basic spread into a signature creation. Add it to smoothies, sandwich it between whole grain bread, or use it as a dessert base — the options are as limitless as your imagination.
These recipes and tips are designed to be approachable and flexible for everyday use. They are free from questionable additives and can be made easily in any American kitchen using widely available ingredients and tools. With proper storage and a bit of creativity, your peanut butter creations will stay fresh, delicious, and ready whenever you need a nutritious bite or a sweet treat.
So next time you reach for a jar of nut butter, consider making your own. With the knowledge you’ve gained here, you’re fully equipped to whip up homemade peanut butter (With Peanut Butter) that’s pure, simple, and deeply satisfying.


