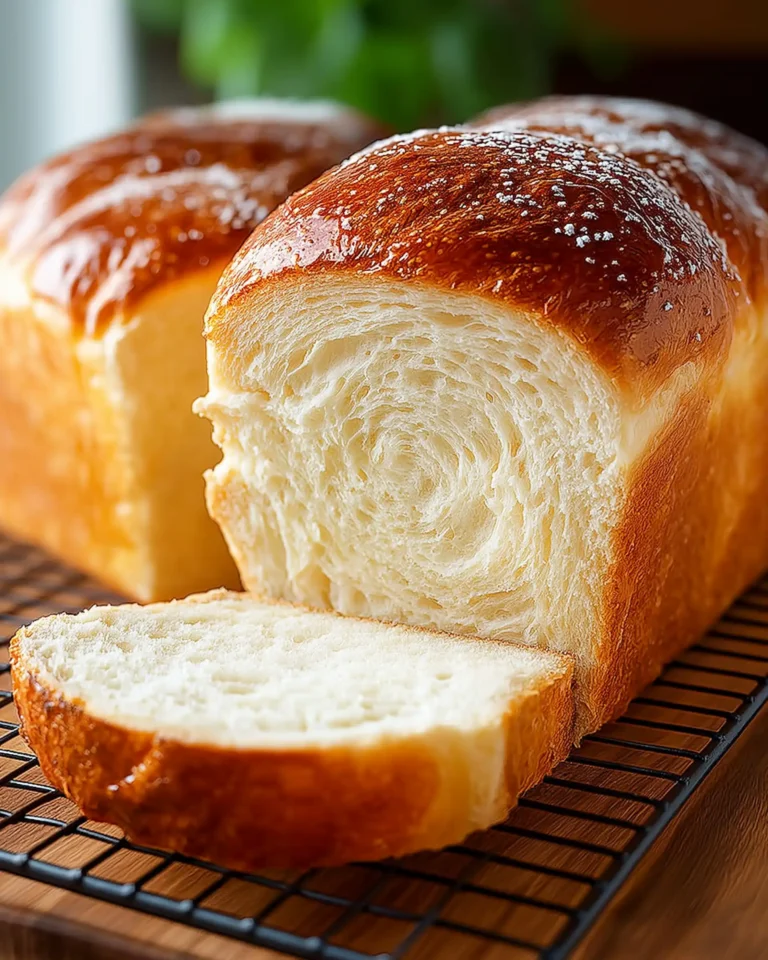
There’s something timeless and comforting about the smell of freshly baked bread. Whether you’re a seasoned baker or trying it for the first time, making your own white bread is one of the most rewarding kitchen experiences. This white bread recipe is simple, reliable, and produces two soft, golden loaves that are perfect for toast, sandwiches, or just enjoying with a dab of butter.
In this article, you’ll learn how to master homemade white bread from scratch using easy-to-find ingredients and beginner-friendly techniques. We’ll break down everything from preparing the dough to shaping and baking, with tips for getting the texture just right. You’ll also find expert answers to common questions, nutritional details, and storing options. Let’s dive into the heart of baking with Part 1, where the magic begins—with the ingredients and preparation.
Ingredients and Baking Tools for the Perfect White Bread
Essential Ingredients for White Bread
To bake a soft and fluffy white bread, using the right ingredients in the correct proportions is key. Here’s what you’ll need:
- Instant yeast (4½ teaspoons or two 0.25-ounce packets): Helps the dough rise quickly and evenly.
- Warm water (¾ cup + 2⅔ cups): Activates the yeast and hydrates the flour.
- Granulated sugar (¼ cup): Feeds the yeast and adds a hint of sweetness.
- Salt (1 tablespoon): Balances the flavor and strengthens the gluten.
- Unsalted butter (3 tablespoons, cubed at room temperature, plus 3 tablespoons melted): Adds richness and softness.
- All-purpose flour (9 to 10 cups): Provides the structure. The amount varies depending on humidity and brand.
These ingredients are pantry staples, making this recipe accessible and budget-friendly. The balance between the flour and liquid, as well as the correct amount of yeast, ensures a rise that gives the bread its soft, tender crumb.
Tools You’ll Need to Make White Bread
Having the right kitchen tools will make the process smoother and more enjoyable. Here’s what you should gather before starting:
- Stand mixer with dough hook attachment: This helps knead the dough efficiently, though you can also knead by hand if needed.
- Large mixing bowl: For combining and rising the dough.
- Measuring cups and spoons: Accuracy is crucial in baking.
- Plastic wrap or kitchen towel: Used to cover the dough while it rises.
- 9×5 inch loaf pans: You’ll need two of these to shape and bake the bread.
- Pastry brush: For brushing melted butter over the loaves.
- Cooling rack: Helps the bread cool evenly and prevents sogginess.
Even if you’re new to baking, these tools are straightforward and widely available. Using proper loaf pans ensures your bread rises tall and bakes evenly, while the dough hook saves you effort during kneading.
Print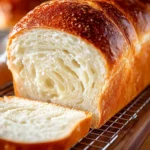
White Bread Recipe
- Total Time: 2 hours 30 minutes
- Yield: 2 loaves (20 servings)
- Diet: Vegetarian
Description
This soft, fluffy white bread recipe makes two golden loaves perfect for toast, sandwiches, or a warm slice with butter. Beginner-friendly and made with pantry staples.
Ingredients
4½ teaspoons instant yeast (two 0.25-ounce packets)
¾ cup + 2⅔ cups warm water (divided)
¼ cup granulated sugar
1 tablespoon salt
3 tablespoons unsalted butter, cubed, at room temperature
9 to 10 cups all-purpose flour
3 tablespoons unsalted butter, melted (for brushing)
Instructions
1. In a mixing bowl, dissolve the yeast in ¾ cup of warm water and let sit for 5 minutes.
2. Add the remaining 2⅔ cups water, sugar, salt, room-temperature butter, and 5 cups of flour. Stir to combine.
3. Using a dough hook, mix on low speed while gradually adding the remaining flour until dough is soft and tacky but not sticky.
4. Continue kneading for 7 to 10 minutes until a soft ball forms and clears the bowl.
5. Place dough in a lightly greased bowl, turn to coat, cover with plastic wrap, and let rise in a warm place for 45 minutes to 1 hour or until doubled.
6. Turn dough onto a floured surface, press out air bubbles, divide in half, and shape each into a 9×12 rectangle.
7. Roll up tightly from the short side, pinch the seams, tuck the ends under, and place into greased 9-inch loaf pans.
8. Cover loosely and let rise in a warm area for 30 to 45 minutes until the dough has risen above the pans.
9. Preheat oven to 400°F and brush the loaves with melted butter.
10. Bake for 30 to 35 minutes until golden brown and internal temperature reaches 195°F.
11. Remove from oven, brush with more butter, cool 10 minutes in pan, then transfer to a rack to cool completely before slicing.
Notes
Note: This recipe makes 2 loaves. You can halve the ingredients to make only one loaf.
Note: Active dry yeast may be used in place of instant yeast, but rise times will be slightly longer.
- Prep Time: 20 minutes
- Cook Time: 30 minutes
- Method: Baking
- Cuisine: American
Notes About Ingredient Substitutions
This white bread recipe is flexible. If you only want one loaf, you can halve all the ingredients and still get great results. Additionally, if you don’t have instant yeast, you can substitute with active dry yeast. Just make sure to let it activate properly in the warm water and note that the rise time may take a bit longer.
When it comes to butter, unsalted is preferred because it allows for better control over the recipe’s salt content. Room temperature butter blends more easily into the dough, creating that ultra-soft texture we all love in homemade bread.
Now that we’ve gathered the essentials, the next step is bringing the dough to life. Continue to Part 2, where we’ll guide you through mixing, kneading, and the first rise.
Mixing, Kneading, and the First Dough Rise
Activating the Yeast for a Strong Start
To ensure your white bread recipe gets off to the right start, it’s important to activate the yeast properly. Begin by dissolving the instant yeast in ¾ cup of warm water. The water should be around 105°F to 115°F—not too hot or it can kill the yeast, and not too cold or the yeast won’t activate. Stir gently and let it sit for 5 minutes. You’ll notice small bubbles forming, a sign that the yeast is alive and ready to work.
If you’re using active dry yeast instead of instant, this step is even more critical. Let it sit until it’s foamy to confirm that the yeast is active. Without this activation, the bread may not rise as expected.
Combining Ingredients and Forming the Dough
Once your yeast is activated, pour in the remaining 2⅔ cups of warm water. Add the sugar, salt, cubed room temperature butter, and 5 cups of all-purpose flour. Mix gently until everything comes together in a shaggy dough.
Now it’s time to knead. Using the dough hook attachment on your stand mixer, start on low speed and gradually add the remaining flour, half a cup at a time. You want the dough to be soft and slightly tacky, but not sticky. You may not need to use all 10 cups—humidity and flour brands can affect the exact amount required.
Keep mixing for about 7 to 10 minutes, until the dough begins to clear the sides of the bowl and forms a smooth, elastic ball. Kneading helps develop the gluten, which gives your bread its chewy texture and structure.
If kneading by hand, turn the dough onto a lightly floured surface and knead using the heel of your hands, pushing away from you, folding back, and rotating the dough. Continue until the dough becomes smooth and springs back when touched.
First Rise: Letting the Dough Double
Once the dough is ready, shape it into a ball and place it in a lightly greased bowl. Turn the dough to ensure all sides are coated with oil, which prevents it from drying out during the rise. Cover the bowl tightly with plastic wrap or a clean towel.
Now let the dough rise in a warm, draft-free environment until it doubles in size. This usually takes about 45 minutes to 1 hour. The dough should look puffed and feel soft when gently poked with a finger. If the indentation remains, it’s ready.
During this stage, the yeast consumes the sugars in the flour and releases gases, which make the dough expand. This process is crucial to developing flavor and the light, airy texture typical of homemade white bread.
Avoid rushing the rise or placing the bowl in a spot that’s too warm, such as directly over a heat source. A consistent temperature helps create an even crumb throughout the loaves.
Shaping, Proofing, and Prepping for the Oven
Degassing and Dividing the Dough
After your dough has doubled in size during the first rise, it’s time to move forward by shaping it into loaves. Turn the risen dough out onto a clean, lightly floured surface. Press gently all over the dough with your fingertips or knuckles to release the built-up gas. This process, known as degassing, helps prevent large air pockets and ensures an even texture inside the loaf.
Once degassed, divide the dough into two equal parts. Use a bench scraper or sharp knife for clean cuts. Each portion will be shaped into one loaf.
How to Shape the Dough into Perfect Loaves
Take one half of the dough and gently pat it into a rectangle about 9 inches by 12 inches. Begin rolling the dough up tightly from the short end, keeping tension in the roll as you go. This helps create structure inside the loaf.
When you reach the end of the roll, pinch the seams and ends to seal them. Then, tuck the ends slightly underneath the loaf to create a neat, uniform shape. This tight rolling method helps ensure the loaf rises up instead of spreading out during baking.
Repeat the process with the second piece of dough.
Preparing the Pans and Final Proofing
Lightly grease two 9×5-inch loaf pans with butter or nonstick spray. Place the shaped loaves into the pans, seam-side down. Loosely cover them with a clean towel or plastic wrap.
Set the pans in a warm, draft-free area and let the dough rise a second time for 30 to 45 minutes, or until the tops have risen just above the edge of the pans. This second rise is called the proof, and it helps give your loaves that fluffy, pillowy interior.
Keep a close eye during this stage. Over-proofed dough may collapse or result in a dense crumb, while under-proofed dough can cause a tight, doughy center. The loaves should feel light and airy when gently touched.
Prepping the Oven for Optimal Baking
While your dough is going through the final rise, position an oven rack to the lowest setting and preheat the oven to 400°F. Baking on a low rack gives the bread a strong base of heat, encouraging a full rise and even browning.
Just before baking, gently brush the tops of the loaves with melted butter. This step helps develop a rich, golden crust while keeping the surface soft.
If your oven tends to have hot spots, you can rotate the pans halfway through baking for an even finish. That will be covered in the next part.
Baking White Bread to Golden Perfection
Time and Temperature: How to Bake It Right
Now that your loaves are perfectly proofed and the oven is hot at 400°F, it’s time to bake. Carefully place the pans on the lowest oven rack. This position helps the bread get a firm, golden base while baking evenly from the bottom up.
Bake for 30 to 35 minutes, depending on your oven’s behavior. Around the halfway point, rotate both pans to ensure even browning. The loaves should be puffed, deeply golden, and the tops firm to the touch.
If you want to be precise (which is a smart move), insert an instant-read thermometer into the center of one loaf. The internal temperature should read 195°F. That’s the sweet spot for white bread—fully baked, but still moist and soft.
Golden Crust: The Butter Brushing Trick
Immediately after pulling the loaves out of the oven, brush them generously with the remaining melted butter. This not only gives them a beautiful sheen, but also softens the crust slightly as it cools.
This little touch is what separates homemade bread from store-bought. It creates a warm, buttery top that melts in your mouth and makes slicing a joy.
Cooling Properly: Don’t Skip This Step
Allow the bread to cool in the pans for about 10 minutes. Then, carefully remove the loaves and transfer them to a wire rack to cool completely—at least another hour. Cooling on a rack prevents moisture from building up at the bottom of the bread and ensures the crust stays lightly crisp while the interior finishes setting.
Never slice hot bread. It may smell amazing and feel irresistible, but cutting too soon will result in a gummy interior and compressed crumb. Trust the process and let the bread finish what it started.
What to Expect: Texture, Aroma, and Flavor
Once cooled, your white bread should be light, fluffy, and incredibly soft. The inside will be pale and tender with small, uniform holes. The crust will have a light crunch and buttery aroma. The flavor is subtle—slightly sweet with a hint of richness from the butter—making it perfect for any kind of toast or sandwich.
This recipe is designed to deliver consistent, bakery-level results, even for first-time bakers. And the best part? No preservatives, no artificial ingredients—just honest, homemade goodness.
Storage Tips and Freezing Instructions
Storing Freshly Baked White Bread
Homemade bread doesn’t have preservatives like store-bought versions, so how you store it makes a big difference in how long it stays fresh. Once your loaves have cooled completely, you have a few options for keeping them soft and delicious:
- At Room Temperature: Wrap the bread tightly in plastic wrap or place it in an airtight bread bag. Stored this way, the bread will stay fresh for up to 4 days.
- Avoid Refrigeration: Storing bread in the fridge may seem logical, but it actually dries it out faster. The cool air causes the starch to crystallize, leading to a hard, stale texture.
To preserve freshness, slice only what you need and leave the rest of the loaf intact. This helps prevent unnecessary exposure to air.
Freezing White Bread the Right Way
If you don’t plan to eat both loaves within a few days, freezing is a fantastic option. White bread freezes beautifully and thaws without losing flavor or texture.
Follow these steps:
- Let the bread cool completely.
- Wrap each loaf tightly in plastic wrap, making sure there are no exposed areas.
- Place the wrapped loaf in a heavy-duty freezer bag or wrap it again in aluminum foil.
You can store frozen bread for up to 1 month without any noticeable loss in quality.
How to Thaw Frozen White Bread
When you’re ready to enjoy your frozen loaf, you have two options:
- Room Temperature Thawing: Unwrap the loaf and let it sit on the counter for a few hours. This gentle thawing keeps the texture soft.
- Oven Thawing: Preheat your oven to 325°F. Remove plastic, wrap the frozen loaf in foil, and warm it for about 20 minutes. This method revives the bread and makes it taste oven-fresh.
You can also slice the bread before freezing it and pull out individual slices as needed. Toasting frozen slices directly from the freezer is quick and convenient for breakfast or sandwiches.
Tips to Keep Your Bread Fresh Longer
- Store loaves in a cool, dry place away from direct sunlight.
- Use a bread box if you have one, as it helps regulate humidity.
- Don’t leave cut loaves exposed. Reseal them after each use to prevent drying out.
Delicious Serving Ideas and Variations
Simple Serving Suggestions for Everyday Meals
Fresh white bread is incredibly versatile and pairs beautifully with just about anything. Here are some of the best ways to enjoy your homemade loaf:
- Classic Toast: Lightly toasted with butter or jam, this bread makes a perfect breakfast staple. Its soft crumb crisps up beautifully while keeping a tender bite inside.
- Sandwiches: Use thick slices for hearty sandwiches like egg salad, grilled chicken, or veggie-loaded stacks. The bread holds its shape and adds a satisfying chew.
- French Toast: Slightly stale white bread is ideal for French toast. Its absorbent texture soaks up the egg mixture without falling apart, giving you golden, fluffy slices every time.
- Bread with Soup: A warm slice of white bread served with homemade soup or stew turns a simple meal into pure comfort.
Whether you’re serving it plain or pairing it with toppings, this white bread adds warmth and richness to any dish.
White Bread Variations You Can Try
Once you’ve mastered the base recipe, you can start experimenting with small changes to suit different tastes and occasions. Here are a few ideas:
- Honey White Bread: Replace the granulated sugar with an equal amount of honey for a slightly sweeter loaf and a deeper flavor.
- Herb-Infused Bread: Add dried herbs like rosemary, thyme, or garlic powder to the dough for a savory twist. Perfect for sandwich loaves or alongside pasta dishes.
- Whole Wheat Blend: Substitute 2 or 3 cups of the all-purpose flour with whole wheat flour for a nuttier, more wholesome loaf. Be sure to increase the hydration slightly, as whole wheat flour absorbs more moisture.
- Seeded Top: Before baking, sprinkle sesame seeds, poppy seeds, or oats on top of the loaves after brushing with melted butter for extra flavor and texture.
Kid-Friendly Uses for White Bread
If you have kids, this recipe is a goldmine. Its soft texture and mild flavor make it perfect for:
- PB&J sandwiches that don’t fall apart
- Mini cheese melts or paninis
- Breadsticks: Slice the loaf into strips, toast lightly, and serve with marinara or cheese dip
It’s easy to slice, doesn’t crumble, and holds up well in lunchboxes or quick snacks. The neutral base also lets any spread or filling shine.
Conclusion: Why This White Bread Recipe Belongs in Your Kitchen
Homemade bread isn’t just about baking—it’s about slowing down, creating something from scratch, and filling your home with warmth and comfort. This white bread recipe delivers everything you want from a classic loaf: a soft, fluffy interior, a golden crust, and a rich, buttery aroma that store-bought bread can’t touch.
Whether you’re enjoying it as toast in the morning, building the ultimate sandwich at lunch, or pairing it with dinner, this bread stands out in both flavor and texture. The best part? It’s easy to make, even if you’re new to baking.
With simple ingredients, clear steps, and versatile uses, this is the kind of recipe that becomes a household favorite. Make it once, and you’ll find yourself baking it again and again. It’s time to skip the plastic-wrapped loaves and fill your kitchen with the joy of homemade white bread—every bite a reminder that the best things are made by hand.


