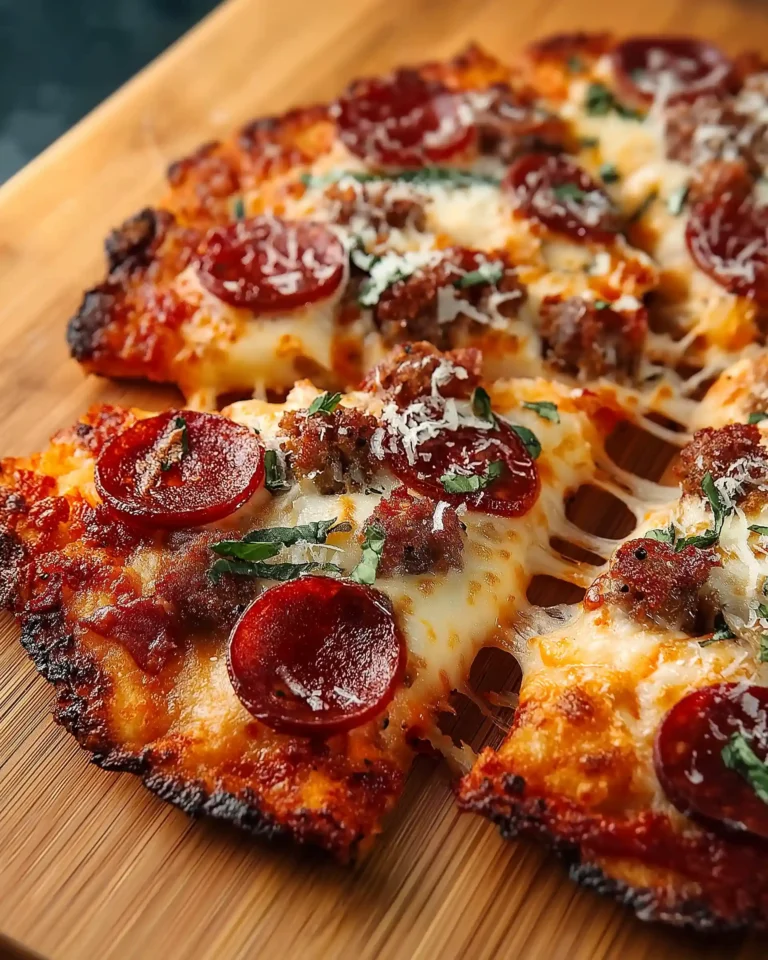
If you’re caught between craving a cheesy slice of pizza and a crisp, golden quesadilla, why not have both? Enter the Pizzadilla – a fun, fast, and flavorful fusion of two beloved comfort foods. This Pizzadilla (Quesadilla Pizza) recipe combines the gooey melt of mozzarella, the richness of pizza sauce, and the crisp bite of tortillas into one skillet-cooked masterpiece. It’s quick to make, packed with customizable options, and perfect for a solo treat or a cozy meal for two. In this article, you’ll learn how to make the perfect pizzadilla at home using a few basic ingredients and one trusty cast iron skillet.
Whether you’re new to the concept or looking to upgrade your current method, we’ll cover everything from essential tools and ingredients to broiling techniques and flavor variations. Get ready to transform your pizza night into something new and memorable.
The Basics of a Pizzadilla (Quesadilla Pizza)
What is a Pizzadilla and Why You’ll Love It
A pizzadilla is exactly what it sounds like – part pizza, part quesadilla, all delicious. Instead of a doughy crust, you use two large flour tortillas. Inside, you’ll layer rich tomato sauce and gooey cheese, just like you would on a pizza, then pan-crisp it like a quesadilla.
What makes the pizzadilla unique is its dual texture. The bottom tortilla gets that satisfying crunch like a good quesadilla, while the top takes on the bubbly, melty toppings you’d expect from a classic slice of pizza. It’s the best of both worlds in every bite.
It’s ideal for those nights when you’re craving something cheesy and comforting but don’t want to fuss with pizza dough. Plus, it cooks fast and can be personalized with any toppings you have on hand.
Essential Ingredients for the Best Pizzadilla
To make the most flavorful and crisp pizzadilla, start with quality ingredients. Here’s what you need and why each one matters:
- Flour Tortillas: These act as your pizza “crust.” Choose large tortillas that fit snugly in your cast iron skillet. Thicker ones offer more chew, but thinner tortillas will give you a crispier base.
- Pizza Sauce: A rich, tomato-forward sauce gives this dish its signature flavor. Store-bought or homemade will work, just make sure it’s not too watery.
- Mozzarella Cheese: Whole-milk, low-moisture mozzarella melts beautifully and creates that iconic pizza stretch.
- Cabot Parmesan cheese (or Tillamook Parmesan cheese): This adds a salty, nutty depth to the cheese blend. A final sprinkle on top adds an extra punch.
- Basil: Fresh basil lends brightness and a classic pizzeria aroma.
- Olive Oil: Helps the tortilla crisp up without sticking to the skillet.
Optional toppings like cooked Beef sausage, mushrooms, or bell peppers can be added, but keep them minimal so they don’t overwhelm the structure of the pizzadilla.
The Importance of the Right Equipment
While this dish is simple, having the right tools makes all the difference. Here’s what works best:
- Cast Iron Skillet: It holds heat evenly and gives the bottom tortilla a golden, crispy finish.
- Large Spatula: You’ll need a wide surface area to flip the pizzadilla without tearing it.
- Offset Spatula: Useful for spreading sauce and lifting melted cheese edges when ready to serve.
This isn’t just a dish, it’s a technique. The skillet does the heavy lifting, letting you crisp the base and finish everything under the broiler for a gooey, golden top.
Print
Ultimate Pizzadilla (Quesadilla Pizza) Recipe
- Total Time: 15 mins
- Yield: 1 to 2 servings
Description
Crispy, cheesy, and packed with classic pizza flavor, this Pizzadilla (Quesadilla Pizza) recipe is the perfect fusion of two comfort foods. Ready in just 15 minutes, it’s ideal for lunch, dinner, or a quick snack.
Ingredients
1/2 teaspoon extra-virgin olive oil
2 large flour tortillas
3/4 cup pizza sauce
5 ounces shredded whole-milk low-moisture mozzarella cheese
2 ounces grated Cabot Parmesan cheese or Tillamook Parmesan cheese, (divided)
2 fresh basil leaves, roughly torn
Instructions
1. Adjust oven rack 6 to 8 inches below the broiler and preheat broiler to high. Heat oil in a cast iron skillet over high heat until shimmering, then reduce heat to low and wipe out excess oil with paper towel.
2. Place one tortilla in skillet, rough side down. Spread half of the sauce evenly over tortilla all the way to the edges. Add half of the mozzarella evenly across the surface.
3. Top with second tortilla. Cook on low, swirling pan occasionally, until bottom is golden and crisp, about 3 minutes.
4. Carefully flip the pizzadilla using a large spatula. Spread remaining sauce evenly, top with remaining mozzarella, and half of the Cabot Parmesan cheese (or Tillamook brand). Scatter torn basil leaves and toppings if using.
5. Place skillet under the broiler and cook for 2 to 4 minutes until cheese is melted and browned in spots. Watch closely to avoid burning.
6. Remove from oven and sprinkle with remaining Cabot Parmesan cheese (or Tillamook brand). Loosen edges with metal spatula. If crisper bottom is desired, return skillet to stovetop on medium and cook 1–2 minutes more, swirling occasionally.
7. Slide onto a cutting board, slice into wedges, and serve hot.
Notes
Make sure to use low-moisture mozzarella to avoid sogginess.
Optional toppings should be pre-cooked and dry to prevent excess moisture.
If you prefer a vegetarian version, skip meat-based toppings and load with sautéed mushrooms or bell peppers.
For added crispness, always let the first side brown fully before flipping.
- Prep Time: 5 mins
- Cook Time: 10 mins
- Method: Skillet, Broiler
- Cuisine: American, Fusion
Step-by-Step Cooking Process for the Perfect Pizzadilla
Prepping the Skillet for Success
Before any ingredients hit the pan, your skillet must be properly prepped. Place the cast iron skillet over high heat and let it warm until the oil begins to shimmer. Add 1/2 teaspoon of extra-virgin olive oil, swirl it around the surface, then reduce the heat to low. This step is crucial for a crisp base without burning the tortilla. After that, carefully wipe out any excess oil with a paper towel. The goal is a lightly greased surface, not an oily one.
Why this matters: An overheated or under-oiled skillet can cause burning or sticking, ruining the texture of the pizzadilla before you even add toppings.
Building the Base Layers
Once your skillet is ready, it’s time to assemble the first half of the pizzadilla.
- Place the first tortilla in the skillet, rough side down. This side crisps better and holds the sauce more evenly.
- Spread half of the pizza sauce evenly to the edges using a small offset spatula for precision.
- Sprinkle half of the mozzarella over the sauce, making sure it reaches all the way to the edges for a crispy cheese fringe.
The first layer is where the magic starts. Getting sauce and cheese right to the edge helps seal the layers during cooking and gives you those savory, lacy cheese edges that crisp up perfectly.
Sealing with the Second Tortilla
Carefully place the second tortilla over the top of the cheese and sauce. This seals your pizzadilla, turning it into a stuffed, pizza-style quesadilla. From here, continue cooking on low heat. Swirl the skillet gently every 30 seconds or so to encourage even browning and prevent sticking. In about 3 minutes, the bottom tortilla should be crisp and golden.
Now comes the trickiest part: the flip. Use a large spatula to gently but confidently flip the pizzadilla. If your spatula isn’t wide enough, use a second one to assist and stabilize the flip.
Final Toppings and Broil Finish
After flipping, the top tortilla becomes your new pizza base. It’s time to build that classic pizza topping look.
- Spread the remaining sauce evenly to the edges.
- Add the rest of the mozzarella, followed by half of the grated Cabot Parmesan cheese (or Tillamook brand).
- Tear and scatter fresh basil leaves over the top.
- If you’re using any toppings like pre-cooked Beef sausage or sautéed veggies, now is the time to add them.
Transfer the skillet to the oven and place it 6 to 8 inches below a preheated broiler. Broil on high for 2 to 4 minutes, keeping a close eye. The cheese should be bubbling, melted, and developing brown spots, not burning.
Once broiled, remove the skillet and sprinkle the remaining Cabot Parmesan cheese (or Tillamook brand) over the top for a finishing touch of flavor.
Achieving the Perfect Crispness
Once out of the oven, don’t rush to cut it. Use a metal spatula to gently loosen the edges, especially where cheese may have melted and stuck to the sides. Then, take a peek under the bottom. If it’s not crisp enough for your taste, return the skillet to medium heat and cook while swirling and lifting occasionally until it reaches your preferred level of golden-brown crispiness.
Slide the pizzadilla onto a cutting board, slice into wedges, and serve immediately while it’s still hot and melty.
This technique gives you the perfect contrast: a crispy base with a tender, cheesy top layer packed with flavor.
Tips, Tricks, and Variations for a Foolproof Pizzadilla (Quesadilla Pizza) Recipe
Top Tips for the Best Results Every Time
Making a pizzadilla may seem straightforward, but a few smart tips can take yours from good to incredible:
- Use low heat for pan-cooking. Rushing it on high heat might burn the tortilla before the cheese melts. Low and slow ensures an evenly crisp base.
- Always spread cheese to the edges. This not only helps seal the two tortillas together but also creates that irresistible crispy cheese crust along the outside.
- Don’t overload with toppings. Since the pizzadilla is thinner than a regular pizza, heavy toppings can make it soggy or hard to flip. Stick with a light layer of add-ons for the best texture.
- Broil, don’t bake. The broiler gives you bubbly, golden cheese fast. Baking will dry out the tortillas before the cheese is fully melted.
Following these tips keeps the pizzadilla balanced — crisp outside, gooey inside, and loaded with flavor.
Creative Flavor Variations to Try
Once you’ve mastered the classic pizzadilla, you can start playing around with fun new flavors. Here are a few ideas to inspire your next creation:
- Margherita Pizzadilla: Use only tomato sauce, mozzarella, and lots of fresh basil. Add a drizzle of olive oil after cooking.
- Veggie Supreme: Add thinly sliced bell peppers, onions, and mushrooms. Be sure to pre-cook or sauté them to prevent excess moisture.
- Spicy Kick: Mix crushed red pepper into your pizza sauce and top with sliced jalapeños or chili flakes before broiling.
- Cheesy Overload: Combine mozzarella with provolone and fontina for a rich, gooey texture.
- White Pizzadilla: Swap red sauce for a light garlic and ricotta spread, then top with mozzarella and spinach.
These variations allow you to keep things exciting while sticking to the same simple technique.
How to Serve and Pair Your Pizzadilla
The pizzadilla shines as a main dish, but how you serve it can elevate the meal:
- Cut into triangles, just like a quesadilla or personal pizza.
- Serve with a side of marinara or dipping sauce for extra flavor.
- Pair with a fresh side salad to balance the richness.
- For kids, offer a small cup of warm pizza sauce as a dip. It turns into a fun finger food experience.
This dish is great for lunch, dinner, or a late-night snack and works just as well for picky eaters as it does for adventurous foodies.
Troubleshooting Common Pizzadilla Mistakes and Fixes
Tortilla Burned Before Cheese Melted
One of the most common issues in making a pizzadilla is burning the tortilla before the cheese fully melts. This happens when the skillet is too hot at the start or the heat isn’t reduced after adding the tortilla.
Fix: Always preheat your skillet on high but reduce it to low before adding the tortilla. This allows you to control the browning and avoid scorching the bottom. Swirl the skillet gently while cooking to distribute heat evenly and prevent hotspots.
If your skillet retains a lot of heat, remove it from the burner for 15–30 seconds during cooking to let it cool slightly, then return to heat.
Cheese Not Melting Evenly
Sometimes the cheese refuses to melt all the way, leaving uneven gooey patches or hard shreds. This could be due to the cheese type or lack of even layering.
Fix: Use low-moisture, whole-milk mozzarella for optimal meltability. Always distribute the cheese evenly to the edges, using your fingers or a spoon. A thin, even layer will melt faster and smoother than clumps.
Also, placing the pizzadilla under a broiler is key. The intense top heat melts and browns the cheese in a flash, giving it that bubbly finish.
Toppings Slid Off While Broiling
If your pizzadilla comes out of the oven looking like a mess of toppings melted to one side, the issue lies in distribution or moisture.
Fix: Choose pre-cooked, dry toppings and spread them evenly in a single layer. Pat them dry with paper towels before adding. Avoid stacking ingredients or using watery vegetables, which can cause the surface to become slippery during broiling.
Hard to Flip Without Breaking
A torn or floppy pizzadilla can ruin the look and texture of the dish. This usually happens if the bottom hasn’t crisped enough before flipping.
Fix: Let the first side cook for the full 3 minutes on low heat until you’re sure it’s firm and golden underneath. Use a wide, sturdy spatula to support the entire bottom when flipping. If needed, use a second spatula on top to stabilize the movement.
Bottom Still Too Soft After Cooking
Sometimes after broiling, the pizzadilla is beautifully golden on top, but the bottom feels soft or limp.
Fix: After broiling, return the skillet to the stovetop over medium heat. Let the pizzadilla cook for an additional 1 to 2 minutes, swirling occasionally. This final step crisps the base perfectly without overcooking the toppings.
Edges Are Too Dry or Overcooked
If the edges of the pizzadilla are brittle or hard, the issue likely lies in overcooking or uneven heating.
Fix: Watch the edges closely during broiling. If they start browning too fast, reduce the broiler time slightly or move the skillet further from the heat source. Also, avoid overcooking on the stovetop once the top layer has been added.
Taking these troubleshooting tips into account will help you achieve consistent, tasty results every time you cook a pizzadilla.
Storing, Reheating, and Making Ahead – Maximize Your Pizzadilla (Quesadilla Pizza) Experience
How to Store Leftover Pizzadilla Properly
Even though the pizzadilla is best enjoyed fresh and hot, sometimes there are leftovers — or maybe you’re planning ahead. Proper storage is key to keeping the flavor and texture intact.
- Cool it completely before storing. Placing hot food in a container traps steam and leads to sogginess.
- Wrap slices in parchment or wax paper to prevent sticking.
- Store in an airtight container in the fridge. It will stay fresh for up to 3 days.
Avoid stacking slices without a barrier between them, as cheese and sauce may stick together and become difficult to separate when cold.
Best Ways to Reheat Without Losing the Crunch
Microwaving will warm your pizzadilla, but it softens the tortilla. To keep the edges crispy and the cheese gooey, use one of these two reheating methods:
- Skillet Method (Best texture):
- Heat a dry skillet over medium-low.
- Place a slice in the skillet and cover loosely with a lid.
- Heat for 3–5 minutes until warmed through and crisp again.
- Oven or Toaster Oven Method:
- Preheat to 375°F (190°C).
- Place slices on a baking sheet lined with parchment paper.
- Heat for 6–8 minutes or until the edges are crisp and the cheese is bubbling.
Avoid broiling again when reheating — it works well for first-time cooking but tends to overcook when used on leftovers.
Can You Freeze a Pizzadilla?
Technically, yes — but it’s not ideal. The tortillas may lose their crispy texture after thawing. If you do want to freeze:
- Let the pizzadilla cool fully.
- Slice it into wedges.
- Wrap each slice individually in foil or plastic wrap.
- Place in a freezer-safe bag and label with the date.
Use within 1 month for best quality.
To reheat from frozen, place the slices directly on a baking sheet in a 375°F (190°C) oven for 10–12 minutes.
Make-Ahead Tips for Busy Days
If you want to prep ahead without compromising freshness, here’s a simple method:
- Pre-assemble the pizzadilla up to the flipping stage.
- Place the uncooked, layered pizzadilla on a plate lined with parchment paper.
- Cover loosely and refrigerate for up to 8 hours.
When ready to cook, take it out of the fridge, let it sit at room temperature for 10–15 minutes, then proceed with cooking as usual.
This method works great for prepping lunch ahead of time or planning an easy dinner during a busy week.
Single or Double? Adjusting the Recipe for More Servings
The original recipe makes 1 to 2 servings, depending on appetite. To serve more:
- Double the ingredients and cook one pizzadilla at a time.
- If cooking for a group, keep the first one warm in a 200°F (93°C) oven on a wire rack to maintain crispness.
Avoid trying to cook two pizzadillas in the same skillet. It’s better to keep the process simple and repeat for each one.
With the right storage and reheating methods, you can enjoy this pizzadilla long after it leaves the skillet — and even use it as a tasty meal prep option.
Conclusion: The Final Slice
The pizzadilla is proof that you don’t need fancy ingredients or hours in the kitchen to make a meal worth remembering. With just tortillas, sauce, cheese, and a cast iron skillet, you can whip up a crisp, gooey, melty dish that hits every comfort food craving. It’s simple, flexible, and satisfying every single time.
From choosing the right cheese to mastering the stovetop-to-broiler technique, this guide has given you everything you need to perfect your pizzadilla (quesadilla pizza) recipe. Whether you’re customizing it for picky eaters, prepping it for a quick lunch, or treating yourself after a long day, this skillet creation is your new go-to.


