Creating artisan pizza dough at home can feel like an art form. But with the right ingredients, a little patience, and a few simple techniques, you can enjoy crusts that are chewy, airy, and beautifully blistered — just like your favorite pizzeria. This guide walks you through everything you need to know to master artisan pizza dough from scratch. We’ll cover what makes artisan dough different, the science behind it, detailed step-by-step instructions, and tips to customize your crust to perfection. Whether you’re using a pizza steel, a cast iron pan, or just a baking sheet, you’ll have dough that’s flavorful, crisp, and bakery-worthy.
Understanding Artisan Pizza Dough
What is Artisan Pizza Dough?
Artisan pizza dough is a hand-crafted, slow-fermented dough that prioritizes flavor, texture, and quality ingredients. Unlike quick-rise or pre-made dough, artisan dough is all about patience. The long fermentation allows the gluten to develop slowly, enhancing both taste and chew. It creates a crust that’s airy inside, with a golden, crispy outside. Each step in the process is purposeful and grounded in tradition.
How Artisan Dough Differs from Regular Dough
Regular pizza dough often relies on quick-rise yeast and shorter proofing times. While it can be tasty, it rarely delivers the depth of flavor or the open crumb structure typical of artisan dough. Artisan pizza dough stands out in several ways:
- Long Fermentation: Typically ferments for several hours at room temperature or even overnight in the fridge.
- Minimal Yeast: Uses very little yeast to allow time and hydration to do the work.
- High Hydration: The dough contains more water, which leads to a softer, lighter, and chewier crust.
- Hand-Mixing and Folding: Emphasizes gentle hand-folding instead of mechanical kneading, helping maintain structure without overworking.
Ingredients That Matter
Every component in artisan pizza dough plays a specific role, even though the ingredient list is short. Let’s break it down:
- Flour (500g) – All-purpose flour is perfect for artisan dough. It has enough protein to build gluten but still creates a soft texture.
- Water (375g) – Warm water hydrates the flour, helping the gluten develop and the yeast activate.
- Yeast (1g) – Just 1/4 teaspoon of active dry yeast kickstarts fermentation. The long rise time makes this small amount powerful.
- Salt (10g) – Fine salt not only enhances flavor, it also strengthens gluten structure and regulates fermentation.
By understanding each element and how it works, you lay the groundwork for artisan perfection.
Print
Artisan Pizza Dough Recipe
- Total Time: 8 hours
- Yield: 2 12-inch pizzas
- Diet: Vegetarian
Description
This artisan pizza dough recipe creates a crisp, chewy, and flavorful crust using only four simple ingredients. Ideal for baking at home with or without a pizza stone or steel.
Ingredients
500g (3 3/4 cups plus 2 tbsp) all-purpose flour
375g (1 1/2 cups plus 2 tbsp) warm water, divided
1g (1/4 tsp) active dry yeast
10g (1 1/2 tsp) fine salt
Instructions
1. Mix the flour and all but 1 tablespoon of warm water in a large bowl until combined. Cover and rest for 20 minutes.
2. Sprinkle yeast over remaining tablespoon of warm water and let it dissolve.
3. Sprinkle salt over the dough, stir the yeast mixture, and pour over the dough. Wet your hand and fold the dough over itself several times.
4. Pinch off 5–6 chunks of dough and fold until fully mixed into a shaggy dough. Cover and rest for 1 hour.
5. Wet your hand and fold the dough by stretching and folding around the bowl until tightened. Transfer to a clean, greased bowl with seam side down. Cover and rise for 5–6 hours.
6. Turn dough onto a floured surface, divide in half. Shape each half into a ball by stretching and folding each side toward the center.
7. Flip over, drag the ball gently across an unfloured surface to build surface tension. Repeat for second dough ball.
8. Place on greased plate, lightly oil tops, cover and rest at room temperature for 1 hour or refrigerate for up to 2 days.
9. Preheat oven to 500°F with pizza steel, stone, or inverted baking sheet for at least 45 minutes.
10. Flatten dough center, leaving 1-inch lip. Stretch to 12-inch circle, place on floured peel or cast iron pan.
11. Add sauce and toppings. Slide onto hot steel or stone, bake for 5 minutes. Broil 2–4 minutes until crust is blistered.
12. If using a cast iron pan, bake 15–20 minutes and broil briefly at the end.
Notes
This dough is highly versatile. It can be cold-fermented for up to 2 days to develop deeper flavor. Make sure to preheat your oven thoroughly before baking for the best results.
- Prep Time: 20 minutes
- Cook Time: 8 minutes
- Method: Bake
- Cuisine: American
Preparing the Dough — Mixing and First Rest
The Autolyse Method: Building Flavor and Texture Early
After gathering your ingredients, the first step is to mix the flour with most of the water. This initial mix, known as autolyse, hydrates the flour and jump-starts gluten development. Here’s how it works:
- Combine 500g of flour and all but one tablespoon of the warm water in a large bowl.
- Mix until just combined — the dough will be rough and shaggy.
- Cover the bowl and let it rest for 20 minutes.
During this resting period, enzymes in the flour begin to break down starches into sugars, feeding the yeast later and enhancing flavor. It also starts gluten formation naturally without any kneading.
Activating the Yeast: A Gentle Spark
While the dough rests, it’s time to wake up the yeast. With only 1g (about 1/4 tsp), this dough leans heavily on a slow fermentation process rather than a big burst of rise. To activate:
- Sprinkle the yeast over the remaining tablespoon of warm water.
- Let it sit for 5 to 10 minutes until it dissolves and slightly foams.
This step ensures the yeast disperses evenly through the dough without clumps or dry spots.
Folding in the Yeast and Salt
Now comes the critical integration phase. Artisan dough is not kneaded like traditional dough. Instead, it’s folded and pinched to build structure gently. Here’s the breakdown:
- Sprinkle 10g of fine salt over the dough’s surface.
- Pour the activated yeast-water mixture over it.
- With a wet hand, reach under the dough, stretch a section, and fold it over the top.
- Rotate the bowl and repeat several times until the dough’s center is covered.
This folding method distributes the salt and yeast without overworking the dough.
Pinching for Uniformity
To fully combine the ingredients:
- Use your thumb and fingers as a pincer to grab 5–6 chunks of dough.
- Pinch and fold gently.
- Wet your hand again and repeat folding a few more times until a shaggy dough forms.
This stage is crucial. It ensures even hydration and salt distribution, leading to better fermentation and rise later.
First Resting Period: Building Internal Strength
Cover the bowl and let the dough rest for about an hour at room temperature. During this time, gluten continues to form, and the yeast begins its slow fermentation journey. The dough will start to relax and become smoother, with a soft but elastic feel when gently poked.
Developing Gluten Through Folding and Bulk Fermentation
Strengthening the Dough with Gentle Folds
Once the dough has rested and starts to show signs of fermentation — like puffiness and elasticity — it’s time to strengthen it further. Rather than kneading, artisan dough relies on strategic folding to develop gluten structure. This process creates internal tension and supports a light, airy crumb.
Here’s how to fold:
- Lightly wet your hand to avoid sticking.
- Reach under the dough, stretch a section up, and fold it over the center.
- Rotate the bowl slightly and repeat the motion 4 to 5 more times, until the dough tightens into a soft ball.
This folding helps organize the gluten strands, promoting a balanced rise and strong crust. You’ll start to feel the dough firming up and becoming more elastic.
Transferring and Preparing for Bulk Rise
After folding:
- Gently lift the dough and invert it into a clean, lightly greased bowl.
- Place the seam side down and leave the top smooth.
- Cover the bowl tightly to keep in moisture and prevent a dry skin from forming.
Let the dough rest and rise for 5 to 6 hours at room temperature until doubled in volume. This slow bulk fermentation process is at the heart of artisan baking. It develops subtle, complex flavors and improves the dough’s overall texture.
During this phase, the gluten network becomes well-developed, while natural sugars increase through fermentation, setting the stage for a golden, blistered crust.
Signs of Proper Fermentation
You’ll know the dough is ready when:
- It has visibly doubled in size.
- A poke leaves a dent that slowly springs back.
- The surface feels slightly tacky, soft, and elastic.
Avoid rushing this part. Artisan dough isn’t about speed. The slow fermentation builds flavor and strength naturally, so give the dough the time it needs.
Optional Cold Fermentation for Deeper Flavor
If you want even deeper flavor, this is also a great point to transfer the dough to the refrigerator for a cold ferment. You can refrigerate it up to 48 hours at this stage, which will create an even chewier crust and richer taste.
Shaping Artisan Pizza Dough Balls
Dividing the Dough for Individual Pizzas
Once your dough has fully risen, it’s time to shape it into individual portions. This step requires a gentle touch to maintain all the air pockets created during fermentation. Avoid punching down the dough or over-handling it.
Start by:
- Lightly flour your work surface.
- Turn the dough out of the bowl and cut it in half using a dough scraper or sharp knife.
- Work with one piece at a time, covering the other to prevent drying.
Each half will yield a 12-inch pizza, and this recipe makes two dough balls in total.
Stretching and Folding: Creating the Dough Ball
Now it’s time to shape each half into a round, tight dough ball that will rise evenly and bake beautifully. Follow these steps:
- Stretch a quarter of the dough outward, just until you feel resistance.
- Fold it over the center, pressing gently to secure.
- Rotate the dough and repeat with the remaining three sides, forming a loose ball.
- Flip the ball over so the seam is on the bottom.
This technique encloses the dough’s surface and centers its tension, which is vital for creating a round, puffy crust later.
Tension and Surface Tightening
To create that firm outer layer:
- Place the dough ball on an unfloured section of your counter.
- Cup your hands around it and gently pull it toward you, dragging the bottom slightly along the surface.
- Rotate the dough 90 degrees and repeat the drag to build surface tension.
- Continue this process until the dough forms a tight, smooth ball.
This pulling motion helps seal the bottom and gives the ball a solid structure, important for shaping the final pizza.
Second Rise and Resting
Once shaped:
- Transfer each dough ball to a greased plate or tray.
- Lightly oil the tops and cover with plastic wrap or a clean cloth.
- Let the dough rest at room temperature for about an hour.
This second rise allows the gluten to relax, making the dough easier to stretch and shape. If you’re not baking immediately, you can refrigerate the dough at this stage for up to two days, tightly wrapped.
Shaping the Pizza and Preparing for Baking
Preparing Your Baking Surface
Before shaping the pizza, it’s crucial to prepare your oven and baking surface. A hot, consistent surface is key to getting that signature artisan crust — crispy on the outside, soft and airy on the inside.
You have a few great options:
- Pizza steel or stone – Preheat it in the middle rack of your oven to 500°F or the highest temperature your oven allows.
- Inverted baking sheet – A solid choice if you don’t have a steel or stone.
- Cast iron pan – Lightly grease it with olive oil for an even heat distribution and naturally crisp bottom.
Let your oven heat up for at least 45 minutes before baking. This gives your baking surface time to get hot enough to blister the crust.
Flattening and Stretching the Dough
Working with one dough ball at a time:
- Lightly flour your work surface and flatten the center of the dough with your fingers, leaving a thick 1-inch rim all around.
- Pick up the disk, holding it by the thick edge, and let gravity stretch the dough as you rotate it gently.
- Continue rotating until you have a 12-inch circle. If the dough resists, let it rest a few minutes and try again.
- Carefully lay the shaped dough onto a floured pizza peel or shape it directly in your cast iron pan if using that method.
Jiggle the peel to make sure the dough isn’t sticking. If it is, lift an edge and add more flour underneath.
Adding Toppings Without Weighing Down the Dough
While the dough is delicate, it’s strong enough to handle simple toppings. To keep the artisan feel, avoid overloading the pizza:
- Spread a light layer of sauce across the center, keeping that 1-inch crust edge clean.
- Add your favorite toppings evenly and sparingly, so the crust doesn’t sag or become soggy during baking.
- Use fresh, high-moisture ingredients with care to avoid excess water pooling on the surface.
Less is more when it comes to artisan pizza. The goal is balance, allowing the crust’s flavor and texture to shine through.
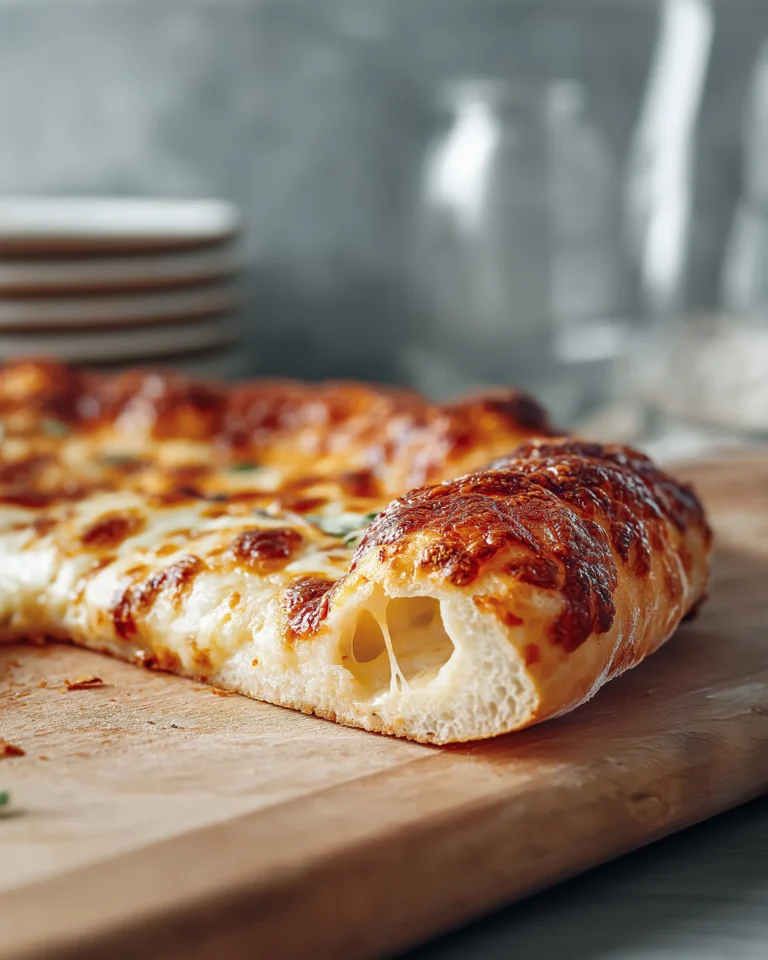
Baking to Golden, Blistered Perfection
- Transfer your pizza from the peel to the preheated surface.
- Bake for 5 minutes, then switch on the broiler and continue for 2 to 4 more minutes, until the cheese melts and the crust develops those signature blistered spots.
If using a cast iron pan, bake the pizza for 15 to 20 minutes, then broil for the last few minutes to develop some charring.
Serving, Storing, and Nutrition of Artisan Pizza Dough
Slicing and Serving Your Artisan Pizza
Once your pizza is hot, bubbly, and perfectly blistered, it’s time to enjoy the fruits of your labor. Allow the pizza to cool for 2 to 3 minutes after removing it from the oven. This helps the cheese set and makes slicing easier.
Use a sharp pizza wheel or large knife to cut your pizza into 4 or 6 slices. Serve immediately while the crust is still crisp and the toppings are hot.
The texture will be:
- Crisp on the bottom
- Airy and chewy inside
- Charred with golden blisters on the crust
Pair your artisan pizza with a fresh salad, lemonade, or sparkling water to keep the meal light and balanced.
Storing Leftover Dough and Pizza
Unused Dough:
If you’re not ready to bake both pizzas right away, you can store the shaped dough balls in the refrigerator for up to 48 hours.
- Keep them lightly oiled and tightly wrapped.
- Let them come to room temperature and rest for 30–60 minutes before shaping and baking.
Leftover Baked Pizza:
Store leftover slices in an airtight container or wrap them in foil. Refrigerate for up to 3 days.
- Reheat slices in a hot skillet with a lid for a crisp bottom and melty top.
- Avoid microwaving if you want to maintain the crust texture.
Nutritional Information (Per Serving)
Here’s a breakdown for ¼ of a 12-inch pizza, based on the dough alone, before any sauce or toppings:
| Nutrient | Amount |
|---|---|
| Calories | 228 |
| Carbohydrates | 48g |
| Protein | 6.5g |
| Fat | 0.6g |
| Saturated Fat | 0.1g |
| Unsaturated Fat | 0.4g |
| Trans Fat | 0g |
| Cholesterol | 0mg |
| Sodium | 488mg |
| Sugar | 0.2g |
| Fiber | 1.7g |
This artisan dough is low in fat and cholesterol, making it a clean canvas for healthy, veggie-packed pizza combinations. The moderate sodium content comes mostly from the salt used to strengthen the dough and enhance flavor.
Why This Recipe Works for Everyone
This artisan pizza dough recipe is approachable yet delivers results that rival professional pizzerias. The simplicity of the ingredients and the patience in the method allow every element — from the flour to the fermentation — to shine through in the final product.
By using just flour, water, salt, and a tiny bit of yeast, you get a crust that’s:
- Chewy and airy
- Crisp on the outside
- Packed with subtle, toasty flavor
- Customizable to suit your own tastes
This recipe respects tradition while making artisan baking achievable for home cooks of any skill level.
Conclusion: Mastering Artisan Pizza Dough at Home
Creating artisan pizza dough from scratch may seem like a long journey, but every step contributes to the outstanding flavor, structure, and character of the final crust. This isn’t just pizza dough — it’s a handcrafted foundation that brings out the best in your toppings and elevates homemade pizza night to something extraordinary.
By using only four simple ingredients — flour, water, yeast, and salt — you build a dough that develops naturally through time, technique, and care. From the first mix to the final blistered bake, you’re transforming humble ingredients into a canvas of golden, airy, and crisp perfection.
Whether you’re baking on a pizza steel, in a cast iron pan, or on a baking sheet, the result is unmistakably artisan. Each bite offers a balance of light chew, deep flavor, and crackling crust. The slow fermentation process and hands-on method deliver what no store-bought dough ever could — personality, presence, and pride in the process.


