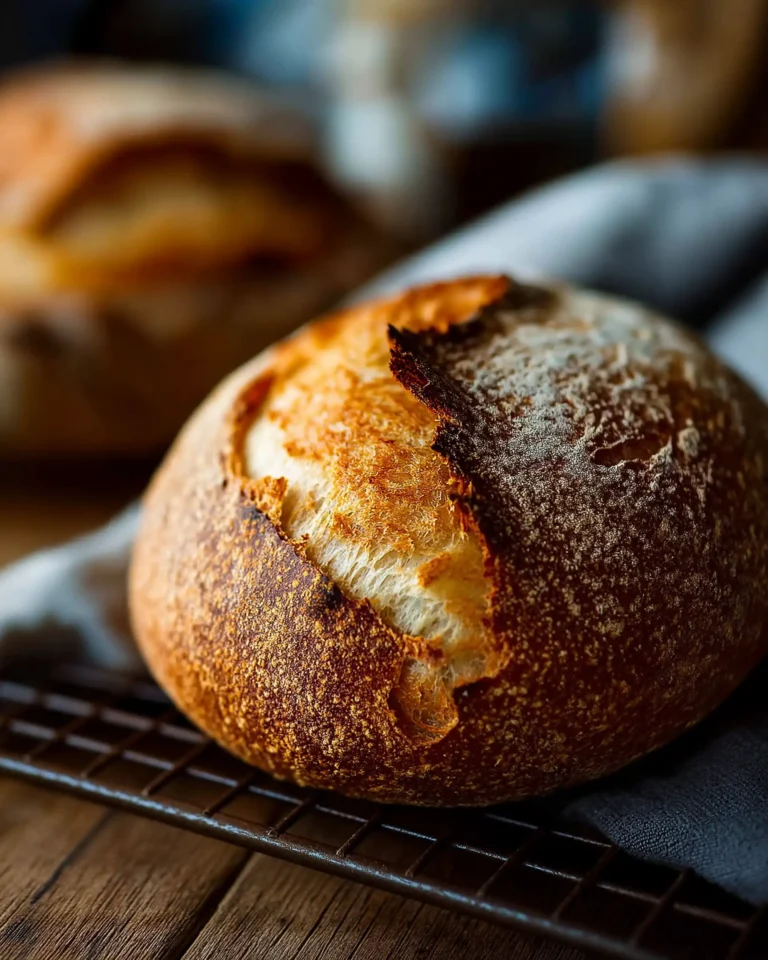
Making sourdough bread at home might seem intimidating at first, but once you understand the process, it becomes a relaxing and rewarding experience. This sourdough bread recipe is ideal for beginners and intermediate bakers alike. It’s crafted using just a few pantry staples—active sourdough starter, water, olive oil, bread flour, and salt—resulting in a crusty, golden loaf with a chewy, flavorful crumb.
In this comprehensive guide, we’ll break down every essential step from mixing to baking, and address common sourdough questions like bulk rise time, dough shaping techniques, and how hydration levels impact results. You’ll also learn the importance of scoring, tools required, and get tips for making this recipe fit your schedule.
Whether you’re after a rustic everyday loaf or experimenting with hydration, this guide offers all you need to bake confidently. Let’s get started with the very foundation of the bread—the dough.
How to Make the Dough for a Sourdough Bread Recipe
Understanding Your Ingredients
A successful sourdough bread recipe starts with understanding your ingredients. Each element plays a crucial role in creating flavor, texture, and rise.
- Sourdough Starter: A bubbly, active sourdough starter is essential. It naturally leavens the dough, meaning no commercial yeast is needed. Your starter should be at its peak when you mix the dough—this ensures optimal fermentation.
- Water: Preferably filtered and warm (about 75°F). Water activates the starter and helps dissolve salt and flour. Hydration levels affect texture—higher hydration results in a more open crumb.
- Olive Oil: While not always present in sourdough recipes, it adds softness and richness, giving the crust a slight sheen.
- Bread Flour: Use strong bread flour, not all-purpose. It contains more protein, which strengthens the dough and supports better rise.
- Salt: Fine sea salt enhances flavor and regulates fermentation. Never skip this step.
Sourdough Bread Recipe
- Total Time: 14 hours
- Yield: 1 loaf
- Diet: Vegan
Description
This artisan-style sourdough bread recipe creates a crusty golden loaf with a chewy, flavorful crumb. Made with only a few ingredients, it’s perfect for beginners and experienced bakers alike.
Ingredients
150g/5.35 oz bubbly, active sourdough starter
250g/8.80 oz warm water, preferably filtered
25g/0.90 oz olive oil
500g/17.65 oz bread flour (not all-purpose)
10g/0.4 oz fine sea salt
Fine ground cornmeal or parchment paper for lining
Instructions
1. In a large bowl, mix starter, water, and olive oil. Add flour and salt, mix until stiff. Combine by hand into a shaggy dough. Cover and let rest for 30 minutes to 1 hour.
2. Form the dough into a rough ball. Cover and let rise in a warm place until almost doubled in size. This may take 3–12 hours depending on temperature.
3. Optional: perform 1–2 sets of stretch and folds during bulk rise to strengthen the dough.
4. Transfer dough to a floured surface. Gently deflate and shape into a round. Use a bench knife to help create surface tension.
5. Place dough in a Dutch oven lined with parchment or dusted with cornmeal. Let it rise again for 30–60 minutes until slightly puffy.
6. Score the top of the dough with a sharp blade. Preheat oven to 450°F (232°C).
7. Bake covered at 400°F (204°C) for 20 minutes, then uncover and bake for another 40 minutes until deep golden brown.
8. Let bread cool on a wire rack for at least 1 hour before slicing.
Notes
For more open crumb, increase hydration up to 300–325g total water and proof in a cloth-lined basket instead of a Dutch oven.
Do not slice the bread too early—cooling is crucial to avoid a gummy crumb.
Use a digital scale to measure for accuracy.
Your starter should be active and bubbly for best results.
- Prep Time: 13 hours
- Cook Time: 1 hour
- Category: Bread
- Method: Oven-Baked
- Cuisine: American
Step-by-Step Dough Preparation
Start by adding your active starter, warm water, and olive oil into a large mixing bowl. Mix thoroughly with a fork until it forms a cloudy liquid. Now, add the bread flour and sea salt. Continue mixing until the dough becomes stiff, then use your hands to fully incorporate any dry bits.
Don’t worry if the dough feels rough and dry. That’s completely normal at this stage. Cover the bowl using plastic wrap or a clean damp towel and let the dough rest for 30 minutes to 1 hour. This resting period, known as autolyse, allows the flour to fully absorb the water and begin gluten development, making the dough easier to handle later.
The Importance of Hydration Levels
This recipe accommodates different hydration preferences. At 250 g of water, your dough will be firmer and easier to shape. With 300–325 g, it becomes wetter and more elastic, which can give your loaf a more open crumb structure. Neither option is wrong, just different. Consider your skill level and comfort with sticky dough when choosing the water quantity.
After autolyse, give your dough a brief kneading to form a rough ball. This part only takes about 15 seconds and helps bring the dough together before fermentation begins.
Now your dough is ready to rise, and that’s where the magic starts to happen. In the next section, we’ll explore how to manage fermentation, including bulk rise and stretch-and-fold techniques for better structure.
Mastering the Bulk Rise in a Sourdough Bread Recipe
What Is Bulk Fermentation and Why It Matters
Bulk fermentation, or bulk rise, is when your dough begins to develop its strength, flavor, and internal structure. This is one of the most critical stages in a sourdough bread recipe. During this time, wild yeasts and bacteria from the starter ferment the dough, causing it to rise, stretch, and build flavor.
Place your mixed dough in a clean bowl or dough tub, cover it with lightly oiled plastic wrap, and let it rest in a warm environment between 70°F to 75°F. A warmer room speeds up the rise, while a cooler space slows it down. Instead of following the clock, watch the dough. It’s ready when it looks puffier, smoother, and nearly doubled in size.
How Long Should It Rise?
Rise time can range widely from 3 to 12 hours, depending on your room temperature and starter strength. In warmer climates, the dough may rise in just 3–4 hours. In cooler rooms, it could take up to 12 hours.
| Temperature | Rise Time |
|---|---|
| 80°F (26°C) | 2–4 hours |
| 75°F (24°C) | 4–6 hours |
| 68°F (20°C) | 10–12 hours |
Keep the dough covered to prevent drying. Use visual cues over strict timing. You want a dough that has grown significantly but hasn’t collapsed.
Optional: Stretch and Fold Technique
To increase strength and volume, you can incorporate a stretch and fold technique during the first part of the bulk rise. About 30 to 45 minutes after placing the dough to rise, begin by grabbing a side of the dough, stretching it up gently, and folding it over itself. Turn the bowl a quarter and repeat this until you’ve done four folds, forming one set.
Wait 45 minutes to 1 hour and repeat once more. This process develops gluten, improves oven spring, and supports a more open crumb.
If your dough feels too tight or tears during stretching, give it more rest time. For firmer dough (lower hydration), the folds will feel dense. For wetter dough (higher hydration), the folds will be more elastic.
Monitoring Fermentation
Look for these signs your dough is ready to move on to shaping:
- Visibly increased in volume, nearly double
- Smoother surface with fewer wrinkles
- Air bubbles forming under the skin of the dough
- A gentle press leaves a light indentation that slowly fills back in
Shaping the Dough in a Sourdough Bread Recipe
Getting Ready to Shape
Once your dough has successfully bulk fermented, it’s time to shape it. This is a delicate but exciting phase of the sourdough bread recipe, where you create structure, build tension, and prepare for the final proof.
Begin by clearing and cleaning your work surface. Lightly flour one half of it—this is your cutting area. Leave the other half clean and dry for shaping. You’ll need a bench knife and a gentle touch here.
Carefully turn the dough out onto the floured section. There’s no need to punch it down. It will naturally deflate just a bit, which is perfectly fine.
Dividing and Pre-Shaping
At this point, you can choose whether to make one large loaf or two smaller loaves.
- For one large loaf, leave the dough whole.
- For two loaves, cut the dough in half with a bench knife.
Once portioned, pre-shape the dough. Gently fold the top of the dough down to the center, then rotate and fold the next section over the center as well. Continue until you’ve folded the full circumference. This motion helps tuck the dough into a round shape.
Now flip the dough over, seam-side down. Use your hands to cup the dough and gently rotate it in place using quarter turns. This builds surface tension, which is key for a tall loaf with great oven spring.
If you notice the dough sliding around, there may be flour on the shaping area. Wipe or brush away any excess—friction helps build that tension.
Tips for Successful Shaping
- Work quickly but gently. You want to preserve the air bubbles formed during fermentation.
- Use minimal flour. Excess flour can make shaping difficult and weaken surface tension.
- Repeat shaping motions a few times to get a smooth, tight round.
Tools That Help
| Tool | Purpose |
|---|---|
| Bench knife | Move, divide, and shape dough with clean cuts |
| Dough scraper | Collect sticky bits and clean work surface |
| Parchment paper | Helps lift and move shaped dough easily |
| Proofing basket or Dutch oven | Supports dough during second rise |
Shaping isn’t about perfection. Each loaf will have its own unique look. What matters most is building enough tension on the surface so the dough holds its shape during baking.
Second Rise and Proofing in a Sourdough Bread Recipe
What Is the Second Rise?
The second rise, also known as proofing, is the final resting period your shaped dough undergoes before it goes into the oven. In this phase of the sourdough bread recipe, the dough relaxes, puffs up slightly, and prepares for optimal oven expansion. This rise is shorter than the bulk fermentation and requires a bit more care in how you handle the dough.
The way you proof your dough depends on its hydration level and the tools you’re using.
Choosing the Right Setup
There are two popular methods for second rise:
- Free-form rise in a Dutch oven
- Basket rise using a cloth-lined proofing bowl
Free-Form Method (Best for 250 g Water Dough)
Place parchment paper or a layer of fine cornmeal in the base of your Dutch oven to prevent sticking. Gently transfer your shaped dough into the pot. Cover it with the lid to keep the environment humid and let it sit at room temperature for 30 minutes to 1 hour, or until it’s slightly puffy.
This method works best with dough that has a lower hydration level (around 250 g of water) because it will hold its shape better during the rise.
Basket Method (For Higher Hydration Doughs)
If your dough is wetter (closer to 300–325 g of water), use a cloth-lined proofing basket. Generously flour the cloth to prevent sticking. Place your shaped dough seam-side up into the basket. Cover loosely and allow it to rise until slightly puffy. This method keeps the dough contained, preventing it from spreading too much.
Visual Signs It’s Ready to Bake
Proofing is done when:
- The dough has a smooth surface with a gentle dome
- A light poke springs back very slowly, leaving a slight impression
- It feels soft but not deflated
Avoid over-proofing, which can result in a flat loaf or one with a weak oven spring.
Timing and Temperature
Toward the end of your second rise, preheat your oven to 450°F (232°C). This ensures your Dutch oven is hot enough to create steam and help the bread spring quickly.
Why Preheat Matters
A hot Dutch oven simulates the conditions of a professional steam oven. It traps steam from the dough, helping the crust expand, blister, and develop a gorgeous golden color. Always preheat with the pot inside the oven for best results.
Troubleshooting Second Rise
| Problem | Solution |
|---|---|
| Dough spreads too much | Use a proofing basket or chill the dough briefly |
| Dough sticks to cloth | Use more flour or rice flour in the lining |
| Dough under-proofed | Give it more time at room temperature |
| Dough over-proofed | Bake immediately and score deeply |
Scoring and Baking in a Sourdough Bread Recipe
Why Scoring Is Essential
Scoring isn’t just for looks—it’s a key step in any sourdough bread recipe. It allows steam to escape and controls how the bread expands in the oven. Without it, your loaf may burst unpredictably, creating uneven cracks and a lopsided shape. A clean score encourages a beautiful ear and a controlled rise.
Tools You Can Use
To score your dough effectively, use one of the following:
- Bread lame (a curved razor blade tool)
- Razor blade
- Sharp paring knife
- Serrated steak knife
Whatever tool you choose, it needs to be razor-sharp to avoid dragging the dough.
How to Score the Dough
Once your oven has fully preheated and your dough has finished its second rise, it’s time to score. Uncover the dough and gently make a shallow slash across the top. A single, confident cut about 2 to 3 inches long and 1/4 inch deep down the center works well for beginners.
If you’re more experienced, you can get creative with patterns, but make sure each cut allows the dough to expand outward. Always score the dough immediately before placing it into the oven.
Baking Instructions
After scoring, carefully place the dough into the preheated Dutch oven. Be mindful of your hands and the hot pot. Immediately cover with the lid and reduce the oven temperature to 400°F (204°C).
- Bake covered for 20 minutes. This traps steam, allowing the loaf to rise.
- Bake uncovered for another 40 minutes. This step darkens and crisps the crust.
Check for doneness using color, sound, or internal temperature. The crust should be a deep golden brown. Tap the bottom of the loaf—it should sound hollow. For accuracy, check with a thermometer: the center should read 205°F to 210°F (96°C to 98°C).
Cooling: The Final Crucial Step
After baking, remove the bread and place it on a wire rack to cool for at least 1 hour. This wait is crucial. Cutting too soon releases trapped steam, making the interior gummy. Let the loaf set properly so that the crumb finishes developing and slicing becomes easier.
Common Baking Issues and Fixes
| Issue | Cause | Solution |
|---|---|---|
| Pale crust | Oven not hot enough | Preheat longer or increase final baking time |
| Tough crust | Overbaked or dry environment | Bake covered longer or reduce uncovered time |
| Gummy center | Sliced too soon | Always cool fully before cutting |
| No oven spring | Over-proofed or weak shaping | Proof for less time or shape more tightly |
Slicing, Storing, and Serving in a Sourdough Bread Recipe
How to Slice Sourdough Bread Properly
Your beautiful sourdough bread recipe has produced a golden, crusty loaf with a rich aroma and airy crumb. But how you slice it matters. Slicing too early can ruin texture, and poor technique can crush the crumb.
- Wait at least 1 hour before slicing to let the interior set.
- Use a sharp serrated bread knife for clean cuts.
- Cut the loaf on its side to prevent flattening the top crust.
If you’re making toast or sandwiches, aim for slices about ½-inch thick. For serving alongside meals or soups, thinner slices also work well.
Best Ways to Store Your Sourdough Loaf
Sourdough has a longer shelf life than commercial yeast bread because of its natural acidity. That said, proper storage still matters for maintaining freshness.
Short-Term Storage (1–2 Days)
- Wrap the loaf in a clean kitchen towel or paper bag.
- Store at room temperature, away from heat or direct sunlight.
- Avoid plastic bags, which trap moisture and soften the crust.
Medium-Term Storage (3–5 Days)
- Keep it in a bread box or cloth bag.
- If it begins to harden, toast slices to revive texture.
Long-Term Storage (Freezing)
- Slice the bread first.
- Wrap slices or halves tightly in plastic wrap and foil.
- Store in a freezer-safe bag for up to 2 months.
- Reheat directly from frozen in a toaster or oven.
How to Refresh a Day-Old Loaf
Sourdough can lose crispness after a day or two. Here’s how to bring it back to life:
- Preheat your oven to 375°F (190°C).
- Lightly spritz the crust with water.
- Heat the loaf directly on the oven rack for 10–15 minutes.
This technique revives both crust and crumb, making your bread taste almost as fresh as day one.
Delicious Ways to Enjoy Sourdough
While sourdough is excellent on its own, it also pairs well with a variety of toppings and meals. Try these ideas:
- Toasted with mashed avocado and sea salt
- Topped with roasted vegetables or hummus
- As a sandwich base with fresh greens and plant-based spreads
- Served alongside soups or hearty stews
- Used for breadcrumbs or croutons when it starts to go stale
With just a few simple ingredients and patience, this sourdough bread recipe gives you a loaf full of character, flavor, and versatility.
Conclusion: Your Perfect Loaf Is Just One Bake Away
Creating an artisan-style loaf with this sourdough bread recipe doesn’t require fancy tools or complex steps—just quality ingredients, time, and a bit of practice. From forming the dough to watching it rise, scoring it with confidence, and finally pulling a golden, crackling crust from the oven, the process is as enjoyable as the result.
Every loaf teaches you something new. Maybe it’s how dough feels when perfectly fermented, or how hydration levels affect shaping. Don’t get discouraged by setbacks—learn from them. This recipe provides a solid foundation, whether you’re new to sourdough or refining your technique.
With a tangy flavor, chewy crumb, and a crust that sings when tapped, this sourdough loaf is more than just bread—it’s a homemade masterpiece made with intention. So roll up your sleeves, feed that starter, and get baking. The next loaf could be your best one yet.


