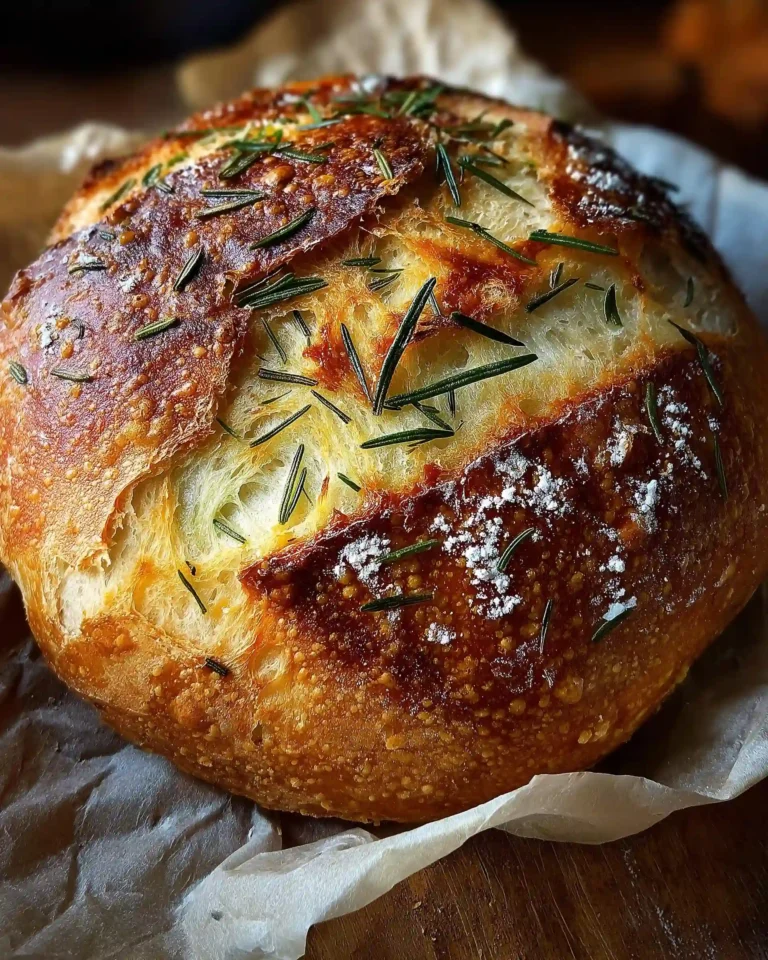
There’s something deeply satisfying about making artisan bread at home, especially when the ingredients are as rich and aromatic as rosemary and roasted garlic. This recipe for Rosemary & Roasted Garlic Artisan Bread is the perfect fusion of rustic flavors and simplicity. It’s designed for both beginners and seasoned bakers who appreciate the unmatched flavor of homemade bread with minimal kneading and maximum flavor. With just a few pantry staples and a little time, you can create a beautifully crusty, golden-brown loaf that tastes like it came straight from a bakery.
Throughout this article, we’ll break down each stage of the process in detail—from preparing the roasted garlic to mixing and proofing the dough, and finally, baking it to perfection in a Dutch oven. Whether you’re baking on a cozy weekend or prepping ahead for a weekday treat, this no-fuss recipe delivers flavor and texture that stands out every single time. Plus, you’ll find tips for storage, proofing, and a few creative ideas to elevate the experience.
Understanding the Art of Artisan Bread
What Is Artisan Bread?
Artisan bread is characterized by its handcrafted nature, a crispy crust, and an open, airy crumb. Unlike commercial bread, which often uses preservatives and shortcuts to speed up the process, artisan bread relies on time and traditional methods. Long fermentation, careful folding, and natural ingredients are key.
This Rosemary & Roasted Garlic Artisan Bread stays true to that definition. It’s slow-proofed, shaped by hand, and baked in a Dutch oven to trap steam and create a crusty, bakery-style finish.
Why Use a Dutch Oven?
Baking in a Dutch oven is the gold standard for home artisan bread. It creates an enclosed environment that traps moisture released from the dough during baking. This steam keeps the crust from forming too quickly, allowing the bread to expand fully before hardening. The result is a crispy, golden exterior and a light, soft interior.
A 3-quart Dutch oven is ideal for this recipe. It retains heat well and evenly distributes it during baking, helping create the perfect loaf every time.
Key Qualities of Rosemary & Garlic Bread
The combination of roasted garlic and rosemary brings a deep, herbaceous, and slightly sweet flavor to the loaf. Roasting garlic softens its bite and enhances its natural sweetness. Meanwhile, rosemary adds a savory, aromatic element that complements the tangy notes of slow-risen dough.
Print
Rosemary & Roasted Garlic Artisan Bread
- Total Time: 18 hours 40 minutes
- Yield: 1 artisan loaf
- Diet: Vegetarian
Description
This Rosemary & Roasted Garlic Artisan Bread features a crusty exterior, soft chewy interior, and deep savory flavor from freshly roasted garlic and fragrant rosemary. Perfect for homemade bread lovers.
Ingredients
1 head garlic
Extra-virgin olive oil (for roasting)
Coarse sea salt and freshly ground black pepper (to taste)
1½ cups water, room temperature (at or near 70°F/21°C)
1 teaspoon active dry yeast
3 cups bread or all-purpose flour, plus more for dusting
½ teaspoon dried oregano
1 teaspoon kosher or fine sea salt
2 teaspoons finely chopped rosemary, plus more for topping
1 whole head roasted garlic, smashed
1 tablespoon extra-virgin olive oil
Instructions
1. Preheat oven to 400ºF (204ºC). Slice garlic head in half, drizzle with olive oil, season, wrap in foil, and roast for 40 minutes.
2. Let roasted garlic cool, then remove cloves from skins and set aside.
3. In a bowl, sprinkle yeast over room-temperature water and let sit for 10–15 minutes.
4. In a large mixing bowl, combine flour, oregano, salt, and chopped rosemary. Stir to mix evenly.
5. Add yeast mixture, roasted garlic, and olive oil to the flour. Mix with a spatula until just combined. Dough should be shaggy and sticky.
6. Cover the bowl and let rise at room temperature until doubled in size (8–10 hours).
7. Transfer dough to a floured surface, gently fold into a round. Place seam-side up in a floured bowl or proofing basket.
8. Cover and refrigerate for at least 1 hour or up to 24–48 hours for added flavor.
9. Preheat oven to 450ºF (232ºC) with Dutch oven inside.
10. Invert dough onto parchment, seam-side down. Score the top with a sharp blade and sprinkle with rosemary.
11. Carefully place dough into hot Dutch oven, cover, and bake for 30 minutes.
12. Remove lid and bake uncovered for an additional 15–20 minutes until golden brown and hollow-sounding when tapped.
13. Cool on a wire rack for 1 hour before slicing.
Notes
You can adjust the amount of roasted garlic based on preference. Leftover garlic can be stored in the fridge for future use.
Rise times depend on room temperature. Cooler kitchens may require more time for dough to double.
Bread stores well at room temperature for 2–3 days, in the fridge for a week, or in the freezer for up to 3 months.
- Prep Time: 10 minutes
- Cook Time: 1 hour
- Category: Bread
- Method: Baking
- Cuisine: American
Choosing Ingredients and Prepping Like a Pro
Selecting the Right Flour
For this Rosemary & Roasted Garlic Artisan Bread, flour plays a crucial role in the bread’s structure and flavor. You can use bread flour or all-purpose flour depending on what you have on hand.
- Bread flour has a higher protein content, typically around 12–13%. This helps create stronger gluten networks, leading to a chewier texture and better rise.
- All-purpose flour, on the other hand, has a slightly lower protein content (10–12%) but still produces an excellent loaf with a soft crumb.
Whichever you choose, make sure it’s unbleached for better fermentation and flavor development.
Why Room Temperature Water Matters
The water in this recipe should be room temperature, ideally around 70°F (21°C). This mild temperature ensures that the active dry yeast activates properly without being shocked. Too hot, and the yeast dies. Too cold, and the fermentation will drag on for too long. Aim for water that feels neutral to the touch.
Using filtered water is also a smart move if your tap water contains chlorine or other chemicals that could interfere with yeast activity.
The Power of Roasted Garlic
Roasted garlic is the centerpiece of flavor in this artisan loaf. Roasting mellows out the sharp bite of fresh garlic, turning it soft, creamy, and slightly sweet. Here’s how to do it right:
- Slice the top off a whole garlic head to expose the cloves.
- Drizzle with extra-virgin olive oil, and season with coarse sea salt and freshly ground black pepper.
- Wrap in foil and roast at 400°F (204°C) for about 40 minutes.
After cooling, squeeze the cloves from their skins. You can smash them slightly with a fork before folding them into the dough later.
You can adjust the amount of garlic to your preference. The recipe calls for one head, but if you’re a garlic lover, don’t hesitate to use more.
Choosing and Prepping Rosemary
Fresh rosemary is ideal for this bread because it delivers bold, aromatic flavor that holds up well during the long fermentation. Strip the leaves from the stem and finely chop them. You’ll need about 2 teaspoons for the dough and a bit more for sprinkling on top just before baking.
Dried rosemary can be used in a pinch, but fresh delivers a much cleaner flavor and better texture.
Supporting Ingredients That Matter
Let’s not forget a few supporting players that round out this dough:
- Olive oil: Just 1 tablespoon adds richness and softness to the crumb.
- Oregano: A half-teaspoon of dried oregano subtly enhances the savory profile and complements the rosemary beautifully.
- Kosher salt or fine sea salt: One teaspoon adds the necessary seasoning to balance the flavors. Avoid iodized table salt as it can lend a harsh taste.
- Active dry yeast: A teaspoon is all you need. Make sure it’s fresh. If it’s past the expiration date, your dough may not rise properly.
Getting Your Tools Ready
To make your baking process smooth, it helps to gather your equipment before mixing:
- Digital scale: Accuracy is key in bread baking, especially for flour.
- Mixing bowl (4-quart): Large enough for proofing the dough without overflow.
- Parchment paper: Prevents sticking and makes it easier to transfer the dough.
- 3-quart Dutch oven: Creates that essential steam-filled environment for a crispy crust.
- Spatula and dough scraper: For mixing and shaping your dough without tearing it.
With everything in place, you’ll be ready to start the dough. In Part 3, we’ll walk through mixing, fermenting, and shaping your loaf for that classic artisan look and feel.
Mixing, Rising, and Shaping the Dough
Activating the Yeast
The first key step in creating your Rosemary & Roasted Garlic Artisan Bread is activating the yeast. This process ensures your dough rises properly and develops the structure it needs.
- Pour 1½ cups of room temperature water into a bowl.
- Sprinkle 1 teaspoon of active dry yeast across the surface.
- Let it sit undisturbed for 10 to 15 minutes.
You’ll know the yeast is active when a thin, foamy layer begins to form on the surface. If this doesn’t happen, your yeast may be expired or your water might be too hot or too cold.
Bringing the Dough Together
Once the yeast is ready, it’s time to assemble the dough:
- In a large bowl, combine 3 cups of bread or all-purpose flour, ½ teaspoon of dried oregano, 1 teaspoon of kosher or fine sea salt, and 2 teaspoons of finely chopped fresh rosemary.
- Stir together dry ingredients to evenly distribute the herbs and salt.
- Add the yeast-water mixture, the smashed roasted garlic cloves, and 1 tablespoon of olive oil to the bowl.
Using a rubber spatula, gently mix the dough until all the flour is incorporated. Don’t worry if the mixture looks rough or sticky. Artisan bread doughs are generally more hydrated and may appear loose and shaggy at first. That’s perfectly normal.
First Rise: Bulk Fermentation
This stage is where the magic begins. Once the dough is mixed:
- Cover the bowl with a clean towel or plastic wrap.
- Let it rise in a warm, draft-free spot until doubled in size. This usually takes 8 to 10 hours, depending on your room temperature.
Ideal proofing temperatures range from 70°F to 75°F (21°C to 24°C). Cooler environments may stretch this process out to 12 hours or more. The key is patience. You want to see that the dough has expanded and become bubbly, soft, and jiggly.
Shaping the Dough
Once the dough has doubled in volume, you’re ready to shape:
- Lightly flour your work surface and your hands.
- Use a dough scraper or your hands to gently release the dough from the bowl onto the floured surface.
- Gently fold the dough over itself a few times to build structure, forming it into a round loaf.
Try not to deflate the dough too much. You want to preserve as many of those lovely air bubbles as possible.
Now, place the dough seam side up into a clean, lightly floured bowl or a proofing basket. This helps keep its shape as it chills and gives the final loaf a rustic look.
Cold Proofing for Enhanced Flavor
Cover the bowl and refrigerate the dough for at least 1 hour, or up to 24 hours. This cold fermentation step:
- Slows down the rise and enhances flavor.
- Makes the dough easier to handle.
- Helps develop that artisan-style crust and crumb texture.
If your schedule allows, chilling the dough closer to 24 hours is ideal. You can also let it go up to 48 hours for a slightly tangier flavor and even more depth.
Scoring and Baking Your Artisan Loaf
Preparing to Bake
Once your dough has completed its cold proof in the fridge, it’s time to get baking. This final stage brings your Rosemary & Roasted Garlic Artisan Bread to life with a golden, crackling crust and a soft, aromatic interior.
Begin by preheating your oven to 450°F (232°C). Place your 3-quart Dutch oven (with the lid on) inside the oven while it preheats. This ensures the pot is piping hot, which helps give your bread an instant burst of steam for that classic artisan rise and blistered crust.
Transferring the Dough
While the oven heats:
- Remove your dough from the refrigerator.
- Uncover the bowl or proofing basket.
- Place a piece of parchment paper over the bowl, then gently invert it onto a flat surface so the dough is now seam side down.
At this stage, the dough may look a bit relaxed. That’s perfectly fine. You can gently nudge it into a more rounded shape with floured hands if needed.
Scoring the Top
Scoring your dough is not just for aesthetics—it’s a crucial step that helps control how the loaf expands in the oven.
Use a sharp knife or razor blade to make a shallow cut or design across the top of the dough. A single deep slash across the center or a few curved cuts in a crosshatch pattern both work well. The goal is to give steam a clear escape path and allow the bread to rise beautifully without tearing.
Optionally, sprinkle a pinch of chopped fresh rosemary over the top to add a visual and aromatic boost.
Baking the Bread
Once your oven is fully preheated:
- Carefully remove the hot Dutch oven using oven mitts.
- Lift the dough using the parchment paper and place it directly into the pot.
- Cover with the lid and return it to the oven.
Bake covered for 30 minutes. This traps steam inside and allows the bread to expand without drying out.
Then, remove the lid and continue baking for an additional 15 to 20 minutes. During this time, the crust will turn golden brown and crisp.
The bread is done when the crust is deeply browned and it sounds hollow when tapped on the top.
Cooling for the Perfect Texture
After baking:
- Use the edges of the parchment to lift the loaf out of the Dutch oven.
- Transfer the bread to a wire cooling rack.
Let it cool for at least 1 hour before slicing. This step is crucial—cutting too early releases steam and moisture, which can affect the crumb’s texture and make the inside gummy.
Letting the bread rest also deepens the flavor and makes slicing easier and cleaner.
Serving Ideas, Storage Tips, and Flavor Pairings
Best Ways to Enjoy Rosemary & Roasted Garlic Artisan Bread
Once cooled and sliced, your Rosemary & Roasted Garlic Artisan Bread is ready to become the star of the table. Its savory flavor and chewy texture make it versatile enough to enjoy in countless ways.
Here are a few serving ideas:
- Fresh with Olive Oil and Sea Salt: Serve slices with a small dish of olive oil and a sprinkle of flaky sea salt. The bread’s crispy crust and soft interior soak up the oil beautifully.
- Toasted with Butter or Plant-Based Spread: Lightly toasting the bread brings out the garlic and rosemary flavors. Spread with salted butter or your favorite dairy-free alternative for a cozy snack.
- Grilled for Sandwiches: Grill slices to use in panini-style sandwiches. The bread holds up well to warm fillings like roasted vegetables or creamy spreads.
- As a Side Dish: Pair it with hearty soups, fresh salads, or pasta dishes. Its rustic flavor complements almost any meal.
- Topped with Avocado or Hummus: For a light breakfast or lunch, add mashed avocado, sliced tomatoes, or hummus to thick slices.
This artisan bread also works wonderfully in recipes like savory bread pudding, croutons, or homemade stuffing.
Storage Recommendations
Proper storage helps maintain the bread’s texture and flavor after baking. Here’s how to keep it fresh:
- Room Temperature: Store in a paper bag or wrapped in a clean towel at room temperature for up to 3 days. Avoid plastic wrap or airtight containers, which can make the crust soggy.
- Refrigeration: Wrap in parchment, then loosely in foil or place in a bread box in the refrigerator for up to 1 week. The crust may soften slightly, but toasting restores its crunch.
- Freezing: Slice the loaf before freezing. Wrap each slice in parchment and place in a zip-top freezer bag. It will keep for up to 3 months. Toast slices straight from the freezer for quick enjoyment.
Reheating Tips
Want to revive your bread’s fresh-baked aroma and texture?
- To Reheat the Whole Loaf: Preheat the oven to 350°F (175°C). Wrap the loaf in foil and warm for 10–15 minutes.
- For Individual Slices: Toast lightly in a toaster or oven until the crust crisps up and the crumb is warm.
Flavor Enhancements and Variations
The beauty of artisan bread lies in its adaptability. Once you’re confident with the base recipe, feel free to experiment:
- Add-ins: Try incorporating sun-dried tomatoes, chopped olives, or caramelized onions during the mixing stage.
- Herb Variations: Swap rosemary with thyme, basil, or sage to match seasonal dishes.
- Topping Options: Before baking, brush the loaf with olive oil and sprinkle with flaky salt, sesame seeds, or extra herbs for a flavorful crust.
These small tweaks can give the bread a new twist every time while still maintaining its rustic, homemade charm.
Conclusion
Baking Rosemary & Roasted Garlic Artisan Bread at home is more than just a recipe—it’s a rewarding experience that blends technique, patience, and creativity. With simple ingredients, minimal equipment, and a little planning, you can create a bakery-quality loaf that fills your kitchen with irresistible aroma and flavor.
From preparing your own roasted garlic to folding and shaping the dough by hand, every step brings you closer to a loaf that’s as satisfying to make as it is to eat. Whether you enjoy it fresh from the oven with a swipe of butter, toasted with your favorite toppings, or paired with a warm bowl of soup, this rustic bread elevates even the simplest meal.
As you grow more comfortable with the process, don’t be afraid to experiment. Try different herbs, mix-ins, or flour types to craft your own signature loaf. With a strong foundation and these expert tips, your homemade bread will consistently impress and satisfy-everyone who tastes it.


