Sourdough baking has captured the hearts of home cooks everywhere, and for good reason. Its unique fermentation process enhances not only flavor but also digestibility. But what if you could elevate this age-old method with a burst of fruity sweetness and citrusy brightness? Enter the Orange-Raisin No-Knead Sourdough Bread Recipe. This beautifully crusty, chewy loaf combines the tangy essence of sourdough with naturally sweet raisins and aromatic orange peel, all without the need for constant kneading.
In this detailed guide, we’ll walk you through every step of crafting this incredible bread. From preparing the starter and soaking the raisins to the overnight fermentation and baking process, you’ll find that this no-knead sourdough recipe fits easily into your schedule. Whether you’re new to sourdough or a seasoned baker, this method provides excellent results with minimal effort.
Preparing the Sourdough Starter and Levain
Understanding the Role of the Sourdough Starter
The foundation of every sourdough bread is its starter, a living culture of flour and water populated with wild yeast and beneficial bacteria. For this recipe, you’ll need a fed and active starter, meaning it’s been recently refreshed and is bubbling at its peak. This guarantees a strong rise and rich flavor development in your final loaf.
Unlike commercial yeast, a sourdough starter brings complex taste and improved digestibility. The natural fermentation helps break down gluten, making sourdough easier on the stomach. Using a mature starter is critical in developing the right balance of tang and texture.
Mixing the Levain for Better Control
To build the levain, remove about 20 to 30 grams of unfed starter before refreshing your mother culture. Then add equal parts flour and warm water to reach 80 grams total. A typical ratio would be 20 grams of starter plus 30 grams each of flour and water. Mix well and leave it in a warm spot until it reaches peak rise—usually about 4 hours.
Your levain should be light, airy, and nearly doubled in volume when ready. If your home is cooler, this process may take longer. A handy tip is to place it in the oven with the light on and the door shut to maintain a gentle warmth without external drafts.
Why Temperature Matters
Water temperature is crucial. For this recipe, aim for water that’s between 90ºF and 95ºF. This ensures that the starter wakes up quickly and stays active during fermentation. Cold water can slow the process drastically, while overly hot water might kill the natural yeast.
The correct water temperature also helps with the dough’s texture, ensuring a consistent crumb and rise. Remember, it’s the small adjustments like this that separate a good loaf from a great one.
Scheduling Your Bake: Day 1 Midday Routine
Begin this process midday on Day 1 by preparing your levain. Doing so aligns your mixing, folding, and bulk fermentation steps with the natural rhythm of the day, setting you up for an overnight rest and baking the following morning.
Print
Orange-Raisin No-Knead Sourdough Bread Recipe
- Total Time: 1 day 45 minutes
- Yield: 1 loaf
- Diet: Vegetarian
Description
A citrus-sweet sourdough loaf made with raisins and orange peel, requiring no kneading and only basic folding techniques. Perfect for beginners or weekend baking projects.
Ingredients
80 grams fed sourdough starter
440 grams all-purpose flour
342 grams warm water (90–95ºF, preferably filtered)
6 grams kosher salt
65 grams raisins (soaked 30 minutes, then drained)
1 1/2 teaspoons orange peel (more if desired)
Rice flour (for dusting banneton)
Instructions
1. Feed the levain around midday. Mix 20–30g unfed starter with flour and water to reach 80g. Let rise until doubled and bubbly.
2. Stir the starter and orange peel into warm water in a bowl. Mix well. Add flour and stir until no dry patches remain. Cover and rest 30–60 minutes.
3. Add soaked raisins and salt. Use your hand and the pincer method to fully combine.
4. Stretch and fold the dough in the bowl. Repeat every 30 minutes over 2 hours, 3–4 total sets. Cover and rest overnight at room temperature.
5. In the morning, transfer the dough to a lightly floured surface. Shape into a round by folding and tightening.
6. Place seam-side down in a floured banneton. Cover and proof 1–4 hours. Perform finger dent test to check readiness.
7. Preheat oven to 475ºF with a Dutch oven inside. Invert dough onto parchment paper, score, and transfer to hot Dutch oven.
8. Bake covered for 30 minutes, then uncovered 20–25 minutes. Cool at least 20 minutes before slicing.
Notes
This recipe is adapted from Ken Forkish’s Overnight Country Brown. You can cold-proof the dough for 1–12 hours before baking for better scoring.
Always use rice flour to prevent sticking in the banneton. Use warm water (90–95ºF) for best fermentation.
- Prep Time: 1 day
- Cook Time: 45 minutes
- Category: Bread
- Method: Baking
- Cuisine: American
Mixing and Autolyse – Building Flavor and Hydration
Combining Water, Starter, and Orange Peel
Once your levain has peaked, it’s time to initiate the dough-building process. Begin by mixing the 342 grams of warm water, 80 grams of fed starter, and 1½ teaspoons of orange peel in a large mixing bowl. Stir gently until the starter is fully dissolved and the orange peel is evenly dispersed. This fragrant citrus zest doesn’t just infuse the dough with a refreshing aroma—it also adds a bright contrast to the sourdough’s naturally tangy profile.
This step not only hydrates the flour but introduces flavor early in the process, allowing the orange oils to spread evenly through the dough.
Incorporating the Flour for Hydration (Autolyse)
Next, add the 440 grams of all-purpose flour to your wet mixture. Stir until no dry flour remains and a shaggy dough forms. There’s no need to knead—just make sure all ingredients are incorporated. Cover the bowl with a clean kitchen towel or plastic wrap and let the mixture rest for 30 minutes to 1 hour.
This step is often referred to as “autolyse.” Although traditionally done without starter or salt, incorporating the starter early in this recipe supports gluten development while improving flavor and structure. During this resting time, the flour fully absorbs the water, initiating enzymatic activity that enhances the dough’s extensibility and elasticity.
Autolyse makes your dough easier to handle and promotes an open crumb and chewy texture—two of the hallmarks of great sourdough.
Why the Autolyse Matters
Skipping this step can result in a tight, underdeveloped crumb and a denser loaf. Allowing the dough to rest now reduces the physical effort needed later and encourages more consistent fermentation. It’s a simple pause that leads to a superior loaf, giving the sourdough its signature chew and depth.
Timing Tips
The longer your autolyse, the more flavor and extensibility you’ll develop. However, with orange peel already present, avoid letting it sit too long as the citrus oils may start to break down some gluten. Aim for a balanced rest between 30 and 60 minutes.
Texture and First Impressions
At this stage, your dough should be soft, sticky, and somewhat loose. That’s normal. No need to panic if it feels wetter than other bread doughs. Hydration helps develop a better crumb structure, and you’ll build strength through folding later.
With your dough hydrated and rested, it’s time to introduce the key flavor addition that gives this loaf its name—plump, sweet raisins.
Folding, Mixing, and Flavor Integration
Adding the Soaked Raisins and Salt
Now that the dough has completed its autolyse phase, it’s time to add the final key ingredients: 65 grams of raisins, which have been soaked in water for at least 30 minutes and then drained, and 6 grams of kosher salt. Soaking the raisins is essential—they absorb moisture and become soft and plump, preventing them from pulling hydration from the dough during fermentation.
Sprinkle the raisins and salt evenly over the surface of the dough in the bowl. You’ll notice the dough feels quite relaxed and hydrated, which is ideal for gently incorporating mix-ins without tearing.
Mixing Using the Pincer Method
To incorporate the ingredients, use your hand like a lobster claw and begin to pinch the dough. This technique, known as the “pincer method,” allows you to distribute ingredients without overworking the dough. Press your fingers into the dough, grab a small portion, and squeeze, then release. Repeat across the entire surface.
After a round of pinching, fold the dough over itself a few times from bottom to top to trap raisins inside and ensure even distribution. This process should take about 3 to 5 minutes. It’s okay if the raisins poke through in some places.
If you’re planning to add any additional optional flavor components (such as toasted seeds or spices), this would be the moment. However, this recipe relies entirely on the interplay between sweet raisins and citrus, keeping the profile clean and naturally flavorful.
First Series of Stretch and Folds
Right after mixing, it’s time for the first stretch and fold. Keeping the dough in the bowl, grab one edge, stretch it upward, then fold it over the dough. Rotate the bowl a quarter turn and repeat three more times. This is one complete set. Do this gently so you don’t tear the dough.
This folding action builds structure without kneading. Gluten networks develop with each fold, helping the dough trap gas and rise properly.
Timing Your Folds for Optimal Strength
Over the next 2 hours, repeat this stretch-and-fold process every 30 minutes, completing 3 to 4 sets in total. After the final fold, cover the bowl with a towel or plastic wrap and let the dough rest overnight at room temperature.
Room temperature should ideally be between 68°F and 75°F. If your kitchen runs cooler, fermentation may take longer. For colder environments, you can place the bowl inside the oven with just the light on.
Visual Cues for Fermentation
By bedtime, the dough should look puffier and feel aerated. You’ll see small bubbles forming near the sides and on the surface. It’s important not to over-handle the dough at this stage. Letting it rest helps the natural fermentation work its magic, producing that deep sourdough flavor you’re after.
Shaping, Proofing, and Dough Readiness
Morning Routine: Preparing for Final Shaping
After a night of resting at room temperature, your dough will be airy, bubbly, and noticeably expanded. This is a clear sign that fermentation has worked well. It’s now time to move into the shaping phase, where the dough takes on its final form and undergoes its second rise.
Gently turn the dough out onto a lightly floured surface. You’ll notice it spreads out and relaxes due to its high hydration. That’s perfectly normal. Handle it carefully to avoid deflating the built-up gas that contributes to an open crumb.
Creating a Tight Round Shape
Start by taking one edge of the dough and folding it toward the center. Continue this motion from different sides, layering the dough into itself. The goal is to form a rough round.
Once the dough is folded inward from all sides, flip it seam-side down. Cup your hands around the dough and pull it gently toward you on the countertop. Your pinky fingers should act as anchors. This motion builds surface tension, which is essential for a strong oven spring. Rotate and repeat three to four times until the dough holds a firm ball shape. Don’t rush this part. A well-shaped loaf bakes evenly and rises beautifully.
Preparing the Banneton for Proofing
Dust a proofing basket (banneton) generously with rice flour. Rice flour is ideal because it prevents sticking and allows the dough to release easily when it’s time to bake. Carefully transfer the shaped dough, seam side down, into the banneton.
Cover the entire basket with a plastic bag or towel to retain moisture and allow the dough to rest undisturbed. Let it proof at room temperature for 1 to 4 hours, depending on how warm your kitchen is. Warmer temperatures accelerate proofing, while cooler temps extend it.
The Finger Dent Test: Is It Ready?
The most reliable way to tell if your dough is ready to bake is the poke test. Lightly flour a finger and press it about ½ inch into the surface of the dough. If the dent springs back slowly and doesn’t fully disappear, the dough is fully proofed and ready for the oven. If it bounces back immediately, give it more time.
Avoid overproofing. If the dough becomes too airy and loses structure, it may collapse during baking and result in a flat loaf. Keep checking every 30 minutes after the first hour to stay on track.
Chilling Option (Optional)
For improved scoring and oven spring, some bakers prefer to refrigerate the dough for 1 to 12 hours before baking. This is optional but can help create a crispier crust and more pronounced scoring patterns. If using this cold-proof method, bake the dough directly from the refrigerator without letting it warm up.
With your dough perfectly proofed and shaped, it’s time to bring it all home in the oven.
Baking Your No-Knead Sourdough to Perfection
Preheating the Dutch Oven
A proper sourdough loaf needs intense, even heat to rise rapidly and form a crisp crust. For this, you’ll use a Dutch oven, which traps steam inside and mimics a commercial bread oven. About 30 minutes before you plan to bake, preheat your oven to 475ºF, placing the empty Dutch oven (with its lid) on the center rack.
This step is essential. A cold Dutch oven will not give the same results—the high heat creates the steam burst that contributes to a well-risen loaf with a golden crust.
Transferring and Scoring the Dough
Once your Dutch oven is fully preheated, it’s time to transfer the dough. If you proofed your dough in the banneton, invert it onto a piece of parchment paper for easier handling. This makes transferring to the Dutch oven much safer and helps keep the loaf’s shape intact.
Use a sharp bread lame or serrated knife to score the top of the dough. Scoring isn’t just decorative—it allows steam to escape and guides how the loaf expands in the oven. A simple straight line or a cross works well. Keep the cuts shallow but firm, at about a quarter-inch deep.
Carefully remove the Dutch oven from the oven, using oven mitts at all times. Take off the lid, lower the dough into the pot by holding the corners of the parchment paper, and cover immediately.
Baking Times and Monitoring the Crust
Place the covered Dutch oven back in the oven and bake covered for 30 minutes. This allows the bread to steam and expand. After 30 minutes, remove the lid and continue baking for 20 to 25 more minutes, depending on how dark and crusty you want your loaf.
Keep a close eye during the final 10 minutes. Some ovens run hot, and the crust can quickly go from golden brown to overly dark. You’re aiming for a deep golden color with a few darker spots that signal proper caramelization.
Finishing Touch: Cooling the Loaf
When baking is complete, remove the Dutch oven from the oven and carefully tilt the bread onto a wire rack. Let the loaf cool for at least 20 minutes before slicing. Cutting into a hot loaf can ruin its texture, releasing steam and causing a gummy crumb.
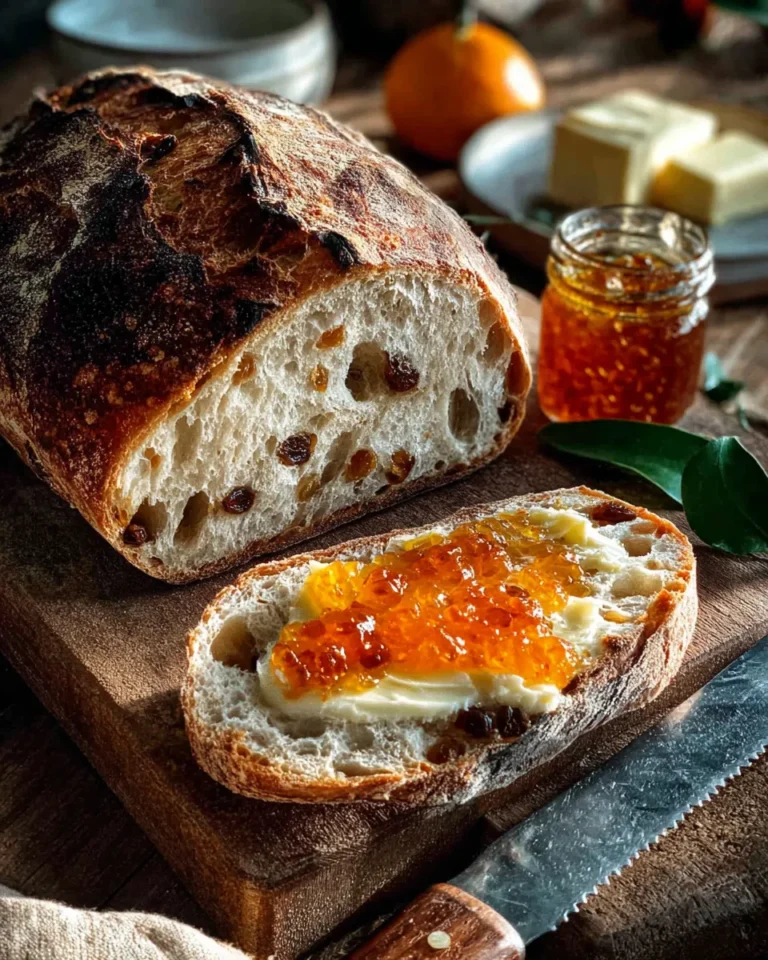
The cooling process allows the interior to set and the flavor to finish developing. Patience pays off here. A fully cooled loaf will slice beautifully, revealing an open, chewy crumb dotted with sweet raisins and zesty flecks of orange.
Slicing, Serving, and Storing Your Orange-Raisin Sourdough
How to Slice Your Loaf the Right Way
Once your bread has cooled completely, it’s time to slice into it. Use a serrated bread knife and a gentle sawing motion to avoid tearing the crust or compressing the airy crumb inside.
Start by cutting from the middle to get symmetrical slices or from one end if you prefer smaller portions. Thanks to the slow fermentation and high hydration, the interior will be moist and open, with sweet bursts of raisin and aromatic citrus running through the crumb.
Be prepared for a crunchy, caramel-colored crust that contrasts beautifully with the soft inside. This texture difference is one of the joys of homemade sourdough—something store-bought bread often lacks.
Serving Ideas for Any Time of Day
This loaf stands beautifully on its own. Serve it toasted with a touch of butter or a drizzle of honey for breakfast. It also works well with nut butters, fruit preserves, or a dollop of Greek yogurt.
At lunch, you can use it for open-faced sandwiches with fresh fruits or cheese alternatives. It’s a naturally sweet bread, so pairing it with savory options like avocado, cucumber slices, or roasted vegetables offers a great contrast.
This bread also makes excellent French toast or bread pudding thanks to its subtle sweetness and hearty texture. Cube and dry the leftovers for homemade croutons or breadcrumbs that add a citrusy twist to your dishes.
How to Store It Properly
To keep your bread fresh, let it cool completely, then wrap it loosely in a clean kitchen towel or place it in a paper bag. Store it at room temperature and consume within 2 to 3 days for the best taste and texture.
Avoid storing sourdough in plastic bags, as this traps moisture and softens the crust. If you must store it longer, freeze the bread. Slice it first, then wrap individual slices in parchment paper and place them in a freezer-safe bag. They’ll keep for up to three months and can be toasted straight from the freezer.
Refreshing Your Loaf After Day Two
After a couple of days, if the crust softens, you can refresh it in the oven. Preheat to 350°F, lightly mist the loaf with water, and bake it for 10 minutes. The crust will crisp up again, and the interior will warm without drying out.
This trick is especially helpful if you’re serving guests and want to give your sourdough that just-baked feel.
Conclusion: Why This Orange-Raisin No-Knead Sourdough Recipe Works
With minimal active work and no kneading, this orange-raisin sourdough offers both convenience and sophistication. The natural fermentation gives the bread its unmistakable tang, while the raisins add sweetness and the orange peel delivers bursts of bright flavor.
Using high hydration and slow fermentation, the loaf achieves an airy, open crumb and a crust that crackles. The no-knead method allows even beginners to get professional results without stress. With just a few ingredients and some patience, you can create a rustic, beautiful loaf that turns an ordinary day into something special.
Whether you’re new to sourdough or looking to elevate your baking, this recipe offers the perfect blend of approachability and artisan quality. Keep baking, keep experimenting, and enjoy every golden slice.


