Making pizza at home can be an incredible experience, especially when you’re working with a high-temperature pizza oven like an Ooni. But the secret to truly great pizza starts with one thing: the dough. A perfect crust that’s light, chewy, and crisp is all about technique, ingredients, and timing. That’s exactly what this Ooni pizza dough recipe is all about. We’ll walk you through the essential steps to make foolproof pizza dough from scratch that works beautifully in high-heat ovens.
In this article, you’ll learn everything you need to know about creating the perfect pizza base. We’ll cover the key ingredients, techniques for kneading and fermenting, how to shape and stretch your dough like a pro, and tips for baking your pizza to perfection. Whether you’re new to pizza ovens or looking to upgrade your crust game, this guide will help you master the Ooni pizza dough recipe once and for all.
Essential Ingredients for Perfect Ooni Pizza Dough
What Makes Ooni Pizza Dough Different?
Ooni pizza ovens cook at much higher temperatures than regular home ovens, often reaching 900°F. This intense heat cooks pizza in as little as 90 seconds. But this speed demands dough that’s specifically formulated to hold up. Unlike thicker doughs made for conventional ovens, Ooni dough should be light, airy, and capable of cooking fast without becoming dense or underdone. It also needs a high hydration level for proper stretch and crisping.
Flour Selection: Tipo 00 vs All-Purpose
The flour you choose makes a big difference. For traditional Neapolitan-style pizza, Tipo 00 flour is ideal. It’s finely ground, low in protein, and makes dough that’s soft yet stretchy. However, all-purpose flour can work just as well if that’s what you have. It may yield a slightly chewier crust, but still performs wonderfully in an Ooni oven. Both options give you flexibility without sacrificing quality.
Yeast and Salt Ratios for the Best Rise
Yeast is responsible for fermentation, giving the dough its rise and flavor. In this recipe, 8 grams of instant or active dry yeast is used to activate the fermentation quickly. Salt is equally crucial, not only for taste but also for controlling yeast activity. 7 grams of kosher salt balances the flavor while keeping the yeast in check during the rise.
Water and Oil: Hydration for Stretch and Flavor
A higher water content helps create that classic airy, blistered texture in your crust. This recipe calls for 310 grams of warm water, about 62% hydration. Add 13 grams of olive oil, which softens the dough, adds subtle flavor, and helps with the dough’s elasticity. The warmth of the water also helps activate the yeast and makes kneading easier.
Semolina or Cornmeal: The Secret to Smooth Transfers
Using semolina flour or cornmeal to dust your pizza peel is an underrated trick. These coarse flours prevent the dough from sticking and allow a smooth transfer to the pizza oven. They also add a touch of crunch to the bottom of your crust.

Ooni Pizza Dough Recipe (for Pizza Ovens!)
- Total Time: 1 hour 2 minutes
- Yield: 3 medium pizzas
- Diet: Vegetarian
Description
A simple, foolproof Ooni pizza dough recipe designed specifically for high-heat pizza ovens. Perfectly crisp on the outside and chewy on the inside.
Ingredients
500 grams Tipo 00 or all-purpose flour (3 ⅓ cups)
8 grams instant or active dry yeast (2 teaspoons)
7 grams kosher salt (1 teaspoon)
310 grams warm water (1 ¼ cups + 1 tablespoon)
13 grams olive oil (1 tablespoon)
Semolina flour or cornmeal, for dusting
Instructions
1. In a large bowl, combine flour, salt, and yeast. Stir to combine.
2. Add warm water and olive oil. Mix until a shaggy dough forms.
3. Transfer to a floured surface and knead for 8 minutes, or use a stand mixer with dough hook on medium-low speed.
4. Divide the dough into 3 equal portions and shape into smooth balls.
5. Lightly oil each dough ball, cover with a damp towel, and let rise for 45 to 60 minutes until doubled in size.
6. (Optional) For best flavor, store dough in airtight containers in the fridge for 2 to 3 days.
7. When ready to use, remove dough and let come to room temperature for 30 to 45 minutes before shaping.
8. Preheat your Ooni pizza oven for 20 minutes until the stone reaches 750°F to 850°F.
9. Stretch dough into an 11-inch circle using hands and knuckles.
10. Dust pizza peel with semolina or cornmeal. Transfer stretched dough to peel.
11. Add toppings and slide pizza into the oven. Bake for 1 to 2 minutes, rotating as needed.
12. Remove, cool for 1 minute, slice, and serve hot.
Notes
You can use all-purpose flour instead of Tipo 00 with slightly chewier results.
Cold fermentation for up to 3 days improves flavor and texture significantly.
To freeze, store dough balls in oiled freezer bags and thaw overnight in the fridge before use.
- Prep Time: 1 hour
- Cook Time: 2 minutes
- Method: Pizza Oven
- Cuisine: Italian
Kneading and Dough Development Techniques
Mixing the Dough: The First Step Toward Structure
Before the dough starts to rise, it has to be mixed correctly. This begins by combining flour, salt, and yeast in a large bowl or a stand mixer bowl. Mixing the dry ingredients first ensures even distribution. Once that’s done, you’ll add warm water and olive oil, which will begin to hydrate the flour and activate the yeast. Use a wooden spoon or your hands to bring the dough together until it forms a shaggy, sticky mass.
At this point, the dough doesn’t look impressive, but it’s starting the transformation from simple ingredients to a smooth, elastic base. If using a stand mixer, attach the dough hook for the kneading phase. If working by hand, lightly flour your surface and get ready to knead.
Hand Kneading: Building Gluten for Chewiness
Kneading is what strengthens the dough’s gluten structure, which is essential for stretchiness and chew. To knead by hand, press the dough away from you using the base of your palm, then fold it back over itself and repeat. Continue this rhythmic motion for 8 full minutes. Don’t rush this part. As the dough develops, it will become smoother, more elastic, and less sticky. If it sticks too much, dust with a small amount of flour, but avoid adding too much, which can dry the dough out.
You’ll know you’re done when the dough forms a soft, supple ball that springs back when gently poked.
Using a Stand Mixer: Faster, Consistent Results
If you’re short on time or prefer convenience, a stand mixer is your best friend. Attach the dough hook and knead the dough on medium-low speed for about 8 minutes. The stand mixer does a great job of developing gluten while keeping the dough uniform. It should clean the sides of the bowl and form a cohesive ball once it’s ready.
Whether by hand or mixer, you’re aiming for a dough that’s smooth, elastic, and just slightly tacky.
The First Rise: Resting the Dough for Better Texture
Once kneaded, divide the dough into three equal parts. Each part will make one medium pizza. Shape each portion into a ball or boule by tucking the edges underneath and creating surface tension on top. This helps it hold its shape and rise properly.
Place each dough ball on a lightly floured surface. Rub a little olive oil on top to keep it moist, then cover with a damp towel. Let them rise for 45 to 60 minutes, or until they double in size. This step is crucial for developing the dough’s structure and airiness.
If you’re not baking immediately, there’s a better option coming next — cold fermentation.
Cold Fermentation and Storage Options
Why Cold Fermentation Matters for Flavor
While your dough is ready to use after the initial rise, you’ll get a deeper, more developed flavor by letting it rest in the fridge for a couple of days. This method is called cold fermentation, and it allows the yeast to work slowly, unlocking subtle nutty and tangy notes that you just can’t get with a quick rise.
During this period, enzymes break down starches into sugars, which also helps the crust brown beautifully in your Ooni oven. It’s a small step with a big payoff — the difference between decent homemade dough and the kind of pizza that rivals your favorite artisan pizzeria.
How to Store Pizza Dough in the Fridge
After the first rise, gently place each dough ball into its own sealed container. Choose containers that give the dough room to expand, as it will continue to grow slowly in the cold. Lightly oil the inside of the container or the dough surface to prevent sticking.
Store the dough in the refrigerator for 2 to 3 days. That’s the sweet spot for flavor without letting the dough degrade. If you don’t plan to use it within that timeframe, freezing is also an option.
Freezing and Thawing Tips for Long-Term Storage
To freeze, place the dough balls into lightly oiled freezer bags. Squeeze out the air, seal the bags, and freeze them flat. Pizza dough can be stored in the freezer for up to 3 months.
When you’re ready to use frozen dough, transfer it to the refrigerator the night before, allowing it to thaw gradually. Then, follow the same day-of-prep as refrigerated dough, giving it time to come to room temperature before stretching.
Getting Dough Ready After Refrigeration
Cold dough is firm and tight, which makes stretching difficult if not handled properly. Take the dough out of the refrigerator and set it on a floured surface. Cover it with a towel and let it sit for 30 to 45 minutes. This rest period allows the gluten to relax and the dough to become pliable again. Once it feels soft and airy, it’s ready to shape.
Be patient here — working with dough that’s too cold will only cause frustration, and it won’t stretch evenly.
Shaping and Stretching Dough for Ooni Ovens
Proper Dough Handling Before Shaping
Once your dough is rested and at room temperature, it’s time to shape it. But how you handle it from this point forward makes a huge difference. Always avoid using a rolling pin. It flattens the air bubbles you’ve carefully developed during fermentation. These bubbles are what give the crust its light, airy texture once baked in a high-heat pizza oven.
Dust your work surface lightly with flour and handle the dough gently. You want to preserve the structure, not crush it.
Initial Pressing and Stretching
Begin by placing the dough ball on your floured surface. Using your fingertips, gently press it into a rough 8-inch circle. Flip it a few times to keep it evenly floured and prevent sticking. Press from the center outward, leaving a slightly thicker border. This creates a natural crust, or cornicione, when baked.
This stage helps establish the foundation before stretching it further.
Gravity-Stretching Technique
Once your dough is pressed into a rough circle, pick it up and rest it over the knuckles of both hands. Don’t stretch the dough with your fingers, just gently rotate it and let gravity do the work. Rotate slowly, letting the dough stretch evenly into a 10 to 11-inch round. If you feel resistance, set the dough down and let it rest for a few minutes — then continue.
Avoid tugging or tearing. If a hole appears, pinch the dough back together gently and let it rest again before continuing.
Troubleshooting Sticky or Stubborn Dough
If your dough feels too sticky to work with, sprinkle a bit of flour on your hands and the surface. A small amount goes a long way. On the flip side, if the dough is too stiff and resistant, it needs more rest time. Never force it. Stretching tight dough leads to tearing and uneven thickness.
Your dough should now be an evenly stretched circle, thin in the center with a puffy outer rim — ready for toppings.
Prepping the Pizza Peel for a Smooth Transfer
Before transferring your stretched dough, dust your stainless steel pizza peel generously with semolina flour or cornmeal. This step is crucial for an easy, seamless slide into the oven. Carefully lay your dough onto the peel and give it a gentle shake to ensure it’s not sticking. If it doesn’t slide easily, lift a corner and dust a bit more underneath.
From here, it’s time to move quickly to toppings and baking. Letting the dough sit on the peel too long can cause it to stick, making the transfer frustrating.
Topping and Baking Pizza in the Ooni Oven
Preheating the Ooni for Optimal Results
A proper preheat is non-negotiable when using your Ooni. These ovens are designed to mimic the intense heat of traditional wood-fired ovens, which means you need to preheat your Ooni for at least 20 minutes. The goal is to get the stone surface around 750°F to 850°F. If it’s too cool, your crust won’t puff or cook through properly.
Use an infrared thermometer to measure the stone’s temperature. This gives you a more accurate reading than relying on time alone. Once the heat is consistent across the surface, you’re ready to bake.
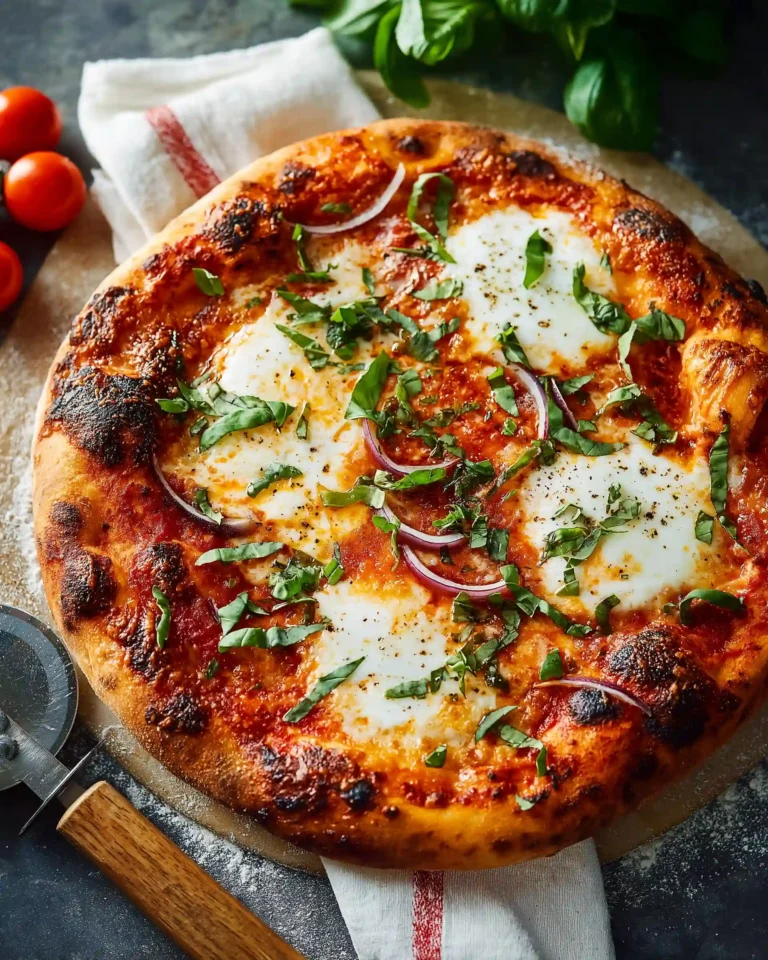
Topping Your Pizza the Right Way
Less is more when it comes to toppings in a high-heat oven. Use a light hand, especially with wet ingredients like sauce or fresh vegetables. Too much moisture can make the dough soggy and prevent crisping. Start with a thin layer of sauce, followed by a modest amount of cheese, then any additional toppings.
Choose ingredients that cook quickly or are already pre-cooked, since the pizza itself will be done in about 90 seconds to 2 minutes. Arrange toppings evenly so they cook and melt uniformly under that intense heat.
Transferring Pizza to the Oven Without Mistakes
When the Ooni is hot and your pizza is topped, gently shake the peel to ensure the dough isn’t stuck. This check is critical. If it’s stuck, lift the stuck areas and sprinkle more semolina or cornmeal.
Open the oven, and in one smooth motion, slide the pizza off the peel onto the stone. Pull the peel straight back quickly and confidently — hesitation can fold the dough or cause a misfire.
Once it’s on the stone, rotate the pizza every 20 to 30 seconds using a turning peel to avoid burning and ensure even cooking.
Baking Time and Visual Cues
In an Ooni oven, pizza cooks fast. Watch closely. Within the first 30 seconds, you’ll start seeing bubbles on the crust. After about 60 seconds, begin checking the bottom of the crust for charring. Use a turning peel to rotate the pizza so every edge hits the hot zone equally.
Look for these signs of readiness:
- Cheese is melted and bubbling
- Crust is golden with leopard-like charring
- Bottom is crispy but not burnt
Resting, Slicing, and Serving
Once the pizza is done, remove it with your peel and set it on a cutting board. Let it rest for about one minute before slicing. This short pause allows the cheese to set slightly, which prevents it from sliding off when cut.
Use a sharp pizza cutter or rocking blade to slice cleanly. Serve immediately while the crust is hot and crisp, and the flavors are at their peak.
Conclusion: Mastering the Ooni Pizza Dough Recipe at Home
Creating the perfect pizza at home starts with the right dough, and this Ooni pizza dough recipe is designed to deliver incredible results in high-heat ovens every time. From selecting high-quality flour to mastering the kneading process, embracing cold fermentation, and properly shaping and baking, each step plays a critical role in building that airy, chewy, crisp crust you crave.
With a little patience, the right technique, and some simple ingredients, you’ll be pulling piping-hot pizzas from your Ooni oven that rival what you’d get at an authentic Italian pizzeria. Whether you’re entertaining guests or enjoying a quiet dinner with family, nothing beats the satisfaction of serving up your own handcrafted pizzas.
Make this recipe your go-to and experiment with toppings, hydration tweaks, or fermentation times. Once you get comfortable, you’ll see that this dough is as versatile as it is delicious.


