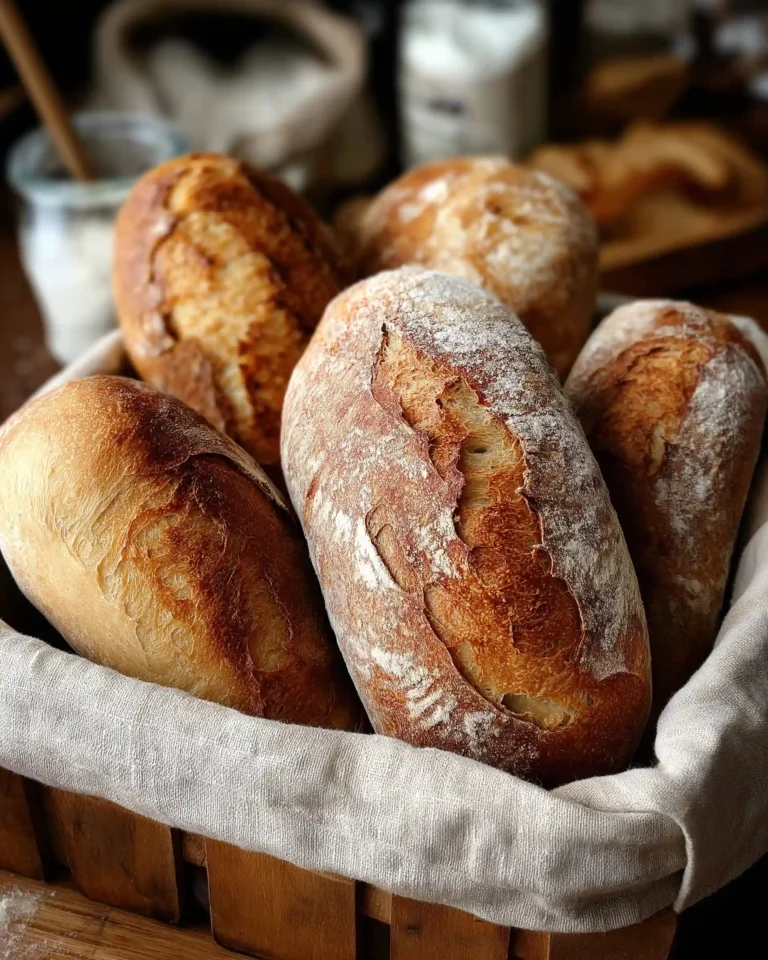
Nothing compares to the aroma of freshly baked Italian bread wafting through your kitchen. If you’ve ever dreamed of making rustic, bakery-style panini bread at home without all the kneading and mess, you’re in the right place. This No Knead Italian Panini Bread Recipe is as simple as it gets. With only a few ingredients, zero kneading, and a bit of patience, you’ll be rewarded with golden, airy panini rolls that are perfect for any sandwich or enjoyed on their own. Whether you’re a seasoned home baker or a beginner in the kitchen, this guide walks you through the process step-by-step to ensure success every time. In this article, we’ll cover how to mix, rise, shape, and bake your panini to perfection, along with useful tips, variations, storage ideas, and more.
Understanding No Knead Panini Bread Dough
What Makes No Knead Bread Different?
No knead dough relies on time instead of labor. Unlike traditional bread recipes that require stretching and folding to build gluten structure, this technique uses long fermentation at room temperature to develop flavor and elasticity. By simply mixing the ingredients and letting them rest, the dough becomes light and chewy with a crisp outer crust.
This method is ideal for anyone short on time or looking for a low-effort way to create authentic Italian-style bread. The hands-off nature makes it especially attractive for home bakers who want to fit bread-making into a busy schedule.
Ingredients Breakdown and Their Roles
- All-purpose flour (3 cups): The base of the dough, providing structure. For a slightly more rustic texture, you can substitute up to 1 cup with whole wheat flour.
- Active dry yeast (1 tsp): A small amount is enough, as the long rise gives it plenty of time to do its work.
- Water (1½ cups, lukewarm): Activates the yeast and hydrates the flour. Lukewarm water, not hot, is essential to avoid killing the yeast.
- Salt (1½ tsp): Enhances flavor and slows down the fermentation slightly for better structure.
- Olive oil (1 tbsp): Adds flavor and a tender texture to the bread.
Each ingredient has its purpose, and together they form a dough that is flavorful, light, and just sticky enough to yield a beautiful, airy crumb.
Why Hydration Matters
One of the keys to successful no knead bread is the high hydration level. This dough is very wet and shaggy, which might seem unusual at first, but it’s essential. The moisture helps gluten strands develop slowly and gives your panini a classic Italian open-crumb structure. The result is a bread that’s soft inside with a lightly crisp crust.
Handling this kind of dough takes a bit of care, but with a well-floured surface and a gentle touch, you’ll master it in no time.
Print
No Knead Italian Panini Bread Recipe
- Total Time: 1 day 2 hours 30 minutes
- Yield: 6 panini
- Diet: Vegetarian
Description
A simple, no knead Italian panini bread recipe that creates rustic, golden rolls with a crisp crust and tender crumb—perfect for sandwiches or eating plain.
Ingredients
3 cups all-purpose flour (plus more for handling)
1 tsp active dry yeast
1½ cups lukewarm water
1½ tsp salt
1 tbsp olive oil
Instructions
1. In a large bowl, stir together flour and yeast using a wooden spoon.
2. Add lukewarm water and mix until combined.
3. Stir in salt, then olive oil. The dough will be wet and shaggy.
4. Cover and let rise at room temperature for 6 to 24 hours until bubbly.
5. Flour your hands and gently shape the dough into a ball. Let rest in the bowl for 1 hour.
6. Transfer to a floured surface, divide into 6 pieces, and shape into balls.
7. Rest the dough balls for 30 minutes, then flatten gently into 5-inch ovals.
8. Roll each into a cylinder and place on a baking sheet. Cover and let rise for 1 hour.
9. Preheat oven to 425°F. Place a pan of water on the lowest oven rack.
10. Score each panini lightly on top. Bake for 25 minutes until golden.
11. Let cool completely before serving.
Notes
Substitute up to 1 cup of flour with whole wheat for a nuttier taste.
Make round panini instead of rolls by shaping into balls and scoring before baking.
Divide dough into 8 pieces for smaller panini or 4 pieces for large sub rolls.
Store at room temperature for up to 2 days, well-wrapped.
Freeze for up to 1 month in airtight containers. Reheat in the oven before serving.
- Prep Time: 30 minutes
- Cook Time: 25 minutes
- Category: Bread
- Method: Baking
- Cuisine: Italian
Mixing and First Rise – Building Flavor Naturally
Step-by-Step: Mixing the Dough with No Kneading
Creating the perfect no knead Italian panini bread dough begins with a simple but essential mixing process. Start by combining 3 cups of all-purpose flour and 1 teaspoon of active dry yeast in a large bowl. Use a wooden spoon for this step—it’s sturdy and gives you good control over the mixture.
Slowly pour in 1½ cups of lukewarm water, stirring constantly to ensure the water gets evenly absorbed. As the dough starts to come together, you’ll notice it has a wet, shaggy look. This is normal and exactly what you want. Once all the water is incorporated, add 1½ teaspoons of salt and give it a good stir. Finally, mix in 1 tablespoon of olive oil. The dough will remain sticky and soft, but don’t worry—this is where the magic of time steps in.
The Importance of a Long First Rise
The first rise is where the dough develops its characteristic flavor, texture, and elasticity. Cover the bowl with a clean kitchen towel or plastic wrap, then let it sit at room temperature for a minimum of 6 hours, but ideally up to 24 hours. This extended resting period allows the yeast to work slowly and effectively.
As the hours pass, you’ll notice bubbles forming on the surface and throughout the dough. These bubbles are carbon dioxide created by the yeast, which helps the dough rise and creates a light, airy texture.
This natural fermentation also enhances the flavor. A slow rise at room temperature gives your bread deep, slightly tangy notes that make it stand out from store-bought options.
Handling the Dough After the Rise
Once the dough has rested and is bubbly, it’s time to move it. Flour your hands generously before lifting it—this dough is sticky. Gently pull the dough from the edges of the bowl and tuck it underneath to form a loose ball.
Do not knead. In fact, avoid working the dough too much at this stage. The goal is to preserve the gas bubbles that have formed, which will help give your panini that light, airy texture inside.
Place the ball back into the same bowl, cover it, and let it rest for another hour. This second rest is crucial. It allows the dough to relax and become easier to shape without tearing or deflating.
Why Resting Again Helps
Think of this step as letting the dough catch its breath. That short hour-long pause improves the elasticity and makes it much easier to shape into individual panini later. It also ensures the dough holds its shape better during the final proof and baking.
With your base dough now perfectly developed, you’re one step closer to creating delicious homemade panini.
Shaping the Dough – Crafting Perfect Panini Rolls
Dividing the Dough with Precision and Care
After the dough has finished its second rest and become more manageable, it’s time to shape your panini. Begin by generously flouring a clean surface and gently dumping the dough onto it. The dough will still be sticky, so make sure your hands and tools are well-floured.
Use a bench scraper or a sharp knife to divide the dough into 6 equal pieces. You can eyeball the portions or use a kitchen scale for more accuracy. Each piece should weigh about 140 grams, which is ideal for traditional panini size.
Avoid pressing too hard or folding the dough at this stage. The goal is to preserve the air bubbles that have developed during fermentation.
Pre-Shaping into Balls
Once divided, lightly shape each portion into a ball by tucking the edges underneath. Don’t knead—just form the dough gently into rounds using the sides of your palms. Then, cover the dough balls with a clean towel and let them rest for 30 minutes.
This short resting period allows the gluten to relax again, making the next shaping step easier and preventing the dough from springing back or tearing.
Flatten and Roll: Classic Panini Shape
After the 30-minute rest, it’s time to shape each ball into its classic oval or cylinder form. Gently press down on each ball to flatten it into a 5-inch circle or oval. Be careful not to press too hard—you don’t want to deflate the dough.
Next, roll each flattened piece into a cylinder starting from one edge and gently tucking it as you go. Place the shaped panini rolls onto a parchment-lined or lightly oiled baking sheet, seam side down. Give them enough space to rise without touching each other.
Final Proof for Structure and Volume
Cover the rolls with a cloth and let them rest again for 1 hour. This final rise helps the dough puff up and develop volume. During this time, the shaped rolls will relax into their final form, and the yeast will continue its slow fermentation, improving the bread’s flavor and structure.
This part of the process may feel slow, but it’s the secret to achieving artisan-style panini rolls that look and taste like they came from a traditional Italian bakery.
Scoring and Baking – From Dough to Golden Panini
Preheating and Setting Up the Oven Environment
Before baking your no knead Italian panini bread, it’s essential to prepare your oven for an optimal baking environment. Start by preheating the oven to 425°F. A hot oven is key to achieving a crisp, golden crust and properly baked interior.
Next, place a pan of water on the lowest rack. This step creates steam in the oven, which is crucial for a beautiful crust and keeping the surface of the panini soft enough to expand during baking. Position your middle oven rack just above this pan. That’s where the baking tray with your panini will go.
Steam is often the secret weapon in professional bakeries. It delays crust formation during the early stages of baking, allowing the panini to rise fully and develop a lovely chewy exterior.
Scoring for Shape and Expansion
Once your panini rolls have finished their final one-hour rise, it’s time to score them. Scoring is more than just a decorative touch—it helps control how the dough expands during baking. Without scoring, the bread may burst unpredictably.
Using a sharp knife or a bread lame, make a shallow, clean cut along the top of each roll. Do not cut too deep. A light touch is all you need to guide the expansion and create a traditional look. Deep cuts can deflate the dough and ruin its airy texture.
Keep the cut straight or slightly diagonal across the top. You’ll see the bread bloom along this line in the oven, creating a rustic finish that’s visually inviting.
Baking to a Golden Finish
Place the scored rolls into the hot oven on the middle rack. Bake for about 25 minutes, keeping an eye on them as they brown. You’re looking for a golden brown top and a slightly darker, golden underside.
Because each oven is different, start checking the panini at the 22-minute mark. They should sound hollow when tapped on the bottom—a classic sign that they’re fully baked inside.
If needed, rotate the tray during the last 5 minutes of baking to ensure even browning, especially if your oven has hot spots.
Cooling is Key
Once baked, remove the panini from the oven and transfer them to a wire rack to cool completely. This step is often rushed, but it’s crucial. Cooling allows the interior of the bread to set properly, ensuring the texture stays light and chewy instead of gummy.
Resist the urge to cut them while they’re still warm. Letting them cool also prevents excess moisture from making the crust soft. When fully cooled, you’ll have golden, crusty panini with a tender inside and subtle olive oil aroma.
Panini Variations and Customizations
Adjusting the Flour: Going Whole Wheat or Multigrain
While the original no knead Italian panini bread recipe uses all-purpose flour for a soft, neutral base, you can tweak it to suit different preferences or nutritional needs. For a nuttier flavor and extra fiber, replace up to 1 cup of white flour with whole wheat flour. This small adjustment will add a deeper, heartier taste while still keeping the texture light and tender.
Want a more complex crumb? Consider adding a tablespoon of oat flour, rye flour, or even a few teaspoons of flaxseed meal for extra texture and subtle earthy notes. Just remember, these additions may absorb more water, so you might need to slightly increase the hydration if the dough feels too dry.
Shape It Your Way: Rounds, Rolls, or Sub Rolls
Traditional panini are oval or cylindrical, but the dough is versatile enough to accommodate other shapes. Here are a few popular options:
- Round Panini Rolls: Instead of shaping into ovals, simply let the dough balls rise as-is, score the tops, and bake. You’ll get soft, rustic buns that work well for sandwiches and sliders.
- Mini Panini (8 pieces): For smaller portions, divide the dough into 8 equal parts instead of 6. These are perfect for kids’ lunches or party trays.
- Submarine Rolls (4 pieces): Need larger, hoagie-style buns? Divide the dough into 4 parts and shape each into a longer roll. They bake up sturdy yet soft, ideal for loading with hearty sandwich fillings.
The beauty of this dough is its flexibility. Once you understand the core method, you can easily adjust the size and shape without compromising texture.
Flavor Twists: Subtle Enhancements
Though the recipe is beautifully simple, you can infuse the dough with mild flavors that complement your fillings. Try adding 1 teaspoon of dried herbs like oregano, basil, or rosemary to the dry ingredients during mixing. You could also incorporate 1 clove of finely minced garlic for a hint of savory depth.
Keep flavor additions modest. The goal is to let the bread remain neutral enough to pair with a variety of ingredients while giving it just a little personal touch.
Panini for Every Occasion
This bread shines on its own, but it becomes truly exceptional as the base for different sandwich styles:
- Vegetarian Delight: Fill with grilled zucchini, eggplant, bell peppers, and a smear of pesto or herbed cream cheese.
- Classic Italian Sandwich: Use with mozzarella, tomato, and fresh basil for a caprese-inspired lunch.
- Toasted Panini: These rolls crisp beautifully in a sandwich press or grill pan—perfect for a warm, melty sandwich.
Because the crust is thin and crisp while the inside remains soft, these panini are as great with hot fillings as they are with cold.
Storing and Freezing Panini Bread for Long-Lasting Freshness
Short-Term Storage: Keeping Bread Fresh for Days
Once your no knead Italian panini bread has cooled completely, proper storage is key to maintaining its delightful texture and flavor. For up to 2 days, store the rolls at room temperature, wrapped tightly in a plastic bag, bread box, or cloth bread bag. Keeping air exposure to a minimum helps prevent the crust from going stale or too soft.
Avoid storing the bread in the refrigerator. While it might seem like a safe place, cold air actually speeds up the staling process for bread, causing it to dry out quickly and lose its fresh-baked aroma and chew.
If you notice the crust has softened too much after the first day, pop the rolls in a preheated 350°F oven for 5 to 7 minutes. This will refresh the crust and bring back that just-baked quality.
Freezing for Long-Term Use
These panini rolls freeze beautifully, making them a smart make-ahead option. Once the bread is completely cool:
- Wrap each roll tightly in plastic wrap or parchment paper.
- Place wrapped rolls in a freezer-safe bag or container. Label it with the date.
Stored this way, the bread will keep for up to 1 month without losing its quality. When ready to use, remove the desired number of rolls and thaw at room temperature.
To restore the crust’s crispness, reheat the thawed rolls in a 350°F oven for 8–10 minutes. The interior will stay moist while the outside turns golden and crackly again.
Best Practices for Freezing and Reheating
- Do not freeze warm bread: Always let it cool to avoid moisture buildup inside the bag, which leads to freezer burn.
- Avoid slicing before freezing: Keep the rolls whole to prevent air exposure inside the crumb.
- Flash freeze for better shape: If you’re freezing a large batch, freeze the panini on a tray for 1–2 hours before transferring to bags. This helps them keep their shape and avoids sticking.
When to Make and Freeze
These panini are a great option to make in bulk during a weekend and enjoy throughout the week. Because they hold up so well to freezing and reheating, they’re perfect for busy weekdays, meal prep, or when you want to whip up a last-minute sandwich without sacrificing quality.
With the dough’s no-fuss method and its excellent freezer performance, this recipe is not just easy—it’s incredibly practical.
Conclusion: Bringing Italian Panini Bread Into Your Everyday Life
Baking homemade bread doesn’t have to be complicated, and this no knead Italian panini bread recipe proves it. With just five everyday ingredients and some patient resting time, you can create artisan-style bread right from your kitchen without kneading, stand mixers, or specialty tools.
From mixing the shaggy dough to watching it bubble through a slow rise, from shaping soft rolls to scoring and baking them to golden perfection, every step is accessible to beginners and rewarding for experienced bakers. The results? Crusty, flavorful panini that are ideal for sandwiches, toasted creations, or simply enjoyed with a drizzle of olive oil.
This bread is more than a recipe—it’s a tool to elevate your meals. Whether you keep it classic or experiment with shapes and flavors, the dough’s versatility means it will quickly become your go-to for weeknight dinners, weekend brunches, and even make-ahead freezer prep.
Its light texture, crisp crust, and no-fuss process make this panini bread a standout. You’ll be surprised how something so simple can become such a staple in your kitchen.


