Making homemade bread doesn’t have to be complicated. If you’re someone who loves fresh bread but avoids baking because of the kneading, this No-Knead Honey Oat Bread is your perfect starting point. Designed for simplicity and flavor, this recipe uses basic pantry ingredients to produce a rustic, slightly sweet loaf with hearty oats and a soft interior.
This article dives deep into every essential part of creating the perfect no-knead honey oat bread. From understanding the role of each ingredient to the secret behind its slow fermentation, you’ll gain everything you need to make your own at home, even if you’ve never baked a loaf before. Along the way, we’ll cover preparation tips, yeast usage, shaping techniques, baking instructions, and even how to store or freeze your loaf for later enjoyment.
Understanding the Magic Behind No-Knead Honey Oat Bread
Why No-Knead Works So Well
No-knead bread takes the traditional approach of long fermentation to create gluten structure without physical kneading. This method relies on time instead of effort. When you allow the dough to ferment for 12 to 18 hours, gluten develops naturally. The result is a bread loaf with a chewy, tender crumb and a crusty exterior.
Unlike traditional kneaded bread, no-knead bread uses hydration and rest time to strengthen the dough. This technique is beginner-friendly and perfect for those who want hands-off baking that still delivers incredible texture and flavor.
Role of Honey and Oats in the Recipe
Honey isn’t just for sweetness here. It adds moisture, enhances the golden crust, and contributes a subtle depth of flavor that pairs beautifully with the nuttiness of oats. Since this recipe uses less honey than older versions, the bread is balanced, not overly sweet.
Oats, particularly old-fashioned or quick oats, introduce a rustic texture and fiber boost. They also help retain moisture in the loaf, giving you a longer-lasting softness. However, instant oats should be avoided, as they break down too easily and alter the consistency of the dough.
Choosing the Right Flour
For best results, bread flour is recommended. It contains more protein than all-purpose flour, which helps in building a sturdier structure that holds the loaf’s shape and rises better. That said, you can still use all-purpose flour in a pinch, but the loaf might turn out slightly softer.
Whole wheat flour can be added in moderation—about one cup in place of bread flour—to introduce a nutty, wholesome note. Going beyond this amount can make the bread too dense and tough to rise properly without adjustments.
Importance of Yeast and Proper Rise
Yeast is the essential rising agent in this no-knead recipe. Whether using active dry or instant yeast, it’s crucial to let the dough rise slowly over many hours to encourage the development of rich flavors and airy texture. Instant yeast speeds up the process slightly and is generally preferred for its reliability and consistency.
Make sure the water you use is around 70°F (21°C). Too warm or cold water can disturb yeast activity and affect the outcome. Room temperature is ideal for both mixing and proofing.
Cinnamon’s Subtle Touch
Though only a small amount is used, cinnamon subtly complements the oat and honey flavors. It’s not enough to dominate, but just right to add a gentle warmth that deepens the overall profile of the loaf.
Print
No-Knead Honey Oat Bread Recipe
- Total Time: 14 hours 30 minutes
- Yield: 1 loaf
- Diet: Vegetarian
Description
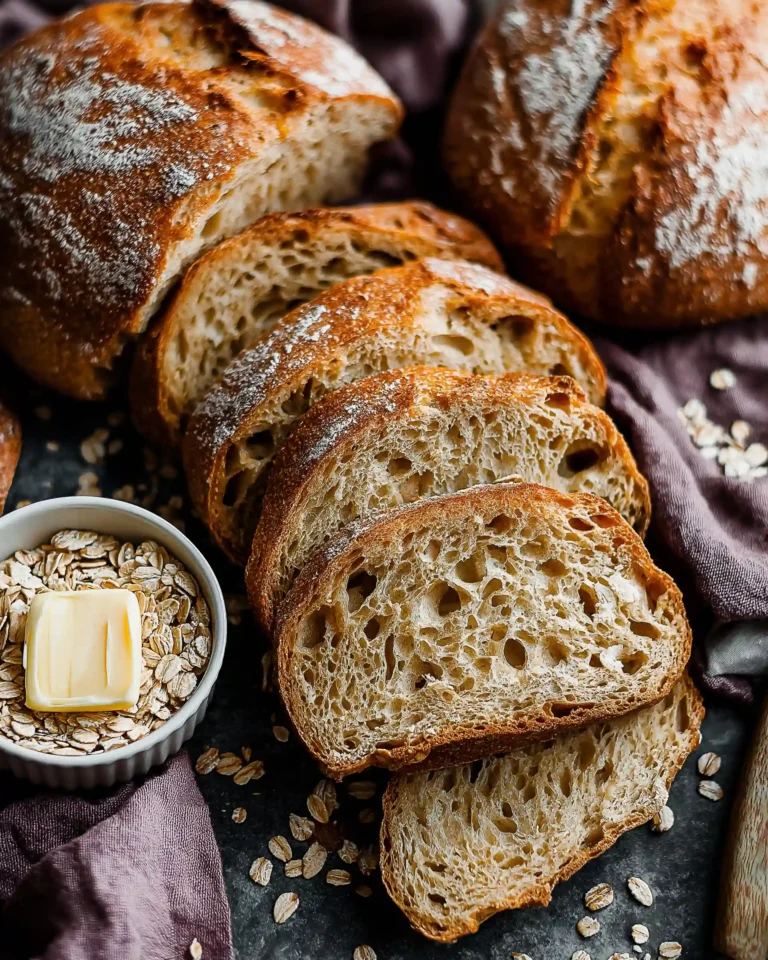
A no-knead honey oat bread with a soft crumb, golden crust, and subtle sweetness. This easy recipe requires no mixer or kneading, just time and patience for rich flavor and chewy texture.
Ingredients
3 cups + 2 Tablespoons (410g) bread flour, divided
1 cup (85g) old-fashioned oats or quick oats (not instant)
1 and 1/2 teaspoons (4g) instant or active dry yeast
1 and 1/2 teaspoons salt
1/2 teaspoon ground cinnamon
1 and 1/2 cups (360ml) water, around 70°F (21°C)
6 Tablespoons (128g) honey
2 Tablespoons (30ml) vegetable oil
Instructions
1. In a large ungreased bowl, whisk 3 cups of bread flour, oats, yeast, salt, and cinnamon.
2. In a separate bowl, whisk water, honey, and oil until combined.
3. Pour wet mixture into dry ingredients and stir gently until sticky dough forms.
4. Cover tightly and let rise at room temperature for 12 to 18 hours until doubled and bubbly.
5. Add remaining 2 tablespoons of bread flour, fold in gently, and shape into an 8×4 loaf.
6. Transfer to a greased 9×5-inch pan and score with a knife or bread lame.
7. Cover loosely and allow to rise again for 1 hour or until dough rises slightly above pan edge.
8. Preheat oven to 375°F (191°C).
9. Bake for 50–60 minutes, tenting with foil after 30 minutes to prevent over-browning.
10. Tap top or check center temperature (195°F/90°C) to confirm doneness.
11. Let cool in pan on wire rack for 15 minutes before slicing.
12. Store covered at room temperature for 3 days or refrigerate up to 10 days.
Notes
To freeze dough: Shape and place in disposable pan, cover well, freeze up to 3 months. Thaw at room temperature for 5 hours before baking.
To freeze baked bread: Cool completely, wrap tightly, and freeze for up to 3 months.
For topping: Optional egg white wash with oats, or cinnamon-sugar before baking.
This recipe was updated in 2022 to reduce honey and cinnamon and slightly increase yeast.
- Prep Time: 13 hours 20 minutes
- Cook Time: 55 minutes
- Method: Baking
- Cuisine: American
Mixing, Hydration, and First Rise – Building the Foundation
Combining the Ingredients the Right Way
Getting the mixture right from the start is crucial in no-knead bread baking. Start by whisking together 3 cups of bread flour, 1 cup of oats, 1½ teaspoons of yeast, 1½ teaspoons of salt, and ½ teaspoon of cinnamon in a large, ungreased mixing bowl. This dry mix sets the base for structure and flavor.
In a separate bowl or large measuring cup, combine 1½ cups of room temperature water, 6 tablespoons of honey, and 2 tablespoons of oil. Use a neutral oil like vegetable oil, which won’t interfere with the bread’s sweet, earthy flavor profile. Once the wet ingredients are fully blended, pour them into the dry mixture.
Using a wooden spoon or silicone spatula, gently fold the ingredients until just combined. The dough will be extremely sticky and wet—this is intentional. Avoid overworking it, as the fermentation process will take care of the gluten development.
Mastering Hydration for a Soft, Chewy Texture
The wet, sticky dough might seem wrong, especially to those used to traditional bread doughs, but this high hydration level is key to achieving the light and airy crumb typical of artisan loaves. Hydration also encourages a more open, irregular crumb with nice air pockets.
The dough should stick to the sides of the bowl and look shaggy, not smooth. Resist the urge to add more flour—stickiness is a sign that your dough is on track.
First Rise: The Importance of Patience
Cover the bowl tightly with plastic wrap or foil and let the dough rest at room temperature for 12 to 18 hours. This long rest period is where the magic happens. During this time, yeast ferments slowly, breaking down starches and sugars while building strength and complexity in flavor.
Don’t expect the dough to rise upward like a cake—it will mostly expand sideways, especially in a wide bowl. Some upward rise is fine, but the key indicator is the appearance of many air bubbles and a sticky, spongy surface.
Make sure to keep the bowl in a consistent, draft-free environment. Normal room temperatures work fine, typically between 68°F and 72°F.
Extending or Adjusting the Rise
If needed, you can place the dough in the refrigerator during this first rise. This is helpful if you’re planning ahead or need to delay baking. Refrigeration slows the fermentation process, giving you up to 18 hours of flexibility. Before shaping, bring it back to room temperature and allow an additional 4 to 6 hours to fully warm and rise.
This part of the process is forgiving, but it’s important not to overextend the fermentation. Going beyond 24 hours may cause the dough to over-proof, deflate, or develop an off taste.
Observing Key Signs of Readiness
Your dough is ready when:
- It has doubled in size or slightly more.
- You see numerous air bubbles on the surface and edges.
- It jiggles slightly when you move the bowl.
Avoid poking or deflating the dough at this point. You want to preserve those bubbles for the next step.
Shaping, Scoring, and Second Rise – Getting Ready to Bake
Light Handling Makes a Big Difference
After the first rise, your dough should be bubbly, airy, and very sticky. Now it’s time to gently prepare it for baking. Begin by sprinkling the remaining 2 tablespoons of bread flour over the surface of the dough. Use a spatula to lightly fold the flour into the dough while still in the bowl. This extra flour helps reduce the stickiness just enough for shaping.
Pour the dough onto a lightly floured work surface. Use floured hands to gently shape the dough into a loaf. Don’t over-handle or stretch the dough. A gentle press and tuck motion works best. You’re not kneading here—you’re guiding the dough into a rough 8×4-inch shape. The goal is to maintain the airy texture created during the first rise.
The Right Pan and Why It Matters
This dough needs support. That’s why a 9×5-inch greased loaf pan is essential. Because of the high hydration level, the dough won’t hold its shape if baked free-form on a baking sheet. The loaf pan helps maintain height, encourages even baking, and gives a more consistent final product.
After shaping, gently lift the dough and place it into the greased loaf pan. You may need to use a bench scraper or floured hands for easier transfer. Don’t worry if it looks uneven—this dough evens out during the second rise and baking.
Scoring the Dough: What, Why, and How
Scoring means making a shallow cut across the surface of the dough, which helps control how it expands during baking. Use a very sharp knife, bread lame, or even kitchen shears to make a single cut down the center or slightly off-center. The cut should be about ½ inch deep.
Scoring guides the bread’s expansion so it doesn’t tear unpredictably. This simple cut also gives a rustic, artisan look to the finished loaf.
Second Rise: The Final Proof
Once scored, loosely cover the loaf pan with plastic wrap or foil. Let it rest at room temperature for about 1 hour. During this time, the dough should puff up and rise slightly above the rim of the pan. It won’t double in size like it did during the first rise, but it should show visible signs of activity.
Keep the dough in a stable environment, away from cool drafts. If your room is cooler than average, give it an extra 10 to 15 minutes.
Optional Toppings for a Rustic Finish
If you’d like to add a topping, now is the time. For an oat topping, whisk 1 egg white with 1 tablespoon of water and gently brush it over the dough’s surface. Sprinkle with 2 tablespoons of oats. This helps oats stick and creates a beautiful finish, though it does add egg to the recipe.
For a lighter, sweet touch, you can skip the egg wash and instead sprinkle a cinnamon-sugar blend (1 tablespoon sugar mixed with ⅛ teaspoon cinnamon) just before baking.
Baking Your No-Knead Honey Oat Bread to Perfection
Preheating the Oven Correctly
As your dough completes its second rise, it’s time to preheat your oven. Set it to 375°F (191°C). Make sure the oven is fully heated before placing your loaf inside. A properly preheated oven ensures an immediate rise (oven spring) and helps form the loaf’s golden crust.
If you’re using an oven thermometer, double-check the internal temperature to guarantee accuracy. Oven temperatures can fluctuate, and even a small difference can affect baking results.
Getting the Timing Right
Place your risen loaf into the center rack of the oven and bake for 50 to 60 minutes. During baking, the top will begin to turn a deep golden brown around the 30-minute mark. At this point, lightly tent the loaf with aluminum foil to prevent over-browning and ensure the inside continues to cook evenly.
The baking time can vary slightly depending on your oven and the exact moisture level of your dough. Keep an eye on it, especially after 45 minutes.
Knowing When the Bread is Fully Baked
There are a couple of reliable methods to determine when your no-knead honey oat bread is done:
- Tap Test: Lightly tap the top of the loaf. If it sounds hollow, that’s a good sign.
- Internal Temperature: For a precise result, use an instant-read thermometer. The bread is done when the internal temperature reaches 195°F (90°C) at the center of the loaf.
Avoid underbaking, as the loaf can be gummy or doughy in the center. On the flip side, overbaking may cause it to dry out.
Cooling Is Not Optional
Once the bread is baked, remove it from the oven and place the pan on a wire rack. Let the loaf rest in the pan for at least 15 minutes. This allows steam to escape and the crumb to set properly. Removing it too early can cause it to collapse or become soggy.
If you prefer cleaner slices, allow the bread to cool completely before cutting. Use a serrated bread knife to avoid squashing the loaf.
Flavor and Texture After Baking
Expect a slightly chewy crust, a moist crumb, and a subtle sweetness from the honey. The oats lend a mild nutty undertone and pleasing texture. If you’ve added toppings like cinnamon-sugar or oats, they’ll be lightly toasted and aromatic.
This bread pairs well with spreads like butter, nut butter, or jam. It also works beautifully for sandwiches or simply served warm with your favorite soup or salad.
Storing, Freezing, and Making Ahead – Keep It Fresh Longer
How to Store No-Knead Honey Oat Bread Properly
To enjoy the best texture and flavor after baking, it’s important to store your bread correctly. Once your loaf is fully cooled, place it in an airtight container or wrap it tightly in plastic wrap or foil. This keeps the crust from becoming too hard and helps retain the soft, moist crumb inside.
- Room temperature: The bread stays fresh for up to 3 days when kept at room temperature. Store it in a dry, cool area—never in the fridge if you’re planning to eat it within this time, as refrigeration can dry out bread faster.
- Refrigerator storage: If you’re looking to keep it fresh beyond 3 days, place the loaf in the refrigerator, where it will last for up to 10 days. Be sure it’s well wrapped to prevent moisture loss and fridge odors.
Freezing Instructions for Dough and Baked Bread
The no-knead method is ideal for freezer-friendly prep. You can freeze both the shaped dough or the fully baked bread. Here’s how:
Freezing the Dough Before Baking
- Prepare the dough through shaping and scoring.
- Place the shaped dough in a greased disposable loaf pan.
- Wrap tightly with two layers of plastic wrap and a layer of foil.
- Freeze for up to 3 months.
When ready to bake: Let the frozen dough thaw at room temperature for about 5 hours. It should rise and come to room temp. Once slightly above the pan rim, bake as instructed.
Freezing the Baked Loaf
- Let the baked bread cool completely.
- Wrap the loaf or slices in plastic wrap, then place in a freezer bag or airtight container.
- Freeze for up to 3 months.
To serve: Thaw at room temperature or in the fridge overnight. You can reheat slices in a toaster or a full loaf in a 300°F oven for 10–15 minutes if you prefer a warm texture.
Make-Ahead Strategies for Busy Schedules
The long fermentation time in this recipe naturally supports make-ahead planning. Here’s how to adjust your baking schedule:
- Mix the dough in the evening, let it rise overnight, and bake the next day.
- Need more time? After mixing, place the dough in the refrigerator for up to 18 hours. Before shaping, bring the dough back to room temperature and let it sit for another 4 to 6 hours to continue rising.
Avoid extending these times too far. Over-proofing can lead to collapsed or dense bread. Stick within the recommended ranges for best results.
Tips for Maintaining Quality After Freezing
- Slice the bread before freezing, so you can take out only what you need.
- Always wrap the loaf tightly and use freezer-safe bags.
- Label with the freezing date to keep track.
Pro Tips, Baking Alternatives, and Troubleshooting
Pro Tips for the Best No-Knead Honey Oat Bread Every Time
Even a simple bread recipe can benefit from small tweaks and careful observations. Here are some expert-backed tips to elevate your results:
- Weigh your ingredients: For precision, use a kitchen scale. This avoids the common mistake of using too much flour.
- Don’t skip the resting periods: Each rise contributes to flavor and structure. Be patient, especially during the first rise.
- Use room temperature water: Too hot and it might kill the yeast. Too cold and the dough will take much longer to ferment.
- Flour your hands and surface: This helps manage the sticky dough without incorporating too much extra flour, which can make the bread dry.
- Score confidently: A deep, clean slash encourages controlled expansion during baking.
Alternative Baking Method: Dutch Oven
If you prefer an even more rustic style loaf with a crispier crust, baking in a Dutch oven is an excellent method.
Here’s how to adapt this recipe:
- After the first rise, shape the dough into a rough ball using floured hands.
- Place it on a large sheet of parchment paper.
- Let it rest while you preheat the Dutch oven to 425°F (218°C) for 30 minutes.
- Score the top of the dough with a sharp knife.
- Carefully place the dough (on the parchment) into the hot Dutch oven.
- Cover with lid and bake for 30 minutes, then remove lid and bake an additional 10 to 12 minutes.
- Cool on a wire rack for 30 minutes before slicing.
The Dutch oven traps steam, creating a beautiful golden crust while maintaining a tender interior.
Why This Dough Isn’t Free-Form Friendly
Due to its high moisture and low structure, this dough must be baked in a pan or Dutch oven. It lacks the stiffness to hold a free-form shape on a baking sheet. Skipping the pan results in a flat, spread-out loaf with uneven baking.
Stick to the loaf pan or Dutch oven for consistent success.
Common Issues and How to Fix Them
1. Bread Didn’t Rise Enough
- Check your yeast freshness.
- Make sure water wasn’t too hot.
- Allow enough time, especially during cooler weather.
2. Dough Is Too Sticky to Handle
- That’s normal, but a sprinkle of flour will help.
- Avoid adding too much or the bread may become dry.
3. Crust Is Too Hard or Thick
- Try tenting with foil sooner during baking.
- Shorten baking time by a few minutes.
4. Bread Is Too Dense
- Likely caused by under-proofing or expired yeast.
- Ensure dough nearly doubles during the first rise.
5. Bread Collapsed After Baking
- Could be over-proofed during the second rise.
- Always bake once dough is slightly above the pan rim.
With these adjustments and alternatives, you’ll be equipped to make no-knead honey oat bread that consistently delights.
Conclusion: Why No-Knead Honey Oat Bread Deserves a Spot in Your Baking Routine
There’s something incredibly rewarding about making bread from scratch, especially when it doesn’t require complicated techniques or special equipment. No-Knead Honey Oat Bread checks all the boxes for home bakers looking for ease, taste, and texture. It offers a warm, slightly sweet flavor, a tender crumb, and a beautiful golden crust—all with minimal effort.
Let’s recap the highlights:
- No kneading required: Save your arms and skip the mixer. This dough develops structure through time, not work.
- Simple, wholesome ingredients: Using pantry staples like bread flour, oats, and honey, this bread brings both nutrition and comfort to the table.
- Flexible rise time: Whether you bake the same day or plan ahead with overnight fermentation, the method adjusts to your schedule.
- Freezer-friendly: Make now, enjoy later. Store the dough or freeze the baked loaf for quick meals or snacks.
- Customizable baking methods: Use a loaf pan for a traditional sliceable bread or switch to a Dutch oven for an artisan-style crust.
Whether you’re new to baking or looking to simplify your routine, this recipe proves you don’t need complex steps to get delicious results. It’s rustic, reliable, and family-friendly. One loaf is never enough—so go ahead, mix up another batch.


