Homemade bread has a magical quality, filling the kitchen with warmth and comfort as it bakes. Among the many varieties, No-Knead Harvest Grains Super-Seed Bread stands out for its rustic texture, deep flavor, and nourishing ingredients. This bread requires no intensive kneading or fancy techniques, yet it delivers bakery-level results at home. It’s perfect for anyone seeking a wholesome loaf packed with whole grains, crunchy seeds, and a tender interior wrapped in a golden, hearty crust.
In this article, you’ll learn step-by-step how to make this delicious no-knead bread, from mixing and resting to shaping and baking. We’ll explore the grains and seeds that make it so nutritious, how to get the crust just right, and tips to adapt it to your tastes. Whether you’re new to baking or a seasoned bread lover, this guide will help you make a reliable, flavorful loaf with minimal effort.
The Power of Grains and Seeds in Bread
Why Whole Grains Matter
Whole grains bring more than just hearty texture to bread. They’re loaded with essential nutrients like fiber, iron, and B vitamins. Unlike refined flour, whole wheat flour includes the bran, germ, and endosperm, giving it a fuller flavor and better nutritional value. When blended with bread flour, which offers more gluten strength, the result is a loaf that’s hearty but not heavy.
Adding King Arthur Harvest Grains Blend—a pre-mixed combination of oats, millet, rye, and barley—elevates this bread with multiple textures and a wholesome bite. These grains absorb water during the resting phase, softening nicely while retaining their integrity in the final bake.
Nutritional Value of the Super Seeds
Seeds aren’t just for topping—they’re tiny powerhouses of nutrients. This bread includes a seeded topping with:
- Pumpkin seeds: High in zinc and magnesium, great for heart and immune health.
- Sunflower seeds: Packed with vitamin E and healthy fats.
- Flax seeds: A rich source of omega-3 fatty acids and fiber.
- Sesame seeds: Loaded with antioxidants and minerals like calcium.
- Poppy seeds: Bring trace minerals and a nutty flavor.
Each seed adds a subtle flavor and crunch, and together, they create a visually appealing and nutrient-rich crust. Incorporating these seeds boosts the bread’s appeal, making it as healthy as it is tasty.
Blending Flours for the Perfect Texture
Using a mix of bread flour and whole wheat flour is essential. Bread flour has a higher protein content, which helps develop gluten even in no-knead recipes. Whole wheat flour provides earthiness and density but can make bread tough on its own. This blend strikes the perfect balance, allowing for structure and softness without extra kneading.
Print
No-Knead Harvest Grains Super-Seed Bread
- Total Time: 8 hours 30 minutes
- Yield: 1 large loaf
- Diet: Vegetarian
Description
This No-Knead Harvest Grains Super-Seed Bread is a rustic, nutritious loaf loaded with whole grains and crunchy seeds. It requires no kneading and delivers deep flavor, chewy texture, and a golden crust — perfect for everyday meals.
Ingredients
3 1/4 cups bread flour
1 cup whole wheat flour
1 cup King Arthur Harvest Grains Blend
2 teaspoons salt
1 teaspoon instant or rapid rise yeast
1 3/4 cups cool water
Seeded Topping:
2 tablespoons pumpkin seeds
2 tablespoons sunflower seeds
1 tablespoon flax seeds
1 tablespoon sesame seeds
1 tablespoon poppy seeds
Instructions
1. In a large bowl, mix bread flour, whole wheat flour, grains blend, salt, and yeast.
2. Pour in cool water and mix until the flour is fully incorporated and a sticky dough forms.
3. Continue gently kneading for 2 to 3 minutes until the dough is slightly smoother.
4. Cover the bowl with plastic wrap and let rest overnight or for at least 8 hours at room temperature.
5. Turn the dough onto a floured surface and gently shape into a round loaf.
6. Place on parchment paper and let rise while the oven preheats for 30 minutes.
7. Preheat oven to 425°F with a lidded Dutch oven inside.
8. Once preheated, carefully place the dough (with parchment) into the hot Dutch oven.
9. Score the top with two slashes and sprinkle the seed mix over the top.
10. Bake with the lid on for 40 to 45 minutes.
11. Remove the lid and bake for another 15 to 20 minutes until deeply golden.
12. Remove from oven, transfer to a rack, and cool completely before slicing.
Notes
You can substitute King Arthur Harvest Grains Blend with your own mix of oats, millet, rye, and barley.
Let the bread cool fully before slicing to avoid a gummy texture.
This bread freezes well — slice before freezing for easy toasting later.
- Prep Time: 15 minutes
- Cook Time: 60 minutes
- Category: Bread
- Method: Baking
- Cuisine: American
Mixing and Resting the Dough – The No-Knead Magic
The Science Behind No-Knead Bread
What makes No-Knead Harvest Grains Super-Seed Bread unique is the long fermentation process, not manual effort. This technique relies on time, rather than kneading, to develop gluten. When mixed and left to rest overnight, the dough becomes elastic and airy on its own. It’s a perfect method for beginners or anyone who doesn’t want to spend hours working dough.
The presence of yeast, even in a small amount, works slowly during the long resting phase. As it ferments, it strengthens the gluten network naturally, producing a chewy, well-structured loaf. This slow rise also deepens the flavor, offering slight tanginess and depth you can’t get with quicker recipes.
Proper Mixing Technique
Start by combining the dry ingredients:
- 3 1/4 cups bread flour
- 1 cup whole wheat flour
- 1 cup King Arthur Harvest Grains Blend
- 2 teaspoons salt
- 1 teaspoon instant or rapid rise yeast
Once the dry ingredients are well mixed, slowly pour in 1 3/4 cups of cool water. Use a dough whisk or a stand mixer on low speed to stir until all the flour is hydrated. The dough will be sticky and shaggy, but that’s exactly what you want.
Continue gently mixing for 2 to 3 minutes. This short phase helps the flour absorb water evenly and begins gluten formation. Don’t be tempted to add more flour. A wetter dough is necessary for creating a moist, open crumb and chewy texture.
The Overnight Rest
After mixing, cover the bowl tightly with plastic wrap. Let it rest at room temperature for at least 8 hours or overnight. During this time, several key things happen:
- The dough rises and becomes bubbly
- The grains soften and swell
- The gluten network strengthens on its own
By morning, you’ll see a significant increase in volume. The dough will have small bubbles on the surface and will feel stretchy and light when handled.
This resting phase is the heart of the no-knead process. It requires patience but absolutely no extra work. You’ll wake up to a dough that’s nearly ready for baking, with minimal cleanup and maximum flavor.
Shaping and Second Rise – Setting the Stage for a Perfect Loaf
Turning Out the Dough
After the dough has rested overnight and grown airy and bubbly, it’s time to shape it into a loaf. Lightly flour a clean surface to prevent sticking, then gently turn the dough out of the bowl using a spatula or your hands. Take care not to deflate the air bubbles too much. These bubbles are what give the bread its open crumb and airy texture.
The dough will be soft and somewhat loose, which is expected. Using floured hands or a bench scraper, fold the edges of the dough into the center to create surface tension. Do this a few times until the dough forms a rough round. Rotate and tighten the shape by cupping your hands and gently pulling the dough toward you on the floured surface.
Using a Lidded Baking Crock or Dutch Oven
Transfer the shaped dough onto a square of parchment paper. This will make it easier to lift into the hot baking vessel later. A 6-quart Dutch oven or any lidded baking crock is ideal because it traps steam during the first part of baking, helping the bread rise and form a crisp crust.
At this point, let the dough rise again for about 30 to 45 minutes while your oven preheats. This second rise, or proof, allows the dough to relax and puff up slightly before baking. It’s not a dramatic rise, but you’ll notice it softening and spreading just a little.
Proper Preheating is Key
Preheat your oven to 425°F with the Dutch oven inside. The pot needs to be very hot before the dough goes in. This high-heat environment mimics a professional bread oven, giving you better oven spring and a beautifully browned crust.
Once the oven is ready, use oven mitts to carefully remove the Dutch oven. Lift the dough by holding the parchment paper and gently lower it into the hot pot. Using a sharp knife or bread lame, make two slashes across the top of the dough. These slashes help release steam and control how the bread expands in the oven.
Adding the Super-Seed Topping
Immediately after scoring the dough, sprinkle the seed mixture on top:
- 2 tablespoons pumpkin seeds
- 2 tablespoons sunflower seeds
- 1 tablespoon flax seeds
- 1 tablespoon sesame seeds
- 1 tablespoon poppy seeds
The seeds will cling to the slightly damp dough and toast beautifully in the oven, adding a crunchy contrast to the soft interior.
Baking the Bread – From Dough to Golden Loaf
The First Bake with the Lid On
Once the dough is placed in the preheated Dutch oven, it’s time for the magic to happen. Cover the pot with its lid and return it to the oven. Bake for 40 to 45 minutes with the lid on. During this period, steam from the dough is trapped inside the pot, creating the perfect environment for the loaf to rise dramatically. This is known as oven spring, and it helps create that rounded, artisan-style shape.
The steam also helps develop a glossy crust before it begins to brown. Keeping the lid on for this initial phase ensures your bread doesn’t dry out or harden too quickly on the outside.
Final Bake with the Lid Off
After the initial 40 to 45 minutes, carefully remove the lid from the Dutch oven. You’ll likely see a loaf that’s already well-puffed and lightly golden. Now it’s time to deepen that crust color and develop flavor.
Continue baking uncovered for another 15 to 20 minutes, or until the crust turns a deep golden brown. This phase also crisps up the seeded topping, enhancing both the flavor and the appearance.
To make sure the bread is baked through, use an instant-read thermometer inserted into the center. When the temperature reaches about 205°F, the loaf is done. This ensures the interior is fully cooked and won’t be gummy when sliced.
Cooling Is Crucial
Once baked, use the parchment paper to lift the bread out of the Dutch oven. Transfer it immediately to a wire rack. This step is important because it allows the steam to escape from the bottom of the loaf. Let the bread cool completely—at least 1 hour—before slicing.
If you cut into the loaf too early, the crumb may turn gummy or collapse. Cooling lets the interior finish setting and improves texture and flavor.
The Final Look and Texture
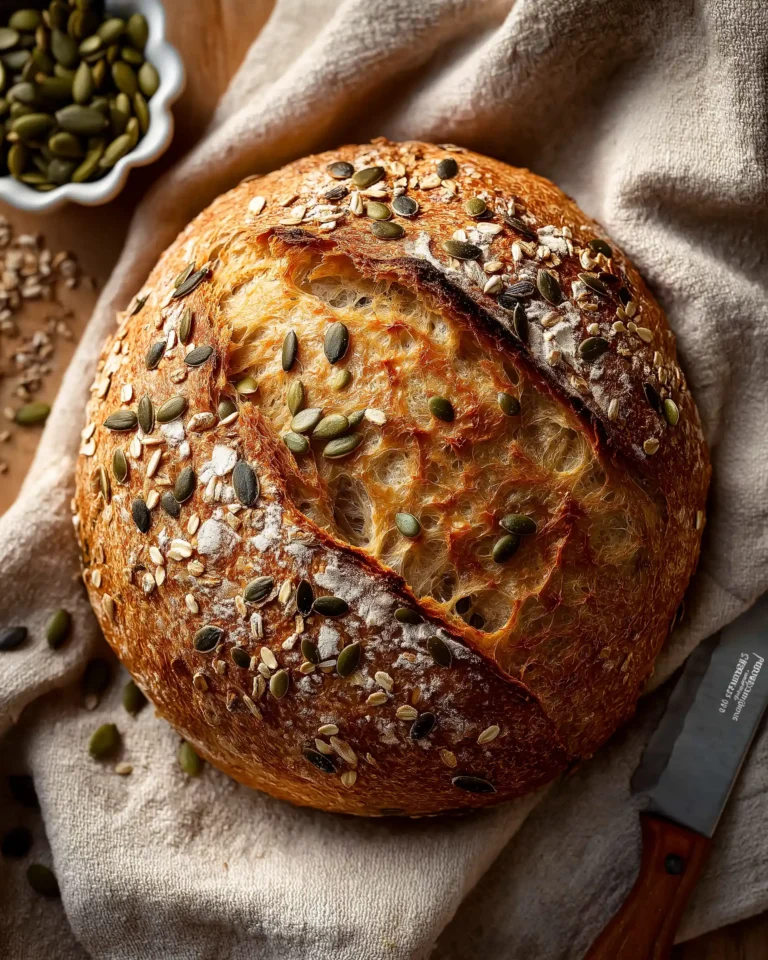
The finished No-Knead Harvest Grains Super-Seed Bread should be:
- Crusty on the outside with a deep brown color
- Topped with golden, toasted seeds
- Light and slightly chewy on the inside with an open crumb
- Slightly tangy and nutty in flavor from the grains and long fermentation
This rustic loaf is as beautiful as it is delicious, and it smells incredible straight from the oven. In the next section, we’ll explore the nutritional benefits and storage tips to keep your bread fresh longer.
Storing, Slicing, and Serving – Getting the Most from Your Loaf
Proper Storage to Maintain Freshness
Once your No-Knead Harvest Grains Super-Seed Bread has fully cooled, proper storage is key to keeping it fresh and flavorful. Unlike commercial bread filled with preservatives, this homemade loaf is all-natural, so it requires a bit more attention.
Here’s how to store it effectively:
- At Room Temperature: Wrap the bread in a clean kitchen towel or place it in a paper bag. Store in a cool, dry place for up to 3 days. Avoid sealing it in plastic unless it’s drying out quickly, as this can make the crust go soft.
- In the Freezer: For longer storage, slice the loaf and freeze it in an airtight bag or container. Frozen slices can be toasted directly from the freezer with no loss in texture or flavor.
- Avoid Refrigeration: The fridge tends to dry out bread more quickly than room temperature or freezing. Stick to either the counter or freezer based on your needs.
Best Practices for Slicing
Use a sharp, serrated bread knife for clean slices without tearing the crumb. Letting the loaf cool completely before cutting is crucial, as warm bread is softer and more fragile. Slice only what you need and keep the rest of the loaf intact to retain moisture longer.
If you enjoy thicker slices for hearty sandwiches or thinner ones for toast, this loaf holds up beautifully either way. Its sturdy structure and chewy interior make it versatile for any meal.
Creative and Healthy Serving Ideas
This bread is more than a basic loaf—it’s a foundation for dozens of delicious, wholesome meals. Try it with:
- Avocado and lemon on toasted slices
- Hummus and roasted veggies for a satisfying lunch
- Nut butter and banana as a power-packed breakfast
- Hearty soups or stews for a filling dinner side
- Grilled vegetable sandwiches for a nutrient-rich meal
Its nutty, seedy crust adds crunch to every bite, while the whole grains deliver a satisfying chew. Because it’s loaded with flavor and nutrition, even a plain slice with a dab of olive oil or your favorite spread becomes a simple delight.
Conclusion: A Simple Recipe, A Rewarding Bake
No-Knead Harvest Grains Super-Seed Bread offers the best of both worlds — simplicity and deep flavor. It proves that you don’t need fancy techniques or endless kneading to create a rustic, nutritious loaf that rivals those from artisan bakeries. By relying on time, high-quality ingredients, and a careful baking process, this bread becomes more than just food. It becomes a nourishing ritual.
Whether you’re baking it for your weekly breakfast, preparing sandwiches for the family, or serving it beside a comforting bowl of soup, this loaf delivers. With whole grains, seeds, and a slow fermentation process, you get something both wholesome and satisfying — a bread that fits into nearly any lifestyle, especially those focused on wellness, plant-based nutrition, and real ingredients.
If you’re looking for a trustworthy, rewarding bread recipe that’s beginner-friendly yet full of character, this is it. From its crunchy seeded crust to its hearty, flavorful crumb, this bread is as much a pleasure to make as it is to eat.


