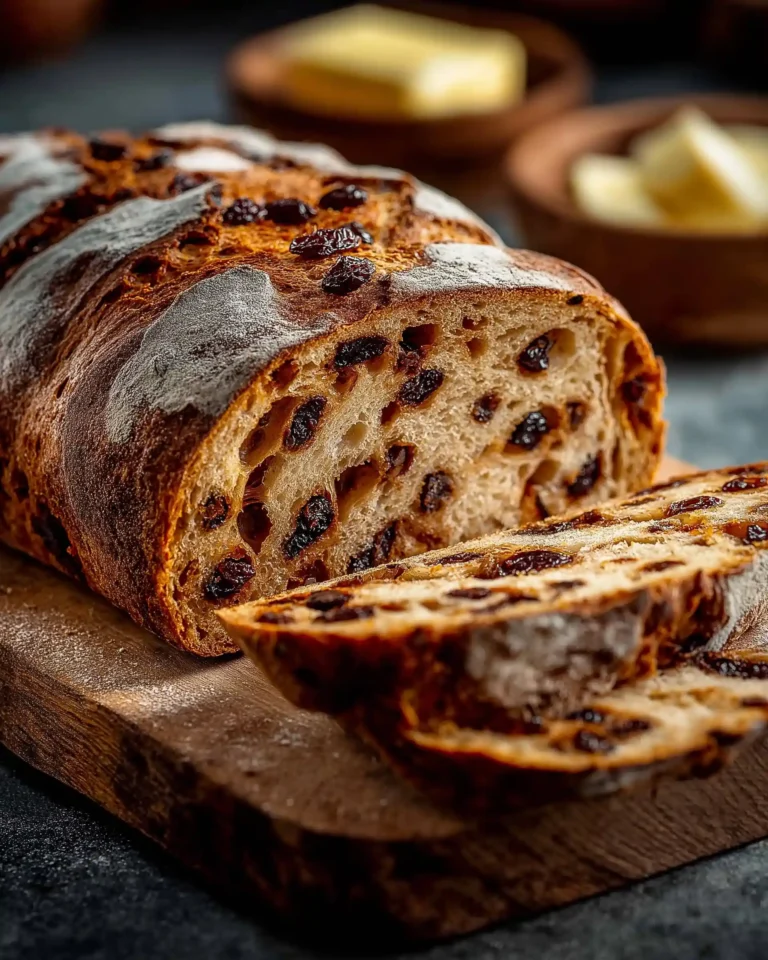
If you’re craving a warm, sweet, and homemade bread without the hassle of kneading or complicated techniques, this No Knead Cinnamon Raisin Bread Recipe is about to become your new favorite. With a chewy crust, soft crumb, and bursts of juicy raisins and warm cinnamon throughout, this bread delivers bakery-quality results with minimal effort. All you need is a big bowl, a Dutch oven, and some patience during the long fermentation time.
In this article, we’ll walk you through the exact steps, tools, and tips to master this no knead recipe. We’ll also explore how it works, why it’s so foolproof, how to adjust it for different preferences, and provide you with nutritional information and storage advice. Whether you’re baking this for a cozy breakfast, a special brunch, or a comforting side dish, you’re going to love the simplicity and flavor.
Understanding the No Knead Bread Method
What Is No Knead Bread?
No knead bread is a revolutionary method of bread-making that skips the traditional labor-intensive kneading step. Instead of using physical effort to develop gluten, time does the work for you. A long fermentation period—anywhere from 12 to 18 hours—allows the flour, water, and yeast to interact slowly, building flavor and structure with minimal input.
This method is perfect for beginners or busy home cooks. There’s no mixer needed, and you don’t need any bread-making experience. The result is a beautiful artisan-style loaf with a crusty exterior and soft, airy interior.
Why Use the No Knead Method for Cinnamon Raisin Bread?
Sweet breads like cinnamon raisin can often be sticky or dense if overworked. The no knead method prevents this by allowing the dough to hydrate fully and ferment slowly. Here’s why it’s ideal for this type of bread:
- Even Flavor Distribution: Cinnamon and raisins are better absorbed into the dough.
- Light Texture: Long fermentation helps form soft, open crumbs.
- Simplicity: Just mix and wait. There’s no folding, stretching, or shaping expertise required.
How the Ingredients Interact
Understanding how each ingredient works helps avoid mistakes:
- Flour: Provides structure. All-purpose flour is ideal for its balance of protein and texture.
- Yeast: Even a small amount works wonders over a long rise. No need to pre-activate.
- Salt: Enhances flavor and controls yeast fermentation.
- Water: Hydrates the dough, dissolves sugar and salt, and activates gluten.
- Cinnamon: Adds warm spice and deep aroma. Ground cinnamon is best.
- Raisins: Sweet, chewy bursts of flavor. Soaking them is optional but helps soften.
- Brown Sugar: Mixed in late for layered sweetness and slight caramelization.
The magic of this method lies in its minimalism. With just a few common ingredients and a bit of patience, you can create a loaf that rivals anything from a professional bakery.
Print
No Knead Cinnamon Raisin Bread Recipe
- Total Time: 18 hours 55 minutes
- Yield: 10 slices
- Diet: Vegan
Description
A no knead cinnamon raisin bread recipe that delivers a crusty exterior and soft, sweet interior with minimal effort. Perfect for breakfast, brunch, or a cozy snack.
Ingredients
3 cups all-purpose flour
1 teaspoon salt
½ teaspoon active dry yeast
1 tablespoon ground cinnamon
1 cup raisins
1½ cups lukewarm water (105°F to 115°F)
3 tablespoons brown sugar
Instructions
1. In a large bowl, combine flour, salt, yeast, cinnamon, and raisins.
2. Pour in lukewarm water and mix until fully incorporated. No need to knead.
3. Cover with plastic wrap and let rise at room temperature for 12 to 18 hours.
4. Preheat oven to 450°F with Dutch oven inside.
5. Flour your hands and surface. Transfer dough onto floured surface.
6. Sprinkle brown sugar, fold dough gently, and shape into a ball.
7. Place dough on parchment paper and lower into preheated Dutch oven.
8. Cover and bake for 30 minutes. Remove lid and bake for another 15–20 minutes until golden.
9. Remove bread and let cool completely before slicing.
Notes
Ensure your yeast is fresh for best results.
Use lukewarm water (105°F to 115°F) to activate the yeast without killing it.
Longer rise equals better flavor—overnight is ideal.
Resist adding extra flour—sticky dough is normal.
Let the bread cool completely before slicing to avoid a gummy texture.
- Prep Time: 10 minutes
- Cook Time: 45 minutes
- Category: Bread
- Method: Baked
- Cuisine: American
Essential Equipment for Perfect No Knead Cinnamon Raisin Bread
Why Your Tools Matter
Even though the No Knead Cinnamon Raisin Bread Recipe is incredibly simple, using the right tools can make a big difference in the outcome. Since the method relies on moisture retention, even baking, and slow fermentation, each piece of equipment plays a specific role in ensuring your bread turns out just right. You don’t need fancy gear, but choosing high-quality and purpose-built items can elevate your loaf from good to exceptional.
Let’s walk through what you’ll need and why.
Dutch Oven: Your Bread’s Best Friend
The Dutch oven is the cornerstone of this baking method. In this recipe, a Le Creuset Enameled Cast Iron Signature Round Dutch Oven (5.5 qt.) is recommended. Here’s why:
- High Heat Tolerance: Can be safely preheated to 450°F.
- Moisture Retention: Traps steam inside while baking, which creates that signature artisan-style crust.
- Even Heat Distribution: Ensures uniform browning on all sides.
- Size and Shape: 5.5 quarts is just right for the size of this dough, allowing room to rise and expand.
If you don’t have this exact model, any heavy-duty, oven-safe Dutch oven with a tight-fitting lid will work well.
Danish Dough Whisk: Mixing Without Mess
A Danish dough whisk is specifically designed to mix sticky doughs efficiently. Unlike traditional whisks or spoons, it doesn’t clog up and it helps you mix the ingredients quickly and thoroughly with minimal effort.
Why it works:
- Efficient Mixing: Incorporates flour, raisins, and water evenly without overworking the dough.
- Easy Cleanup: Dough doesn’t stick to the wires like it does on spatulas or spoons.
You can use a wooden spoon or spatula in a pinch, but a Danish whisk makes the process smoother.
Parchment Paper: For Easy Transfer and Baking
Parchment paper is a simple yet vital tool in this recipe. You’ll use it to transfer the dough ball into the hot Dutch oven, which helps prevent sticking and avoids burns.
- Non-Stick Surface: Ensures your dough doesn’t cling to the pot.
- Ease of Handling: Lifting the dough with the parchment means no deflating your carefully proofed loaf.
- Clean Baking: Makes for easier cleanup, especially when sugar caramelizes.
Avoid using wax paper or foil—they don’t hold up well to high baking temperatures.
Bread Knife: Slice Clean Every Time
Once your bread has cooled completely, you’ll need a good knife to slice through that crispy crust without tearing the soft crumb. The CUTCO Bread Knife (9.8″, High Carbon Stainless) is ideal.
Benefits of this knife:
- Serrated Blade: Easily cuts through thick crusts.
- Length: Long enough for even, full slices.
- Durability: Made to last and stay sharp.
Using a dull knife can crush your loaf or tear the slices, so a high-quality bread knife is essential for presentation and texture.
Supporting Items
Here are a few extras that can make your baking process easier:
- Plastic Wrap: To cover the bowl during the long proofing period.
- Mixing Bowl (Large): Big enough to allow the dough to rise significantly without spilling over.
- Kitchen Thermometer: Optional, but useful for checking water temperature (105°F to 115°F is key).
Setup for Success
Before starting, have everything ready on your counter. Lay out your mixing bowl, measure all your ingredients, and make sure your Dutch oven is clean and oven-safe. Pre-cut a piece of parchment paper big enough to line the pot, and keep oven mitts nearby for safe handling.
By using the right equipment in the right way, you’ll set yourself up for a successful baking experience—yielding a beautiful, fragrant, golden loaf that looks and tastes like it came from a professional bakery.
Step-by-Step Guide to Making the Dough
Mixing the Ingredients: Where Flavor Begins
The beauty of this No Knead Cinnamon Raisin Bread Recipe lies in how effortlessly everything comes together. You don’t need a stand mixer or any kneading strength—just a bowl, a spoon, and a bit of patience. Let’s walk through the preparation from start to finish.
Here’s what you’ll need to gather before starting:
- 3 cups all-purpose flour
- 1 teaspoon salt
- ½ teaspoon active dry yeast
- 1 tablespoon ground cinnamon
- 1 cup raisins
- 1½ cups lukewarm water (105°F to 115°F)
No need to activate the yeast. Even though you’re using active dry yeast, this recipe works without blooming it first thanks to the long fermentation period.
Step-by-step:
- Combine the dry ingredients:
In a large mixing bowl, add the flour, salt, cinnamon, and yeast. Stir together with your Danish dough whisk or wooden spoon until everything is evenly distributed. Then, fold in the raisins. Make sure they’re coated in the flour to prevent clumping. - Add the water:
Pour the lukewarm water directly into the dry ingredients. Use your spoon or whisk to mix the dough until everything is well combined. The dough will look shaggy and sticky—that’s exactly what you want. - No kneading needed:
Don’t overthink it. Just stir until you no longer see dry flour. The dough will be loose and sticky. You might be tempted to add more flour—don’t. Moisture is key to a light, chewy texture later.
The Long Rise: Let Time Do the Work
The dough now needs to rest so that the yeast can slowly ferment and work its magic. This slow process builds flavor and gluten naturally without manual labor.
Here’s how to rise it properly:
- Cover the bowl tightly with plastic wrap.
- Let it sit at room temperature or inside your turned-off oven.
- Leave it undisturbed for 12 to 18 hours.
You’ll know it’s ready when the dough has doubled in size and is dotted with bubbles across the top.
Tips for success:
- If your room is cooler (below 70°F), lean toward a full 18-hour rise.
- If your kitchen is warm, the dough might be ready closer to 12 hours.
- Avoid drafts or cold spots. A consistent temperature helps fermentation.
Shaping the Dough: Gentle Is the Way
After the rise, the dough is delicate, airy, and sticky. Now is the time to add brown sugar for a sweet boost.
You’ll need:
- 3 tablespoons brown sugar
- Extra flour for dusting
Here’s how to shape it:
- Flour your hands and surface:
Generously dust your hands and a clean surface with flour. Lightly sprinkle some over the dough as well. - Transfer the dough:
Using your floured hands, gently scoop the dough from the bowl and place it on your floured surface. Avoid deflating it too much. - Add the brown sugar:
Flatten the dough just slightly, then sprinkle the brown sugar evenly across the surface. - Fold and shape:
Fold the dough over itself a few times to incorporate the brown sugar, then gently form it into a round ball. Use more flour if it sticks to your hands, but don’t overdo it. - Prepare for baking:
Place the dough ball onto a piece of parchment paper. This makes transferring to the Dutch oven much easier.
Let it rest briefly while the oven preheats.
Preheating the Dutch Oven: Timing Is Everything
Preheat your oven to 450°F, placing your Dutch oven inside with the lid on. Let it heat up as the oven warms—this usually takes about 30 minutes.
Why this step matters:
- A hot Dutch oven helps the bread form a crisp crust instantly.
- It creates a steamy environment for the first part of baking, which improves oven spring and texture.
Always handle the pot with care. Use heavy-duty oven mitts and set the hot pot on a safe surface when transferring the dough.
Final Touch: From Bowl to Oven
Once your oven is preheated:
- Lift the dough using the parchment paper and carefully lower it into the hot Dutch oven.
- Cover with the lid and bake for 30 minutes.
- Remove the lid and bake for another 15 to 20 minutes until the top is golden brown and crusty.
When it’s done, carefully remove the loaf and set it on a cooling rack. It should slip out easily, thanks to the parchment paper.
Resist the urge to slice into it too early. Let the bread cool completely—this is key for setting the crumb and avoiding a gummy texture.
The Science Behind the Slow Rise
Why Long Fermentation Works
One of the most important aspects of the No Knead Cinnamon Raisin Bread Recipe is time. Letting the dough sit for 12 to 18 hours might seem excessive, but it’s this unhurried fermentation process that transforms a handful of basic ingredients into a flavorful, chewy, golden loaf. The science behind this lies in how the yeast behaves over time.
Here’s what’s happening during the long rise:
- Gluten Development: Normally, kneading builds gluten, but here, the proteins in the flour slowly form gluten strands on their own as they hydrate. That gives the bread its chewy, structured interior.
- Flavor Formation: As the yeast ferments the natural sugars in the flour, it releases carbon dioxide and organic acids. These acids create complex flavors, with slightly tangy, earthy notes that enhance the cinnamon and raisin sweetness.
- Gas Bubbles and Open Crumb: Slow fermentation allows small air pockets to develop evenly. This leads to a beautiful open crumb when you slice the bread, rather than a dense loaf.
Time vs. Temperature: Getting the Balance Right
While the ingredients remain the same, the outcome depends heavily on the temperature of your kitchen. Fermentation is sensitive to its environment. Here’s how to adjust based on your conditions:
| Kitchen Temperature | Recommended Rise Time |
|---|---|
| Below 68°F (20°C) | 18 to 20 hours |
| 68°F – 72°F | 14 to 18 hours |
| 73°F – 76°F | 12 to 14 hours |
| Over 77°F (25°C) | 8 to 10 hours |
If it’s too warm, your dough might overproof, losing strength and collapsing. If too cold, it may underproof and not rise enough. When in doubt, the appearance of your dough will guide you—it should be puffy, slightly domed, and dotted with bubbles on the surface.
Sweet Dough Fermentation Tips
Adding ingredients like raisins, cinnamon, and sugar slightly changes how fermentation behaves.
- Raisins: They add natural sugars, which can speed up fermentation. But since they’re mixed dry into the dough, the effect is minimal. Just make sure they’re well distributed to avoid clumping.
- Cinnamon: Surprisingly, cinnamon can inhibit yeast growth in large amounts. This recipe uses just enough for flavor without affecting the rise.
- Brown Sugar: Added later in the shaping stage, it gets swirled into the dough. It doesn’t interfere with the fermentation but adds a deeper, molasses-like sweetness.
Common Fermentation Pitfalls (and Fixes)
- No rise after 12 hours
- Check if your yeast was expired or if your kitchen was too cold. Try moving the dough to a slightly warmer spot and wait a few more hours.
- Dough overflows the bowl
- Use a larger bowl next time. If it’s very active, bake it sooner, or refrigerate to slow it down.
- Flat bread after baking
- It may have overproofed or wasn’t shaped tightly enough before baking. Next time, fold the dough firmly and bake sooner.
- Too sour flavor
- Long fermentation can create tangier notes. If you prefer a sweeter taste, reduce rise time to around 10 to 12 hours.
Final Rise Before Baking: Optional, But Worth It
Some bakers like to let the shaped dough rest for 30 to 45 minutes before baking, especially if it was cold or underproofed. This second rest allows the dough to relax and rise again slightly, helping with oven spring and final texture.
While not strictly necessary, it can be useful if you’re unsure whether your dough had enough time during the initial proof.
Why You Shouldn’t Rush
In today’s fast-paced world, it’s easy to want results now—but bread doesn’t work that way. The slow rise is the soul of no knead bread. It builds texture, flavor, and structure naturally, without effort. Letting time do the work not only makes baking easier but also makes the final loaf taste significantly better.
Troubleshooting, Cooling, and Storing Your Bread
Avoiding Common Baking Mistakes
Even though this No Knead Cinnamon Raisin Bread Recipe is beginner-friendly, there are a few pitfalls that can pop up if you’re not careful. Let’s look at the most common issues and how to avoid them, so every loaf comes out bakery-worthy.
Problem: Dough Sticks to Everything
- Fix: This dough is naturally sticky, which is a good sign. Resist the urge to add extra flour. Instead, flour your hands and work surface well when shaping. A light dusting over the dough also helps.
Problem: Bread is dense or flat after baking
- Fix: The dough may not have proofed long enough or was overproofed. Look for bubbles on the surface and a puffy texture before shaping. Also, make sure you bake it immediately after transferring it to the Dutch oven while it still holds gas.
Problem: Crust is too hard or too dark
- Fix: Baking uncovered for too long can cause over-browning. Stick to 15–20 minutes after removing the lid. If your crust still seems too tough, loosely tent with foil toward the end of baking.
Problem: Gummy inside
- Fix: This usually happens when slicing before the bread has cooled completely. Always let it rest for at least an hour on a wire rack before cutting into it.
Letting It Cool: The Final, Crucial Step
It’s tempting to dive right in when your kitchen smells like cinnamon heaven, but slicing into warm bread can ruin the texture. The steam inside needs time to settle and the crumb to firm up.
Here’s what to do:
- Remove the loaf from the Dutch oven and place it on a cooling rack.
- Let it cool at room temperature for at least one hour.
- Do not wrap or cover during this time—trapped steam can make the crust soggy.
If you slice it too soon, you risk a gummy texture and compressed interior, no matter how well it was baked.
Slicing Like a Pro
Once your bread is completely cool, use a serrated bread knife for clean, even slices. A dull knife can crush your loaf and tear apart the interior.
Cut only what you plan to eat right away. The rest will stay fresher longer if left whole.
Storing for Freshness
Your cinnamon raisin bread contains no preservatives, so storage is key to enjoying it over several days.
Room Temperature (Best for 1–2 days):
- Wrap the loaf in a clean kitchen towel or store it in a paper bag.
- Avoid airtight containers unless you’re freezing—trapped moisture can soften the crust.
Freezing (Best for up to 3 months):
- Slice the loaf once cooled completely.
- Wrap individual slices in plastic or parchment, then place them in a freezer-safe zip bag.
- Reheat slices in the toaster or oven as needed.
Fridge? Avoid it.
- The refrigerator tends to dry out bread faster than room temp or the freezer.
Best Ways to Enjoy It
Now that you’ve mastered the bake, here are a few tasty ways to serve your cinnamon raisin bread:
- Toasted with butter: Classic and comforting.
- French toast base: Thick slices soaked in egg mixture make a next-level breakfast.
- With cream cheese or almond butter: A protein-packed snack.
- As a side with breakfast casseroles or eggs: Adds a touch of sweetness to a savory meal.
This bread is incredibly versatile. You can enjoy it plain, toasted, or even turned into a sweet bread pudding if you have leftovers.
Dietary Tips, and Recipe Variations
Is It Healthy?
In moderation, yes. Here’s why:
- Low in fat: Only 1g per slice, with very little saturated fat.
- Natural sweetness: Raisins and brown sugar provide gentle sweetness without overpowering the loaf.
- Good fiber: With 3g of fiber, it supports digestion and helps keep you full.
It’s satisfying without being heavy, and pairs well with protein-rich toppings like nut butter or a slice of cheese for more balanced nutrition.
Dietary Adjustments and Tips
Want to customize the recipe for specific diets or preferences? Here are smart ways to adapt it:
For Lower Sugar
- Reduce the brown sugar to 1 or 2 tablespoons.
- Choose unsweetened raisins or reduce their quantity.
For Whole Grain Boost
- Substitute 1 cup of all-purpose flour with whole wheat flour.
- You may need to increase water by 1–2 tablespoons, as whole wheat absorbs more moisture.
For Gluten Sensitivity
- Use a high-quality 1:1 gluten-free baking flour. Look for blends with xanthan gum for structure.
- Expect a slightly denser loaf but still delicious with the no knead method.
For Nut-Free Households
- This recipe is naturally nut-free. But if you want to add crunch, opt for seeds like sunflower or pumpkin as a topping after baking.
For Vegan Diets
- This bread is already vegan-friendly—no eggs, dairy, or animal products included.
- Just be sure to check that your brown sugar is vegan-certified, as some are processed with bone char.
Flavor Variations to Try
Once you’ve mastered the base recipe, get creative with these add-ins and swaps:
| Variation | How to Add |
|---|---|
| Apple Cinnamon | Add ½ cup finely diced dried apples with raisins |
| Cranberry Orange | Swap raisins for dried cranberries and add 1 tsp orange zest |
| Coconut Raisin | Add 2 tbsp unsweetened shredded coconut with the flour |
| Pumpkin Spice | Replace cinnamon with 1 tbsp pumpkin pie spice |
| Chai-Inspired | Add ½ tsp cardamom and ¼ tsp ground cloves to the dry mix |
Each variation builds on the base flavor of the no knead method, offering a twist without changing the ease of preparation.
Pairing Suggestions (Without Alcohol or Meat)
Want to round out your meal without using alcohol-based products or meat? Here are clean, wholesome ideas:
- Breakfast Platter: Pair with scrambled eggs, avocado slices, and fresh berries.
- Brunch Table: Serve alongside Greek yogurt, a fruit salad, and herbal tea.
- Light Dessert: Toast and drizzle with honey or maple syrup, then top with fresh banana slices or berries.
Conclusion: Why This No Knead Cinnamon Raisin Bread Belongs in Your Baking Rotation
This No Knead Cinnamon Raisin Bread Recipe proves that artisan-style baking doesn’t have to be complicated. With just a few pantry staples, a bit of patience, and simple tools, you can create a soft, chewy, golden-brown loaf that’s packed with sweet raisins and warm cinnamon flavor.
Whether you’re a first-time baker or a seasoned home cook, this method is approachable, forgiving, and consistently impressive. It’s the kind of recipe you’ll return to again and again—not just because it’s easy, but because the results speak for themselves. The long fermentation creates deep flavor, the Dutch oven gives you that crackly crust, and the cinnamon-raisin combination makes every slice feel like a hug in bread form.
Perfect for breakfast, brunch, or a snack, this bread keeps well, freezes beautifully, and offers endless variations to suit your taste. And with no kneading required, it’s one of the simplest and most satisfying ways to fill your kitchen with the smell of fresh-baked comfort.


