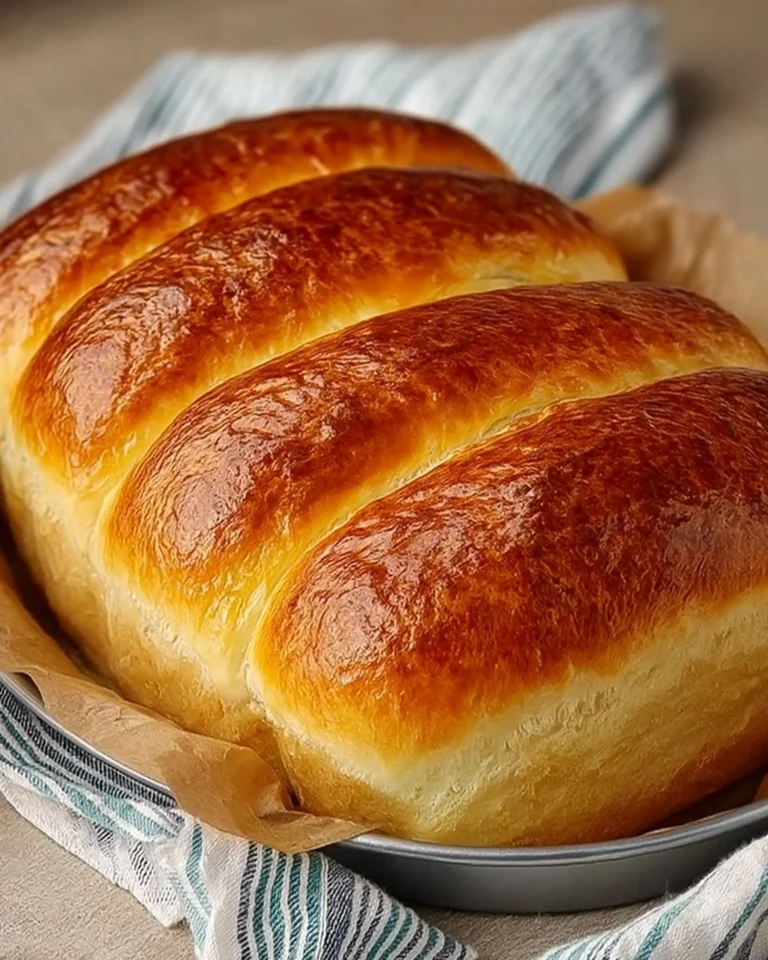
Brioche is the kind of bread that brings smiles at the table, with its buttery flavor, pillowy texture, and golden crust. Unlike other breads, Milk Brioche Bread has a rich tenderness, thanks to the perfect blend of butter, eggs, and warm milk. In this guide, we’re walking you through everything you need to know to make an authentic, bakery-quality milk brioche bread at home.
We’ll start with the ingredients and preparation technique, then guide you through the kneading, shaping, proofing, and baking process. Whether you’re new to baking or already comfortable around flour, this recipe is both easy and forgiving. We’ll also share essential tips to ensure a soft interior, glossy crust, and that beautiful tear-apart texture that makes brioche so irresistible.
Understanding Milk Brioche Bread Basics
What Makes Brioche Different from Regular Bread
Brioche stands out because it’s an enriched dough. Unlike lean breads like baguettes or sandwich loaves, brioche contains eggs, butter, and milk. These ingredients give it a richer flavor and a tender, buttery crumb.
While many breads rely only on flour, water, salt, and yeast, milk brioche goes a step further with fat and dairy. These added ingredients make the dough soft, delicate, and slightly sweet — ideal for everything from morning toast to festive rolls.
The addition of warm milk in this specific recipe also helps activate the yeast while improving the final crumb structure, giving it an ultra-light texture that feels almost cake-like.
The Science Behind Enriched Dough
Enriched doughs like milk brioche require a bit more care. The fat from butter and egg yolks slows down fermentation, which means it rises more slowly. This slower rise is actually beneficial. It allows the dough to develop deeper flavor while producing a fluffier final bread.
However, this also means kneading plays a crucial role. Developing gluten in an enriched dough takes more effort, and it must be kneaded thoroughly until the dough becomes elastic. This elasticity is key to a tall, voluminous loaf that doesn’t collapse during baking.
Brioche also benefits from careful temperature management. Lukewarm milk — around 100°F — is just warm enough to activate yeast but not too hot to kill it. The dough should rise in a warm, draft-free environment for best results.
Essential Ingredients for the Perfect Milk Brioche
To create the perfect milk brioche bread, let’s take a quick look at the core ingredients and their roles:
| Ingredient | Quantity | Purpose |
|---|---|---|
| Warm Milk | 150 ml (2/3 cup) | Activates yeast and softens the dough |
| Instant Yeast | 7 g | Helps the dough rise |
| Sugar | 15 g (1 tbsp) | Feeds the yeast and adds sweetness |
| Flour (for yeast starter) | 15 g (1 tbsp) | Helps develop initial sponge |
| Flour (main dough) | 330 g (2 5/8 cups) | Provides structure and gluten |
| Egg | 1 whole | Adds richness and improves crumb texture |
| Salt | 3 g (1/2 tsp) | Enhances flavor and controls fermentation |
| Butter (softened) | 20 g (1 tbsp + 1 tsp) | Adds tenderness and moisture |
| Egg Yolk | 1 | For brushing and giving a shiny crust |
| Butter (for greasing) | 5 g (1 tsp) | Prevents sticking and adds flavor |
Each of these ingredients plays an essential role in developing the signature structure, taste, and appearance of milk brioche bread.
Equipment You’ll Need
Milk brioche bread doesn’t require fancy tools, but having a few basics on hand can make the process easier:
- Medium and large mixing bowls
- Whisk and spatula
- Kitchen scale (for accurate measurements)
- Clean kitchen cloth or plastic wrap
- Lightly floured work surface
- Bread tin or baking pan
- Oven thermometer (optional, but helps with accuracy)
With these basics and a bit of patience, you’ll be well on your way to baking a stunning loaf of milk brioche bread.
Print
Milk Brioche Bread Recipe
- Total Time: 30 minutes
- Yield: 6–8 servings
- Diet: Vegetarian
Description
This milk brioche bread recipe yields soft, buttery rolls with a golden crust. Perfect for breakfast or as a snack, this low-difficulty recipe uses simple ingredients to produce a bakery-quality result at home.
Ingredients
150 ml (2/3 cup) warm milk
7 g instant yeast
15 g (1 tbsp) flour (for yeast)
15 g (1 tbsp) sugar
1 egg
20 g (1 tbsp + 1 tsp) softened butter
330 g (2 5/8 cups) flour
3 g (1/2 tsp) salt
5 g (1 tsp) butter (for greasing)
1 egg yolk (for brushing)
Instructions
1. In a medium bowl, combine warm milk, yeast, and sugar. Whisk well, stir in 1 tbsp flour, and let sit for 10 minutes.
2. Add egg and softened butter to the mixture and stir until smooth.
3. In a large bowl, sift flour and salt. Add yeast mixture and mix with a spatula to form dough.
4. Knead dough by hand for 10–15 minutes until elastic.
5. Form into a ball, cover, and let rise in a warm spot until doubled in size.
6. Transfer dough to floured surface. Divide into 5 parts: 3 larger and 2 smaller pieces.
7. Shape each into a ball. Cover and rest for 15 minutes.
8. Flatten each ball into an oval and roll up from the long side into logs.
9. Grease baking tin and arrange rolls, placing the largest in the center.
10. Cover and proof again for 30–45 minutes until puffy.
11. Preheat oven to 180°C (360°F). Brush tops with egg yolk.
12. Bake for 15 minutes until golden and cooked through.
13. Cool slightly before serving.
Notes
Use lukewarm milk around 100°F to activate the yeast.
Don’t add extra flour during kneading even if dough feels sticky.
Brush the top with egg wash before baking for a glossy finish.
To prevent over-browning, cover with foil halfway through baking.
Let the bread cool completely before slicing for best texture.
- Prep Time: 15 minutes
- Cook Time: 15 minutes
- Method: Baking
- Cuisine: French
Preparing and Kneading the Brioche Dough
Making the Yeast Starter
The first step in crafting your milk brioche bread is preparing a yeast starter. This process helps activate the yeast and gives the dough a strong beginning. In a medium-sized bowl, combine the warm milk, instant yeast, and sugar. Give it a good whisk until the yeast begins to dissolve.
Once mixed, stir in 1 tablespoon of flour. This acts as a small meal for the yeast, giving it an instant energy source to begin bubbling. Let this mixture sit at room temperature for about 10 minutes.
You’ll know it’s ready when the surface turns foamy and bubbly. If there’s no change, your yeast may be expired, and you’ll need to start over with fresh yeast. The foamy texture is a clear indicator that your yeast is alive and active.
Adding the Enriching Ingredients
Once your yeast starter is ready, add the softened butter and egg to the bowl. Stir until everything is combined and smooth. It’s important that the butter is soft, not melted. Soft butter blends more evenly into the dough, ensuring a uniform texture later on.
You don’t need to whip the ingredients, just ensure everything is mixed until you get a thick, cohesive liquid. This enriched mixture is now ready to be incorporated into the dry ingredients.
Mixing and Hydrating the Dough
In a large mixing bowl, sift together the 330 grams of flour and salt. This removes lumps and helps with even gluten development later.
Pour the wet yeast mixture into the flour. Start mixing with a spatula or wooden spoon. The goal here isn’t to knead just yet but to fully hydrate the flour and form a rough dough. You’ll notice the dough is sticky and shaggy, and that’s perfectly normal at this stage.
Once everything comes together into a rough ball, it’s time to put that dough on your work surface and begin kneading.
Kneading for Elasticity and Texture
Now the magic happens. Kneading is essential for developing gluten, the network that traps gas and allows the dough to rise. You can knead by hand or use a stand mixer with a dough hook.
If kneading by hand, stretch and fold the dough repeatedly for about 10 to 15 minutes. The dough will be sticky, but resist the temptation to add more flour. Adding too much flour makes brioche dry and dense. Instead, use lightly floured hands and a clean surface.
You’ll know you’ve kneaded enough when the dough becomes smooth and elastic. It should pass the “windowpane test”: stretch a small piece of dough between your fingers, and it should form a thin, translucent sheet without tearing. This elasticity is crucial for the airy texture milk brioche is known for.
Tips to Improve Kneading
- Use a bench scraper to help lift and fold sticky dough.
- Knead in intervals: 5 minutes of kneading, 5 minutes rest, then resume. This allows the gluten to relax and makes kneading easier.
- Room temperature matters: Cold butter or eggs can slow down yeast and tighten gluten. Make sure ingredients are room temperature before mixing.
Once kneaded, form the dough into a round ball and place it back into your bowl. Cover it with a kitchen cloth or plastic wrap to protect it from drying out.
Proofing and Shaping the Dough
First Rise – Letting the Dough Develop
After kneading your dough to that perfect smooth texture, it’s time to let it rise. This is known as the first proof, and it’s one of the most important stages in baking bread. Gently shape the kneaded dough into a ball, place it in a lightly greased bowl, and cover it with a clean kitchen towel or plastic wrap.
Let it sit in a warm, draft-free place for about 1 to 1.5 hours, or until the dough has doubled in size. If your kitchen is a bit chilly, place the bowl in a turned-off oven with the light on or near a warm stovetop.
Avoid rushing this stage. The slow rise helps develop flavor and allows the gluten to strengthen, which gives your bread that light, fluffy structure.
How to Tell If It’s Ready
You can check if the dough has risen enough by gently pressing a finger into the dough. If the indentation slowly springs back, your dough is proofed and ready. If it bounces back too quickly, it needs more time.
However, if the dough collapses or the finger mark stays deep, you’ve likely over-proofed it. While still usable, over-proofed dough may not rise as well in the oven.
Dividing the Dough
Once proofed, transfer the dough onto a lightly floured surface. It should feel soft, smooth, and a bit airy. Use a sharp knife or dough cutter to divide it into five pieces – ideally three slightly larger pieces and two smaller ones.
This size difference helps create a visually appealing roll pattern inside the loaf pan.
Use your hands to gently shape each piece into a round ball, tucking in the edges to build surface tension. This helps the dough maintain shape and encourages even baking.
Bench Rest: Let the Dough Relax
After shaping the dough into balls, let them rest for 15 minutes, covered with a cloth or plastic wrap. This short rest period, known as a bench rest, allows the gluten to relax so it’s easier to shape in the next step.
Skimping on this step can cause the dough to tear during shaping, so don’t skip it.
Shaping the Brioche Rolls
Take one ball at a time and flatten it into a thin oval using your hands or a rolling pin. Starting from the long side, gently roll it into a log, just like you’d roll up a cinnamon roll. This creates a tight spiral that gives the finished bread its signature swirled texture when torn apart.
Repeat with the remaining balls. You’ll now have five long rolls ready for assembly.
Arranging the Dough in the Tin
Lightly grease your baking tin with butter. Place the longest roll in the center of the tin and position the shorter rolls evenly around it. The dough should fit snugly but not be packed too tight. Leave a little space between the rolls to allow for expansion during the final proof and baking.
Cover the pan again with a kitchen towel or plastic wrap and let the dough rise for the second time, about 30 to 45 minutes. It should puff up and fill the tin nicely.
Baking Milk Brioche Bread to Golden Perfection
Preheating the Oven
Once your shaped dough has finished its second proof and looks beautifully puffed, it’s time to preheat the oven. Set your oven to 180°C (360°F). This moderate temperature ensures that the inside of the brioche bakes through without burning the top.
If you have an oven thermometer, use it to make sure the internal temperature is accurate. Oven dials can sometimes be off, which affects how evenly your bread bakes.
Brushing for a Shiny Crust
Before sliding your brioche into the oven, prepare an egg wash using 1 egg yolk. Whisk it lightly until smooth. Use a pastry brush to gently coat the top of each roll with a thin layer of egg yolk.
This step is optional, but it makes a big difference in appearance. The egg wash gives the bread a shiny, golden-brown crust that looks irresistible right out of the oven.
If you want to go even fancier, you can brush the top with simple syrup after baking for a slight sheen and a touch of sweetness.
Baking Time and Monitoring
Place the brioche bread in the preheated oven and bake for about 15 minutes. It should turn a rich, golden color on top while staying light and fluffy inside.
Keep an eye on it as it bakes. If the rolls start to brown too quickly on top but aren’t done inside, loosely place a sheet of aluminum foil over the pan to prevent burning.
The bread is done when the tops are golden and the interior registers 190°F (88°C) if checked with an instant-read thermometer. If you don’t have a thermometer, gently tap the top. It should sound hollow when done.
Cooling the Bread
Once baked, remove the brioche from the oven and let it sit in the tin for about 10 minutes to settle. Then transfer it to a cooling rack to allow air to circulate and keep the crust from getting soggy.
Don’t rush to cut or pull the bread apart. Let it cool for at least 20–30 minutes so the crumb sets properly. Cutting too early will compress the fluffy structure you’ve worked so hard to build.
What to Expect from a Perfect Bake
- Color: Deep golden brown on the outside
- Texture: Light and airy crumb with visible swirls from the rolled dough
- Crust: Thin and slightly crisp with a glossy finish from the egg wash
- Aroma: Buttery and mildly sweet with the comforting scent of baked bread
Troubleshooting Common Baking Issues
| Problem | Possible Cause | Solution |
|---|---|---|
| Bread is too pale | Skipped egg wash or underbaked | Always brush with egg yolk and bake fully |
| Dough collapsed | Over-proofed | Reduce proofing time slightly next bake |
| Too dry inside | Overbaked or too much flour | Stick to suggested bake time and avoid adding extra flour |
| Dense texture | Under-kneaded dough | Knead until dough passes the windowpane test |
Serving Suggestions and Storage Tips
How to Serve Milk Brioche Bread
Freshly baked milk brioche bread is incredibly versatile. Its tender crumb and buttery notes make it perfect for both simple and special occasions. Here are a few classic and creative ways to enjoy it:
- Warm from the oven: Just break the rolls apart and enjoy them as-is. This is the most satisfying way to appreciate the soft texture and rich flavor.
- Toasted with butter or jam: Slice the brioche, toast lightly, and top with a pat of butter, honey, or fruit preserves for a sweet breakfast treat.
- French toast: Brioche makes the perfect base for rich, custardy French toast. Its ability to soak up the egg mixture without falling apart gives it an edge over regular bread.
- Sandwiches: Use it for savory fillings like egg salad, grilled chicken, or roasted vegetables. The slight sweetness of the bread balances well with savory flavors.
- Bread pudding: If you’ve got leftovers, use them to make a simple yet luxurious bread pudding by layering the pieces with custard and baking.
Best Time to Eat
Milk brioche bread is at its best within the first 24 hours of baking. That’s when it’s the most fragrant, fluffy, and moist. However, its richness means it also holds up well for a few days if stored correctly.
How to Store Milk Brioche
To keep your milk brioche bread soft and fresh:
- Cool completely before storing. Warm bread traps steam and leads to soggy or stale texture.
- Wrap tightly in plastic wrap or aluminum foil. This helps retain moisture.
- Store at room temperature in an airtight container for up to 3 days. Avoid refrigerating, as it can dry out the bread faster.
- Freeze for longer storage: Wrap tightly in plastic wrap and then in foil. Store in the freezer for up to 1 month. When ready to eat, thaw at room temperature or reheat gently in the oven.
Reheating Tips
- For softening day-old rolls, microwave each roll for about 10 seconds.
- To refresh the crust, reheat in a 300°F oven for about 5–7 minutes.
- If frozen, allow to thaw completely at room temperature before warming.
Maintaining Texture After Storage
Brioche bread’s charm lies in its light, airy structure. To help maintain that texture, avoid exposing it to air for extended periods. If you notice it’s getting slightly dry, you can gently steam it before serving to reintroduce moisture.
PART 6: Expert Tips and Flavor Variations
Key Tips for Perfect Brioche Every Time
Mastering milk brioche bread doesn’t stop at just following the recipe. Here are proven techniques to help you improve each bake:
1. Don’t Add Extra Flour
Brioche dough should be slightly sticky. Resist the urge to add more flour during kneading. Adding too much dries out the bread and leads to a heavy texture.
2. Use the Windowpane Test
To check gluten development, stretch a small piece of dough between your fingers. It should stretch thin enough to see light through without tearing. This ensures your dough has enough elasticity to trap air bubbles for a fluffy loaf.
3. Avoid Cold Ingredients
Use ingredients at room temperature. Cold eggs or milk slow down yeast activity and interfere with gluten formation, resulting in dense or uneven bread.
4. Brush with Egg Yolk for Shine
An egg yolk brush before baking creates a glossy, golden crust. For extra sheen, you can brush the top again with simple syrup as soon as it comes out of the oven.
5. Control Your Proofing Time
If the dough rises too long, it can collapse during baking. Use the finger-poke test during each proof: if the indentation springs back slowly and partially, it’s ready. Fast recovery means under-proofed; no recovery means over-proofed.
6. Mind the Oven Temperature
Too hot, and the bread browns before it’s cooked inside. Too cool, and it won’t rise properly. Stick to 180°C (360°F) for even baking. If you’re unsure, use an oven thermometer for accuracy.
Creative Variations on Classic Milk Brioche
Once you’ve mastered the classic version, try giving it a twist with these flavor variations. Each adds a little something extra while preserving the beloved softness of brioche.
1. Sweet Vanilla Brioche
Add 1 teaspoon of vanilla extract to the dough along with the milk and yeast mixture. The vanilla enhances the overall aroma and adds a subtle sweetness.
2. Citrus Zest Brioche
Grate some fresh lemon or orange zest into the flour for a fragrant, bright note. This is perfect for spring brunches or breakfast gatherings.
3. Cinnamon Sugar Swirl
Before rolling each dough ball into an oval, brush the surface with melted butter and sprinkle with cinnamon sugar. Roll it up and bake as usual for a lightly spiced interior.
4. Honey-Topped Brioche
Instead of egg wash, brush the top with a bit of warm honey after baking. It adds sweetness and a sticky glaze without overpowering the bread’s flavor.
5. Filled Brioche Rolls
Flatten the dough balls and place a teaspoon of fruit preserves or chocolate spread in the center before rolling them up. Seal well before placing in the pan.
6. Mini Brioche Buns
Divide the dough into smaller portions and bake them as individual rolls on a tray. This is perfect for parties, kids’ snacks, or quick breakfasts.
Pairing Ideas (Without Alcohol or Pork Products)
Looking for ideas on how to enjoy your brioche? Here are some delicious, family-friendly pairings:
- With scrambled eggs or omelets for a filling breakfast
- Spread with almond butter and banana slices for a quick snack
- Dipped into creamy vegetable soups for a cozy meal
- Topped with soft cheese and fresh berries for a light dessert
The gentle sweetness and buttery richness of milk brioche bread make it the perfect companion for both sweet and savory toppings.
Conclusion
Milk brioche bread is more than just a loaf — it’s a rich, satisfying experience from the first whiff of buttery aroma to the last soft bite. With simple pantry ingredients and a little patience, you can create a bakery-style bread right in your own kitchen.
This recipe walks you through every detail, from activating the yeast to shaping the rolls and baking them to golden perfection. By understanding the science behind enriched dough and applying the expert tips provided, you’ll get consistent, delicious results every time.
Whether you serve it warm for breakfast, use it in a special dish, or enjoy it plain straight from the oven, milk brioche bread is a timeless treat that fits into any kitchen and any occasion. Once you’ve tried this version, it might just become your go-to homemade bread recipe.


