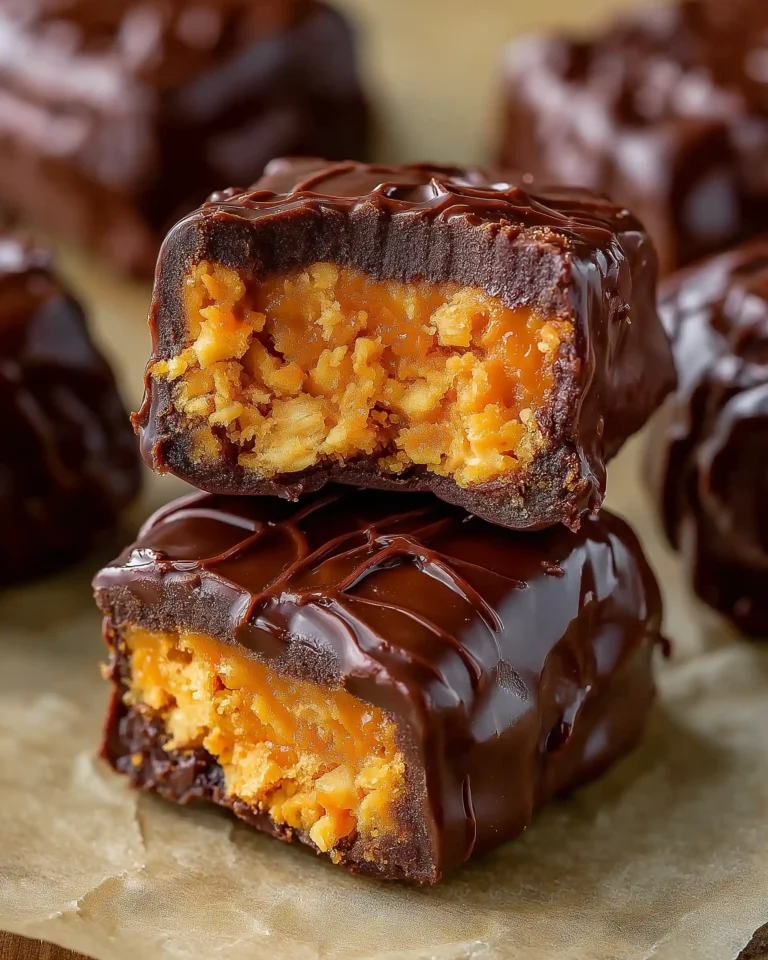
If you’ve ever wished for a way to enjoy your favorite chocolate-coated candy bars without the extra processed sugar and artificial ingredients, this healthy homemade Butterfingers recipe is exactly what you need. Made with simple pantry staples like corn flakes, peanut butter, maple syrup, and chocolate, this version is naturally sweetened, rich in flavor, and perfect for satisfying that sweet tooth while staying mindful of what you eat. Unlike store-bought candy bars, which are loaded with preservatives and additives, this recipe keeps things wholesome and approachable, all without compromising on taste.
The beauty of this treat lies in its crunchy yet chewy texture, balanced sweetness, and indulgent chocolate coating. It’s also freezer-friendly, making it an excellent option for meal prepping snacks ahead of time. Whether you’re someone who loves experimenting in the kitchen or simply wants a healthier alternative to traditional candy, this homemade version is both easy and rewarding to make.
In this article, we’ll dive into how to make this healthy homemade Butterfingers recipe step by step, explore ingredient benefits, share variations, and offer practical tips for achieving the perfect candy-like texture at home. By the end, you’ll not only have a delicious recipe to enjoy but also the knowledge to tweak it to your taste and lifestyle.
Why Choose a Healthy Homemade Butterfingers Recipe?
Healthier Ingredients Compared to Store-Bought Candy
Traditional Butterfinger candy bars rely heavily on refined sugar, corn syrup, artificial flavorings, and preservatives. While delicious, these ingredients are not ideal for someone who wants to cut back on processed foods. The healthy homemade Butterfingers recipe uses natural sweeteners like maple syrup and molasses, combined with peanut butter for richness. Instead of processed candy coating, it uses simple melted chocolate chips mixed with a touch of coconut oil for smoothness.
This shift in ingredients means you can indulge without the guilt. Maple syrup provides trace minerals and a deep, caramel-like flavor, while molasses adds complexity and nutrients like iron. Corn flakes give that signature crunch but without the extra additives that usually come in candy bars. By choosing these whole-food alternatives, you’re not just making a dessert, you’re making a mindful choice for your health.
The Benefits of Peanut Butter in Homemade Treats
Peanut butter is the star of this recipe, delivering creaminess, protein, and healthy fats. Unlike candy fillings that use sugar-heavy nougat or processed oils, peanut butter provides satiety and keeps the snack more balanced. The drippy consistency of natural peanut butter works perfectly here, helping to bind the corn flakes with the syrup while keeping the texture chewy and pliable.
Peanut butter is also versatile, making this recipe easy to adjust depending on your dietary preferences. For example, if you’re sensitive to peanuts, you can easily swap it for almond butter or sunflower seed butter while still keeping the flavor rich and indulgent. This flexibility allows the healthy homemade Butterfingers recipe to adapt to a variety of needs, making it a more inclusive dessert option.
A Candy That’s Freezer-Friendly and Long-Lasting
One of the best aspects of this homemade Butterfingers recipe is how well it stores. Once coated in chocolate, the bars can be frozen for up to two months without losing texture or flavor. This makes it an excellent option for meal-prepped desserts or for keeping a stash of healthier candy ready whenever cravings strike. Unlike store-bought bars that may sit on shelves for months thanks to preservatives, this version lets you enjoy freshness and quality with every bite.
Freezer-friendly snacks also make portion control easier. Instead of feeling tempted to eat an entire store-bought candy bar, you can simply grab a single bite-sized piece straight from the freezer. This built-in moderation makes it much simpler to enjoy sweets responsibly, while still feeling fully satisfied.
Print
Healthy Homemade Butterfingers Recipe
- Total Time: 2 hours 5 minutes
- Yield: 18 bites
- Diet: Vegetarian
Description
A healthier twist on the classic candy bar, this homemade Butterfingers recipe is made with peanut butter, maple syrup, corn flakes, and real chocolate for a crunchy and satisfying treat.
Ingredients
1 1/2 cups organic corn flakes
3/4 cup drippy peanut butter
1/3 cup maple syrup
1 teaspoon molasses (optional)
1/2 cup chocolate chips
1 teaspoon coconut oil
Instructions
1. Place cornflakes in a resealable bag and crush into small pieces.
2. In a small saucepan over low-medium heat, combine peanut butter, maple syrup, and molasses (if using). Stir gently until smooth and well combined. Do not overheat.
3. Remove from heat and stir in the crushed corn flakes until evenly coated.
4. Spoon the mixture into a silicone ice cube tray, filling each cavity about halfway. Freeze for at least 2 hours until firm.
5. Melt chocolate chips with coconut oil in the microwave in 15-second intervals, stirring until smooth.
6. Pop hardened bites from the tray and dip each into melted chocolate, coating completely. Place on a parchment-lined tray.
7. Freeze again until the chocolate hardens and enjoy!
Notes
If you don’t have a silicone ice cube tray, spread the mixture evenly on a parchment-lined baking sheet. Freeze until firm, cut into squares, then dip into melted chocolate as directed.
These bites store best in the freezer in an airtight container for up to 2 months. Enjoy them straight from the freezer for the perfect crunch.
- Prep Time: 2 hours
- Cook Time: 5 minutes
- Category: Dessert
- Method: Freezer
- Cuisine: American
Step-by-Step Guide to Making Healthy Homemade Butterfingers
Preparing the Base Mixture
The base of this healthy homemade Butterfingers recipe begins with crushed corn flakes. The key here is to create small, even pieces that mimic the signature crisp texture found in candy bars. You don’t want them pulverized into dust, but rather lightly crushed so they still retain crunch once coated in the sticky peanut butter mixture. Using a resealable bag and a rolling pin works perfectly for this step, giving you control over the size of the flakes.
Next comes the peanut butter, maple syrup, and a touch of molasses. These are gently heated together on low to medium heat until smooth and well combined. It is important not to rush this step, as overheating can scorch the peanut butter and alter the flavor. A slow, gentle heat keeps the mixture creamy and workable. Once the syrupy base is ready, the crushed corn flakes are stirred in, creating a sticky, crunchy mixture that will form the foundation of each bite.
Shaping the Candy Bites
Instead of forming a traditional bar, this version uses a silicone ice cube tray to shape bite-sized pieces. This makes the candy easier to portion and ensures even coating when dipped in chocolate later on. Each cavity of the tray is filled about halfway with the mixture, pressing lightly to compact it without making it too dense. Once all the cavities are filled, the tray goes into the freezer to set for at least two hours.
If you don’t own a silicone ice cube tray, there’s a simple workaround. Spread the mixture onto a parchment-lined baking sheet, press it evenly, and freeze. Once firm, the sheet can be cut into squares or rectangles. These shapes can then be dipped into chocolate the same way, giving you the same delicious result without special equipment.
Coating with Chocolate
Once the base bites are hardened, it’s time for the most indulgent part, coating them in chocolate. Chocolate chips are melted in short increments in the microwave with a teaspoon of coconut oil, which helps create a smooth and glossy coating. Stirring frequently ensures the chocolate melts evenly without burning.
Each bite is carefully dipped into the melted chocolate, making sure it is fully coated. Using a spoon to drizzle and smooth the chocolate around the candy helps cover any uneven spots. After dipping, the candies are placed back on a parchment-lined tray and returned to the freezer, where the chocolate hardens into a crisp shell. This final layer transforms the simple peanut butter cornflake base into a candy that looks and tastes decadent, yet remains healthier than anything you’d buy at the store.
Storage and Serving Tips
The best way to store these homemade Butterfingers is in the freezer. The chocolate shell protects the inside from freezer burn, keeping each bite as fresh as the day it was made. Stored in an airtight container, they last for one to two months. The beauty of this storage method is that you can enjoy them straight from the freezer, as they don’t require thawing.
For serving, these bite-sized treats are perfect as an afternoon pick-me-up, a sweet addition to lunchboxes, or even as a healthier dessert option after dinner. Since they’re portioned individually, you can enjoy one or two without overindulging, making them ideal for anyone looking to balance indulgence with mindful eating.
Nutritional Benefits and Smart Ingredient Choices
The Role of Natural Sweeteners
One of the biggest differences between this healthy homemade Butterfingers recipe and store-bought candy is the sweetener choice. Traditional candy bars are packed with refined white sugar and corn syrup, which can cause blood sugar spikes and energy crashes. In contrast, this recipe uses maple syrup and molasses in moderation.
Maple syrup is a natural sweetener that contains trace minerals like manganese and zinc. It delivers sweetness with a subtle caramel-like flavor, enhancing the taste without overwhelming it. Molasses, while optional, adds depth and also provides small amounts of iron, calcium, and magnesium. Together, they offer a more wholesome alternative to processed sugars, helping you enjoy sweetness without the same drawbacks.
Peanut Butter: Protein and Healthy Fats
Peanut butter is a powerhouse ingredient in this recipe. Not only does it add creaminess and flavor, but it also contributes protein and heart-healthy fats. Each bite delivers a small but meaningful boost of nutrition that keeps you feeling satisfied longer than typical candy bars. This is because protein and fat help slow digestion, balancing the natural sugars and reducing sudden hunger.
When choosing peanut butter, it’s best to opt for a natural variety with minimal ingredients. Look for jars that list only peanuts or peanuts and salt. This ensures you avoid unnecessary hydrogenated oils or added sugars that can take away from the health benefits.
Chocolate with Antioxidants
The chocolate coating isn’t just indulgent, it also has nutritional benefits when chosen wisely. Dark chocolate in particular contains antioxidants, such as flavonoids, which may support heart health. Using chocolate chips with a higher cocoa content means you’re adding more antioxidants and less refined sugar to your treats.
Even if you use semi-sweet chocolate chips, adding just a teaspoon of coconut oil makes the coating smoother and easier to work with. Coconut oil itself provides a small amount of medium-chain triglycerides (MCTs), which are fats that the body can convert into quick energy. This small addition makes the chocolate coating both functional and flavorful.
A Balanced Sweet Treat
When combined, these ingredients create a candy that feels indulgent but is far more balanced than commercial alternatives. Each serving of this healthy homemade Butterfingers recipe offers a mix of carbohydrates, protein, and fat. The balance helps satisfy cravings while providing a steady release of energy, rather than a sugar high followed by a crash.
This makes it a dessert that not only tastes amazing but also fits into a more health-conscious lifestyle. Whether you enjoy it after a meal, as an afternoon snack, or even as part of a lunchbox surprise, you’re giving yourself or your family a treat that delivers flavor and nourishment.
Creative Variations and Flavor Twists
Nut and Seed Butter Alternatives
While peanut butter is classic for this recipe, it’s not the only option. For those with peanut allergies or simply a desire to experiment, almond butter makes an excellent substitute. It offers a slightly milder flavor but still provides creaminess and healthy fats. Sunflower seed butter is another fantastic option, especially for those avoiding nuts entirely. It has a naturally sweet, nutty taste that pairs beautifully with maple syrup and chocolate.
Experimenting with different nut and seed butters allows you to create variations of the healthy homemade Butterfingers recipe that suit your preferences while keeping the core nutritional benefits intact. Each alternative brings its own unique flavor profile, making it fun to change things up from batch to batch.
Flavor Enhancements with Natural Add-Ins
If you’d like to add extra layers of flavor, consider mixing in a splash of alcohol-free vanilla flavor when heating the peanut butter and maple syrup. Vanilla enhances sweetness naturally and deepens the overall taste of the candy. A pinch of sea salt sprinkled over the chocolate coating before freezing can also elevate the flavor, creating that irresistible salty-sweet contrast.
For a more adventurous twist, spices like cinnamon or cardamom can be stirred into the base mixture. These warming spices not only add a unique flavor but also bring subtle health benefits, such as antioxidants and anti-inflammatory properties.
Chocolate Variations
While semi-sweet or dark chocolate chips are the most common choice, you can tailor the coating to your taste. For those who prefer a sweeter bite, milk chocolate chips will create a softer flavor. On the other hand, if you love a bold, slightly bitter finish, choose chocolate with 70 percent or higher cocoa content. White chocolate can also be used for a completely different spin, though it tends to be sweeter and less nutrient-dense.
You can even create a two-tone effect by dipping the candy in dark chocolate first, letting it set, and then drizzling melted white chocolate over the top. This adds visual appeal and a layered taste experience without much extra effort.
Texture and Crunch Options
Corn flakes give the candy its iconic crunch, but you can substitute them with other crispy cereals for variety. Brown rice crisps or puffed quinoa are excellent alternatives that still deliver that satisfying snap while offering a slightly different flavor.
For a more indulgent twist, try adding finely chopped nuts, such as almonds or pecans, into the base mixture along with the corn flakes. This boosts the crunch factor while also adding extra nutrients like fiber and magnesium. Coconut flakes can also be sprinkled into the mixture, adding both texture and a subtle tropical note.
Portion and Presentation Ideas
The silicone ice cube tray method is convenient, but presentation can be customized. For party-ready treats, you can press the mixture into silicone molds shaped like hearts, stars, or other fun designs before dipping them in chocolate. For a more rustic look, simply spread the mixture on a tray, cut into uneven chunks, and coat with chocolate for a “candy bark” effect.
These small adjustments make the recipe feel fresh and exciting each time, giving you endless possibilities to enjoy your homemade Butterfingers in new and creative ways.
Tips, Tricks, and Common Mistakes to Avoid
Tips for the Perfect Texture
One of the secrets to achieving the best homemade Butterfingers is handling the corn flakes correctly. Crushing them into small, uniform pieces ensures that they mix evenly with the peanut butter and syrup mixture. If the flakes are too large, the candy won’t hold together as well. If they’re too fine, the texture becomes more chewy than crispy. Aim for a balance that gives you crunch while still allowing the mixture to bind properly.
Another texture tip is to avoid overheating the peanut butter mixture. Low to medium heat is sufficient to melt and combine the ingredients. Overheating can cause the oils in the peanut butter to separate, leading to a greasy, grainy mixture instead of a smooth, sticky one. Stir constantly and remove from heat as soon as everything is well blended.
Tricks for Easy Chocolate Coating
When melting chocolate, patience pays off. Microwave in short 15-second intervals and stir each time to prevent burning. If you prefer using the stovetop, a double boiler is ideal, as it melts chocolate gently and evenly. Adding a teaspoon of coconut oil makes the chocolate smoother and gives the final coating a glossy finish.
To avoid messy dipping, use a fork to lower each piece into the melted chocolate, allowing excess chocolate to drip off before placing it on parchment. This helps achieve a cleaner coating and prevents thick clumps at the base of each candy.
Storage Solutions for Long-Lasting Freshness
Since these treats are freezer-friendly, proper storage is essential. Always store them in a sealed, airtight container to prevent freezer burn and maintain freshness. If stacking candies in a container, separate the layers with parchment paper to prevent them from sticking together.
For quick snacking, consider pre-portioning the candies into smaller containers or freezer bags. This makes it easier to grab a piece or two without exposing the entire batch to air each time you open the container.
Common Mistakes to Avoid
One of the most common mistakes is using overly processed peanut butter with added sugars and oils. This type of peanut butter can change the consistency of the mixture, making it too oily or too sweet. Stick to natural, drippy peanut butter for best results.
Another mistake is skipping the freeze step before dipping in chocolate. If the base isn’t fully hardened, it will crumble or fall apart in the melted chocolate, creating a mess. Always give the mixture at least two hours in the freezer before moving on to the coating stage.
Finally, avoid rushing the setting process after dipping. Placing the coated candies directly in the freezer allows the chocolate to harden quickly and evenly. Leaving them at room temperature risks a sticky, uneven finish.
Small Adjustments for Big Improvements
If you find the candy too sweet, try reducing the maple syrup slightly and increasing the corn flakes for more crunch. If you prefer a richer, more decadent flavor, opt for darker chocolate with a higher cocoa content. For those who love salty-sweet combinations, sprinkle a pinch of flaky sea salt on top before the chocolate sets.
These small tweaks allow you to tailor the healthy homemade Butterfingers recipe to your taste, ensuring every batch feels personalized and satisfying.
Conclusion: Enjoy Candy the Smarter Way
This healthy homemade Butterfingers recipe proves that you don’t need artificial ingredients or excessive sugar to enjoy a candy bar experience. By using simple, wholesome ingredients like peanut butter, maple syrup, corn flakes, and real chocolate, you get the same satisfying crunch and sweetness in a way that feels better for your body.
Throughout this guide, we explored why making your own version at home is healthier, how to prepare it step by step, the nutritional benefits of each ingredient, creative flavor variations, and the most important tips for success. The result is a candy that is freezer-friendly, portion-controlled, and endlessly adaptable to your taste.
Instead of reaching for store-bought candy filled with preservatives, you can prepare a batch of these homemade bites in just a few steps and keep them ready whenever cravings strike. Whether you enjoy them as a quick afternoon snack, a balanced dessert, or a fun kitchen project with family, these little bites offer both indulgence and nourishment.
Once you try this recipe, you’ll realize how easy it is to bring a beloved classic candy into a healthier, more mindful lifestyle. The crunch, the sweetness, and the rich chocolate coating all come together in a way that satisfies without compromise. Your kitchen can truly become the place where indulgence meets wellness, one bite at a time.


