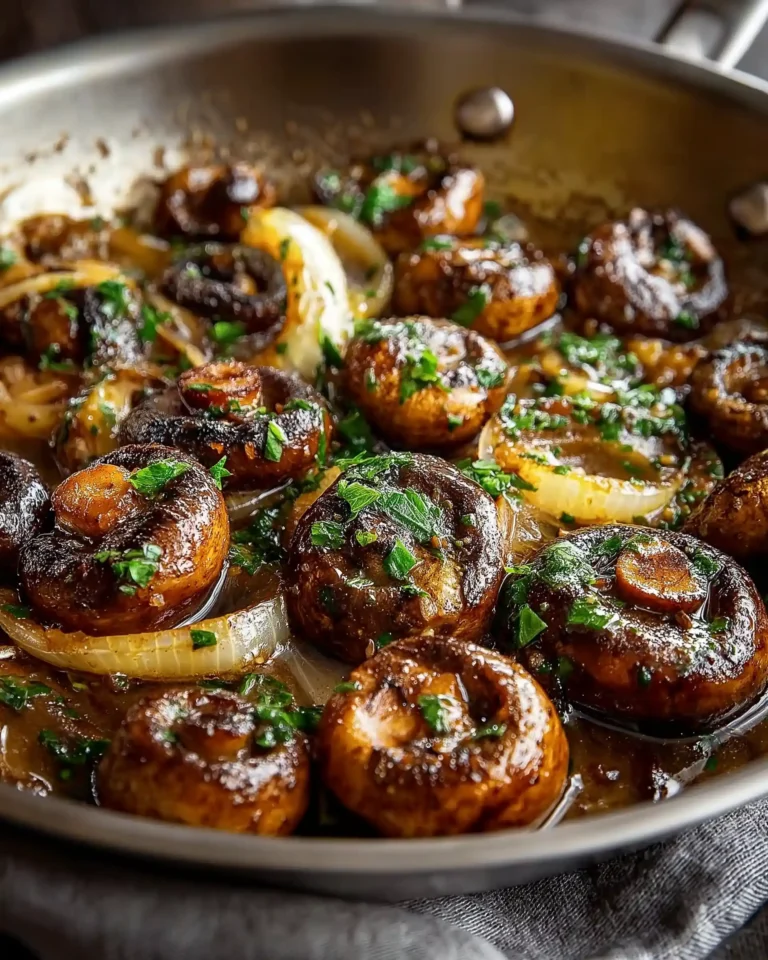
If you’re searching for a savory side dish that’s easy to make, bursting with flavor, and pairs well with just about any meal, Garlic Butter Mushrooms and Onions is your answer. This dish is known for its rich buttery taste, mellow garlic undertones, and a slight kick from chili flakes that brings everything together. Perfect for weeknight dinners, family gatherings, or special occasions, it’s a side dish that wins everyone over.
In this article, we’ll explore how to make garlic butter mushrooms and onions using simple ingredients while unlocking deeper culinary insights along the way. We’ll walk through each part, from ingredient preparation to serving ideas and variations. You’ll also get pro tips, storage advice, health benefits, and answers to frequently asked questions to help you master this delicious dish. Let’s dive into the world of comforting, sizzling skillet mushrooms and onions.
Getting Started with Garlic Butter Mushrooms and Onions
Choosing the Right Mushrooms for Flavor and Texture
Not all mushrooms are created equal, and the choice you make can impact both taste and texture. For this dish, small button mushrooms are ideal because they cook evenly, hold their shape, and soak up the buttery garlic mixture beautifully. If you prefer a more earthy and bold flavor, cremini mushrooms or baby bellas can be used as alternatives. These varieties have a firmer texture and slightly meatier taste.
Before cooking, make sure to clean the mushrooms gently with a damp cloth or soft brush. Avoid rinsing them under running water as mushrooms are highly absorbent and can become soggy. Trim any dry or rough ends of the stems but keep most of the stems intact for added bite and texture.
Preparing Your Onions and Garlic for Maximum Aroma
Mushrooms might be the star, but onions and garlic are the flavor foundation of this dish. Use a medium yellow or white onion, finely minced to blend well without overpowering the mushrooms. As it cooks, the onion becomes sweet and caramelized, adding depth to the dish.
When it comes to garlic, fresh is best. Use four cloves, chopped or crushed. Crushing helps release more of the garlic oils and aroma. Garlic should be added after the mushrooms begin to brown, to avoid burning it early and creating a bitter taste. Timing is key to achieving that golden, savory harmony.
Selecting the Right Fat: Olive Oil and Butter Balance
This dish uses both olive oil and butter, and the balance is essential. Olive oil helps the mushrooms brown faster and gives them a nice sear, while butter contributes to the rich flavor and smooth texture. Begin with olive oil to sauté the mushrooms, then add butter in stages to build layers of flavor.
Divide the butter into two additions — first during the garlic-onion phase and again near the end of cooking. This approach ensures that the butter does not burn and that it emulsifies well with the remaining broth and lemon juice to form a glossy, flavorful sauce.
Why Lemon Zest and Juice Make a Big Difference
You might not think citrus has a place in a warm, buttery mushroom dish, but a zest of lemon and a tablespoon of lemon juice help brighten the flavors. The acidity cuts through the richness of the butter, and the zest enhances the natural earthy flavor of the mushrooms without being overly tangy.
Add the lemon elements once the stock or broth has reduced slightly. This allows the flavors to mix into the dish without overpowering the garlic and herbs.
Chili Flakes: Turning Up the Heat (Just a Bit)
The subtle touch of chili flakes brings warmth and complexity to the dish. Don’t worry — the goal isn’t to make it spicy but to give it a little kick that balances the garlic and butter. Half a teaspoon is a good starting point, but feel free to adjust to your taste preferences.
Kitchen Equipment That Makes It Easy
- Large skillet or sauté pan: Choose one with a wide surface so the mushrooms can sear rather than steam.
- Wooden spoon or heat-safe spatula: Ideal for stirring without breaking the mushrooms.
- Microplane or fine grater: For zesting the lemon.
- Sharp chef’s knife: To mince the onions and chop the garlic effectively.
Having the right tools speeds up prep time and ensures everything cooks evenly, especially when working with quick-cook dishes like this one.
Print
Garlic Butter Mushrooms and Onions Recipe
- Total Time: 25 minutes
- Yield: 6 servings
Description
An easy, flavorful side dish made with sautéed mushrooms, caramelized onions, garlic, butter, and a splash of lemon. Perfect for any dinner table.
Ingredients
16 ounces small button mushrooms
2 tablespoons olive oil
4 cloves garlic, chopped or crushed
1 medium onion, minced
1/2 cup chicken stock
Zest from 1 medium lemon
1 tablespoon lemon juice
1/2 teaspoon chili flakes
4 tablespoons butter, divided
2 tablespoons chopped parsley
Kosher salt, to taste
Fresh cracked black pepper, to taste
Instructions
1. Brush mushrooms clean. Trim stem ends if dry. Leave whole or halve if large.
2. Heat a large skillet over medium-high heat. Add olive oil, then mushrooms. Cook until browned, 3–5 minutes.
3. Add 2 tablespoons butter, then onions and garlic. Sauté until soft and lightly caramelized, 3–5 minutes.
4. Add stock, lemon zest, lemon juice, and chili flakes. Simmer 2 minutes until slightly reduced.
5. Stir in remaining butter and parsley. Cook 1 minute more.
6. Season with salt and pepper. Serve warm.
Notes
Use cremini mushrooms for a deeper flavor.
For a vegan version, substitute plant-based butter and use vegetable stock.
Avoid overcrowding the pan to allow mushrooms to brown properly.
- Prep Time: 10 minutes
- Cook Time: 15 minutes
- Method: Sautéed
- Cuisine: American
The Step-by-Step Cooking Method for Perfect Mushrooms Every Time
Step 1: Cleaning and Prepping the Mushrooms
Begin by brushing your mushrooms clean using a damp paper towel or a soft brush. Mushrooms act like sponges, so avoid rinsing them directly under water. If your mushrooms are small, leave them whole to maintain a satisfying bite. For larger mushrooms, cut them in half to ensure even cooking and better caramelization.
Trim off the dried or tough ends of the stems, but don’t remove the whole stem unless it’s very woody. The stems carry flavor and texture that complement the caps.
Step 2: Searing the Mushrooms for a Golden Finish
Heat a large skillet over medium-high heat and add 2 tablespoons of olive oil. Once the oil shimmers, add the mushrooms in a single layer. Don’t overcrowd the pan — you want the mushrooms to sear and caramelize, not steam. Let them cook undisturbed for 2 minutes, then stir occasionally.
After about 3 to 5 minutes, the mushrooms should be golden brown with slightly crispy edges. This browning step builds flavor, so be patient and allow the mushrooms to release their moisture and then reabsorb it for the best texture.
Step 3: Adding the Aromatics – Garlic and Onion
Once the mushrooms are seared, add 2 tablespoons of butter to the pan. Let it melt gently, then add the minced onion and crushed garlic. Stir everything together, allowing the onions and garlic to coat the mushrooms.
Sauté this mixture for another 3 to 5 minutes, until the onions become translucent and lightly caramelized, and the garlic is golden. Keep stirring to prevent burning — a burnt garlic note can overpower the dish.
Step 4: Deglazing with Chicken Stock and Brightening with Lemon
Pour in ½ cup of chicken stock (a low-sodium broth works great), then add lemon zest and 1 tablespoon of lemon juice. This deglazes the pan, lifting all those caramelized bits from the bottom and infusing them into the liquid.
Let the mixture simmer for 2 minutes so the liquid reduces slightly. As it simmers, it creates a silky glaze that clings to the mushrooms and onions.
Add ½ teaspoon of chili flakes, or adjust to taste. This small amount adds just enough heat to cut through the richness of the butter and lift the other flavors.
Step 5: Finishing Touches – More Butter and Fresh Parsley
Add the remaining 2 tablespoons of butter, letting it melt fully. Then, stir in 2 tablespoons of freshly chopped parsley. This final burst of butter brings the dish together with a glossy, velvety finish, while the parsley gives it freshness and color.
Stir everything to coat evenly, season with kosher salt and freshly cracked black pepper to taste, and remove from heat.
Step 6: Serving Tips to Elevate Your Presentation
- Serve immediately while the mushrooms are warm and coated in the buttery sauce.
- Use a shallow serving bowl so the sauce pools around the mushrooms, encouraging spoonfuls of both solids and sauce.
- Garnish with a sprinkle of parsley and a light crack of pepper on top for visual appeal.
This method is foolproof, fast, and results in a side dish that is both rustic and refined. Whether you’re serving it with grilled chicken, roasted vegetables, or just some fluffy rice or mashed potatoes, garlic butter mushrooms and onions bring savory comfort to any plate.
Flavor Combinations and Pairings That Work
Complementary Side Dish Pairings
Garlic butter mushrooms and onions are versatile and can fit into nearly any meal. Their buttery richness, garlicky depth, and slight citrusy brightness make them the perfect companion to a wide range of main courses. Try pairing them with:
- Grilled or roasted chicken: The umami flavor of mushrooms complements the mildness of poultry beautifully.
- Pan-seared tofu or tempeh: For a vegetarian main, these mushrooms can enhance the protein’s texture and flavor.
- Mashed or roasted potatoes: Serve mushrooms over creamy mashed potatoes for a rich, earthy contrast.
- Steamed white or brown rice: The buttery sauce coats rice grains wonderfully, adding moisture and taste.
- Pasta or orzo: Combine with cooked pasta for a rustic, no-fuss garlic butter mushroom pasta bowl.
Their adaptability is one of their biggest strengths — they work with light proteins, hearty carbs, or even as a topping for toast or grain bowls.
Using as a Main for Plant-Based Meals
While this dish is most often served as a side, it can easily transition into the main component of a vegetarian meal. Thanks to their naturally meaty texture, mushrooms are satisfying enough to serve as a centerpiece. Here’s how:
- Grain Bowl Base: Start with quinoa or barley, then top with garlic butter mushrooms and onions, a handful of greens, and a drizzle of lemon tahini dressing.
- Stuffed Sweet Potatoes: Scoop these mushrooms into a roasted sweet potato for a nutrient-packed, flavorful lunch.
- Flatbread Topping: Spread hummus on warm flatbread and top with the mushroom mixture and arugula for a simple, elegant meal.
The key is balancing the mushrooms’ richness with lighter, brighter ingredients — greens, citrus, or whole grains all pair beautifully.
Ingredient Substitutions for Customization
Whether you’re looking to adapt based on what’s in your kitchen or for dietary preferences, here are some smart substitutions:
| Ingredient | Swap Option | Resulting Change |
|---|---|---|
| Button mushrooms | Cremini or baby bella | Richer flavor, firmer texture |
| Chicken stock | Vegetable broth | Suitable for vegetarian diets |
| Butter | Plant-based butter | Keeps dish dairy-free or vegan |
| Onion | Shallots | Sweeter, more delicate onion flavor |
| Lemon juice | Balsamic vinegar or apple cider | Slightly tangier and deeper flavor |
| Chili flakes | Smoked paprika or cayenne | Different style of heat and depth |
These swaps ensure the recipe remains accessible, customizable, and welcoming for all kinds of eaters.
Flavor Profile Breakdown
Let’s break down what makes this dish so addictively good:
- Savory base: Mushrooms provide a hearty, earthy umami that feels like comfort food.
- Sweetness: Comes from the caramelized onions and lightly browned garlic.
- Tangy freshness: Lemon juice and zest brighten the overall profile, balancing the butter.
- Subtle heat: Chili flakes sneak in warmth without being overwhelming.
- Creamy finish: Butter gives it that rich, glossy, indulgent mouthfeel.
This mix of flavors creates a balance that feels gourmet while still being incredibly simple and quick to make.
Kid-Friendly and Crowd-Pleaser Variations
- Leave out chili flakes for a mild version everyone will enjoy.
- Add sweet corn or green peas for color and natural sweetness — perfect for kids.
- Top with shredded mozzarella and bake for a cheesy version that can double as a hot dip or appetizer.
No matter who you’re feeding, you can tailor garlic butter mushrooms and onions to suit the audience. That’s what makes it such a reliable, go-to side dish.
Nutritional Insights and Health Benefits
A Low-Calorie, Flavor-Packed Option
Despite its rich, indulgent flavor, garlic butter mushrooms and onions are surprisingly low in calories. A serving contains just 143 kcal, making it an ideal side dish for those watching their intake without compromising on taste.
Much of the richness comes from the butter and olive oil, but the dish remains balanced thanks to low-calorie, nutrient-dense mushrooms and onions. You’re getting both comfort and health in every bite.
| Nutrient | Amount per Serving |
|---|---|
| Calories | 143 kcal |
| Protein | 3g |
| Fat | 12g |
| Carbs | 5g |
| Fiber | 1g |
| Sugar | 2g |
| Sodium | 103mg |
| Potassium | 303mg |
These values make it clear that while the dish offers fat for richness, it keeps carbs and sugars to a minimum, which is great for low-carb or balanced-diet followers.
Health Benefits of Mushrooms and Onions
Mushrooms are the nutritional powerhouse behind this dish. They’re rich in antioxidants like selenium and ergothioneine, which support immune function and fight oxidative stress. Additionally, mushrooms provide:
- Vitamin D: Especially when exposed to sunlight during growth, helping with calcium absorption.
- B Vitamins: Including riboflavin and niacin, supporting energy production.
- Potassium: Helps regulate fluid balance, muscle contractions, and nerve signals.
Onions, on the other hand, are packed with quercetin, a natural antioxidant that supports heart health and reduces inflammation. When combined with garlic, which contains allicin, known for its antibacterial and antiviral benefits, this dish goes beyond flavor into functional nutrition.
Healthy Fats Done Right
The combination of olive oil and butter delivers a balance of healthy unsaturated and saturated fats. Olive oil provides monounsaturated fats that promote heart health and reduce bad cholesterol. Meanwhile, butter adds flavor and helps absorb fat-soluble vitamins.
Using a measured amount of butter (4 tablespoons split in two stages) ensures you still enjoy that velvety finish without overloading on fat. Plus, using olive oil for searing allows for higher-heat cooking and better browning.
Gluten-Free and Easily Dairy-Free
This recipe is naturally gluten-free, as it contains no wheat or flour-based ingredients. That makes it safe for those with gluten sensitivities or celiac disease.
To make it dairy-free, simply swap in a plant-based butter. The dish maintains its creaminess and depth of flavor without the need for dairy, making it suitable for a wider range of dietary needs.
Good for Gut Health
Mushrooms contain beta-glucans, which support gut health and immune function. Garlic and onions act as prebiotics, feeding the good bacteria in your gut and improving digestive health over time.
Together, these ingredients not only taste good but actively contribute to your well-being when enjoyed as part of a balanced diet.
Portion Control Without Effort
One of the hidden benefits of garlic butter mushrooms and onions is that it’s self-limiting by richness. Because the dish is so flavorful and satisfying, a modest portion goes a long way. This makes it easier to maintain proper portion control and enjoy indulgence without overindulgence.
Time-Saving Tips and Meal Prep Ideas
Prepping Ahead to Save Time
One of the best things about garlic butter mushrooms and onions is how quickly it comes together — just 25 minutes from start to finish. But if you’re looking to save even more time, prepping a few key ingredients in advance makes the process seamless.
Here’s how to break it down:
- Mushrooms: Clean and trim them up to 24 hours in advance. Store them in a breathable paper bag or a covered container lined with paper towels to keep them fresh and dry.
- Onions and Garlic: Mince both and store in an airtight container in the fridge. They’ll keep well for up to 2 days without losing flavor.
- Lemon zest and juice: Zest and juice the lemon and store them separately. Fresh lemon juice holds well in a sealed jar or container for up to 3 days.
With these elements ready to go, you can assemble and cook the entire dish in under 10 minutes, making it perfect for busy nights or last-minute side dishes.
Cooking in Batches for the Week
This dish stores and reheats well, making it ideal for meal prep. Here’s how to do it right:
- Double the recipe if you want to include it in multiple meals throughout the week.
- Allow the cooked mushrooms and onions to cool to room temperature before storing.
- Store in an airtight container in the refrigerator for up to 4 days.
When reheating, use a skillet over medium heat rather than a microwave. A quick sauté in a small amount of butter or olive oil revives the texture and flavor.
Freezing Tips for Longer Storage
Although mushrooms have high water content and can become a bit softer after freezing, you can still store leftovers for longer use:
- Let the dish cool completely.
- Transfer to a freezer-safe, airtight container or zip-top freezer bag.
- Label and date the container.
You can freeze it for up to 2 months. When ready to use, thaw overnight in the fridge, then reheat on the stovetop. The sauce may need a small splash of broth or water to loosen it up during reheating.
Smart Meal Prep Pairings
Looking to build a full meal prep plan around garlic butter mushrooms and onions? Pair them with these simple, prep-friendly components:
- Cooked brown rice or quinoa: Portion into containers and top with mushrooms for an easy lunch.
- Pre-grilled chicken or turkey breast slices: These lean proteins pair well with the buttery sauce.
- Steamed broccoli or roasted carrots: Add color and crunch to your meal prep bowl.
Make a few variations throughout the week to keep meals interesting while using a single base dish.
Tips for Cooking a Crowd
Need to scale the recipe for a dinner party or family gathering? Here’s what to keep in mind:
- Use a large sauté pan or cook in batches to avoid overcrowding the mushrooms, which can lead to steaming instead of browning.
- Keep the seasoning moderate when cooking large quantities, then adjust at the end.
- Hold the finished dish in a warm oven (around 200°F) if needed until serving time.
This way, everyone gets mushrooms that are evenly cooked, rich in flavor, and ready to impress.
Make It Part of Your Weekly Routine
Once you try this dish, it’s likely to become a reliable part of your weekly meal rotation. It’s flexible, fast, and loaded with flavor, and the ingredients are easy to keep on hand. With these prep strategies, you’ll save time and still deliver a fresh, satisfying result every time.
Cooking Tips and Pro Chef Techniques to Enhance the Dish
Achieving the Perfect Mushroom Sear
One of the keys to making garlic butter mushrooms and onions truly outstanding is getting a golden sear on your mushrooms. Here’s how to do it like a pro:
- Preheat your skillet before adding oil. A hot pan ensures immediate contact and better browning.
- Use medium-high heat and do not overcrowd the skillet. Overcrowding causes mushrooms to steam rather than sear.
- Don’t stir too soon. Let mushrooms sit untouched for at least 2 minutes on their first side to develop that rich, golden crust.
These simple habits help lock in the mushrooms’ natural umami flavor and create that irresistible edge that elevates every bite.
Building Flavor in Layers
Professional chefs always talk about building flavor in layers. In this dish, that means:
- Searing the mushrooms to form a base.
- Adding garlic and onions with butter for richness and sweetness.
- Deglazing with broth and adding lemon to lift the entire dish.
- Finishing with parsley and final butter for that smooth, bright finish.
Timing matters. Each stage builds upon the last, so resist the urge to rush or throw everything in at once. This approach lets each ingredient shine and creates balance and depth.
Butter Timing for Maximum Silkiness
The recipe calls for 4 tablespoons of butter, split in half. This is intentional and key to achieving the right texture:
- The first 2 tablespoons go in after searing, giving the onions and garlic a buttery base to soften and caramelize.
- The last 2 tablespoons are added at the end to emulsify into the reduced broth and lemon juice. This creates a velvety, clingy sauce that coats the mushrooms perfectly.
Always use room-temperature butter to help it melt evenly and combine smoothly with the liquids in the pan.
Controlling Moisture for Better Browning
Mushrooms release a lot of water when cooked, which can prevent browning. Here’s how to manage it:
- Use high heat and don’t salt the mushrooms until after they’ve browned.
- Keep the mushrooms in a single layer while cooking.
- If using a smaller pan, cook in two batches to maintain a dry cooking surface.
These tips ensure your mushrooms don’t become soggy and dull — instead, they’ll turn out crisp, savory, and full of character.
Knife Cuts That Impact Texture
For uniform texture and cooking, your knife skills matter. Follow these guidelines:
- Mince onions finely, so they blend into the sauce and don’t dominate the bite.
- Chop garlic evenly — avoid super thin slices, which burn quickly.
- If cutting mushrooms, aim for halves or thick slices to preserve bite and shape.
Precision leads to better texture, even cooking, and a more visually appealing dish.
Professional Garnish Ideas
Want your garlic butter mushrooms and onions to look as good as they taste? Use these finishing touches:
- Sprinkle a pinch of chopped fresh parsley just before serving for a vibrant green pop.
- Add a twist of fresh cracked pepper on top — it adds contrast and subtle heat.
- Use a zest of lemon over the dish at the last second to revive brightness just before serving.
These small additions transform the presentation from rustic to refined in seconds.
Adapting to Different Cooking Surfaces
Whether you’re using non-stick, stainless steel, or cast iron, here are some adaptations:
- Non-stick: Use slightly lower heat to prevent scorching the butter.
- Stainless steel: Perfect for searing — make sure the pan is well heated and use enough oil to prevent sticking.
- Cast iron: Holds heat well but requires more oil and attention to prevent sticking when adding onions and garlic.
Choosing the right pan and heat level helps you maintain control and ensures professional results, every time.
Conclusion
Garlic butter mushrooms and onions are more than just a side dish — they’re a simple, flavorful celebration of everyday ingredients. With minimal prep and quick cook time, this dish delivers rich umami, savory depth, a hint of heat, and a touch of citrus brightness in every bite. Whether you’re serving it alongside roasted vegetables, grilled chicken, or adding it to a grain bowl or pasta, it elevates the meal with comfort and elegance.
From health benefits and time-saving tips to expert cooking techniques, you now have everything you need to master this crowd-pleasing favorite. It’s adaptable, nutritious, and loaded with flavor — proof that the best dishes often come from the simplest combinations done right.


