Creating bakery-quality bread at home is more achievable than you might think. If you’ve ever longed for a soft, sweet, and cloud-like loaf, this Fluffy Condensed Milk Bread Recipe will quickly become a favorite in your kitchen. Whether you enjoy it fresh out of the oven or toasted the next morning, this bread is rich, delicate, and perfect for breakfast or dessert.
In this article, we’ll walk you through every essential step—from understanding ingredients to mastering proofing and shaping techniques—so you get perfectly fluffy bread every time. We’ll also share pro tips on storing, variations to try, and answers to common questions. Let’s dive into the satisfying art of homemade milk bread.
Understanding the Essentials of Fluffy Condensed Milk Bread
What Makes Condensed Milk Bread Different?
The defining element of this bread is sweetened condensed milk, which adds both sugar and richness. This single ingredient creates a velvety crumb and slightly sweet flavor that distinguishes it from other dinner rolls or loaves. When paired with cake flour and whole milk, it produces a structure that’s airy yet soft with a subtle chew.
Unlike rustic loaves or crusty artisan breads, condensed milk bread falls under the category of enriched breads. These typically include milk, butter, eggs, and sugar—all of which contribute to a moist, tender texture.
The Role of Each Ingredient
Getting the texture right begins with understanding what each ingredient brings to the table:
- Cake flour: Contains less protein than all-purpose flour, resulting in a finer crumb. If unavailable, a blend of all-purpose flour and cornstarch can be used.
- Instant yeast: Ensures a reliable rise. No need to proof in liquid beforehand, making it more convenient.
- Whole milk: Adds fat and moisture, helping with softness and color during baking.
- Sweetened condensed milk: The hero ingredient, it adds sweetness, moisture, and richness.
- Egg: Enhances structure and gives a golden hue to the crust.
- Unsalted butter: Softens the crumb, enriches flavor, and helps with shelf life.
- Salt: Balances out the sweetness and strengthens gluten structure.
Equipment You’ll Need
While it’s possible to mix everything by hand, using a stand mixer with a dough hook attachment saves time and effort, especially for enriched doughs. Other essentials include:
- Large mixing bowl
- Rolling pin
- Plastic wrap or clean kitchen towel
- Baking pan
- Serrated or sharp knife
- Pastry brush
Having the right tools sets the foundation for a smooth baking experience. If you’re working with limited equipment, it’s still completely manageable—just allow extra time and effort, especially during kneading.
Texture Expectations
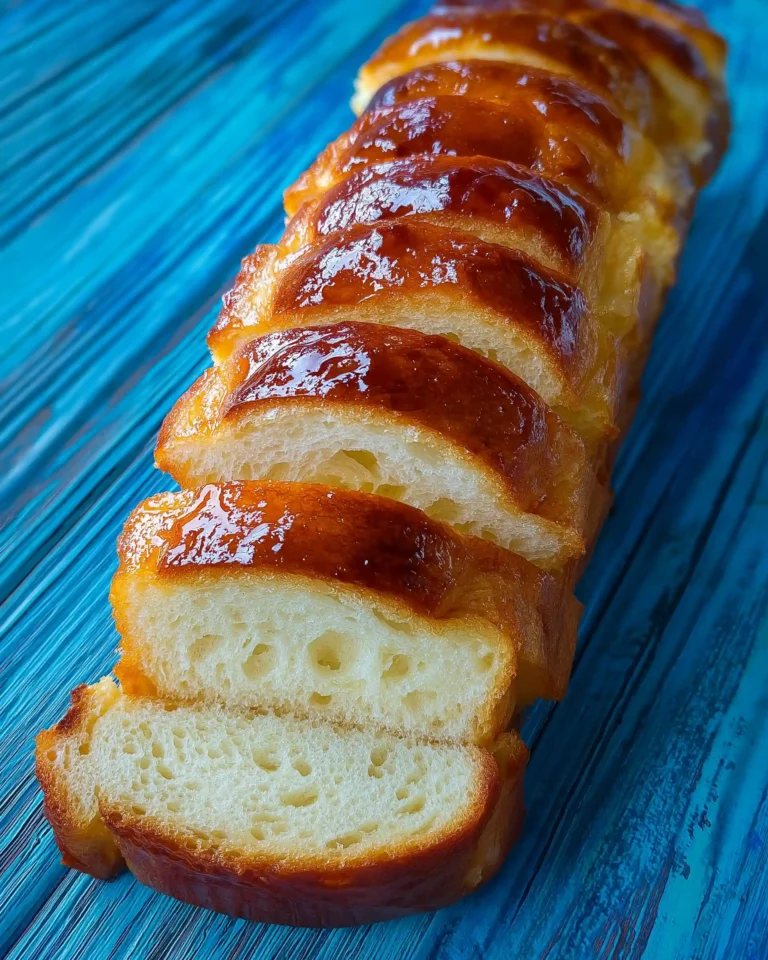
Don’t expect a crunchy crust here. This loaf is all about that feather-light bite. Once it’s baked and brushed with the condensed milk glaze, the result is shiny, sweet-topped bread with pillowy insides. When you pull a roll apart, you should see strands of soft, stringy bread—proof of a well-developed dough.
Print
Fluffy Condensed Milk Bread Recipe
- Total Time: 5 hours 10 minutes
- Yield: 1 loaf
- Diet: Vegetarian
Description
This fluffy condensed milk bread recipe creates an ultra-soft, slightly sweet loaf that’s perfect for breakfast, snacking, or dessert. Made with cake flour, condensed milk, and butter, this bread bakes into pillowy perfection every time.
Ingredients
Bread Dough
3.5 cups cake flour (or all-purpose flour substitute with cornstarch)
1 tbsp instant yeast
½ tsp salt
1 cup whole milk (room temperature)
½ cup sweetened condensed milk
1 medium egg
2 oz unsalted butter (softened, room temperature)
Egg Wash
1 medium egg
1 tbsp whole milk
Condensed Milk Glaze
3 tbsp sweetened condensed milk
1 tbsp unsalted butter (softened, room temperature)
Instructions
1. In a mixing bowl, combine cake flour, instant yeast, and salt.
2. On low speed, mix in whole milk, sweetened condensed milk, and egg until a shaggy dough forms.
3. Increase to medium speed and add butter one piece at a time until fully incorporated and dough pulls away from sides.
4. Transfer dough to lightly floured surface, knead by hand until smooth and elastic (about 1–2 minutes).
5. Place dough in greased bowl, cover, and let proof for 1.5 to 2 hours until doubled in size.
6. Punch down dough, roll into a rectangle, and roll into a tight cylinder. Pinch seam to close.
7. Cut dough into even pieces and arrange in greased pan, seam side down.
8. Cover loosely and proof again for 1 to 1.5 hours until doubled.
9. Preheat oven to 350°F. Brush dough with egg wash.
10. Bake for 35-40 minutes, rotating halfway through.
11. Brush with condensed milk glaze immediately after baking.
12. Cool completely before slicing or serving.
Notes
To substitute all-purpose flour for cake flour, use 2 tablespoons less flour per cup and add 2 tablespoons of cornstarch per cup.
Allow bread to cool fully before slicing to maintain texture.
Store in an airtight container at room temperature for up to 3 days.
Leftovers can be frozen or used in bread pudding recipes.
- Prep Time: 30 minutes
- Cook Time: 40 minutes
- Method: Baking
- Cuisine: Homemade
Step-by-Step Dough Preparation for the Perfect Rise
Combining Dry and Wet Ingredients
Start by adding all the dry ingredients into the mixing bowl: cake flour, instant yeast, and salt. These form the structural base of your bread. Ensure they’re well-mixed before introducing any liquid to avoid uneven activation of the yeast or salt clumping in one spot.
Next, pour in the wet ingredients—whole milk, sweetened condensed milk, and a beaten egg. Mix on low speed just until a shaggy dough begins to form. This stage helps hydrate the flour and allows the yeast to start working.
If you see flour clinging to the sides of the bowl, pause and scrape down with a rubber spatula. You want all the ingredients to come together before moving to the next phase.
Adding Butter for Enrichment
Once the initial dough forms, increase the mixer speed to medium. Now it’s time to add softened butter, one piece at a time. Let each piece fully incorporate before adding the next. This gradual process ensures the butter emulsifies into the dough, which contributes to the fluffiness of the final product.
The dough may seem greasy or too soft at first. Don’t worry—that’s normal. As the kneading continues, the butter will become fully absorbed. After around 8 to 10 minutes of mixing, the dough should pull away cleanly from the bowl and feel elastic.
To test, gently stretch a piece of dough. It should form a thin “windowpane” without tearing, a sign of well-developed gluten.
Hand Kneading for a Smooth Finish
Transfer the dough onto a lightly floured surface. Use just enough flour to prevent sticking—too much can dry the dough out. Start folding the dough inward and pressing it out with the heel of your hand. Turn 90 degrees and repeat. Continue for 1 to 2 minutes.
This extra kneading ensures a smooth, rounded shape and gives you a chance to assess the dough’s texture. By the end, you should have a soft, elastic dough ball with a silky surface.
First Proofing for Maximum Volume
Place the shaped dough into a lightly greased bowl, seam side down. Cover it tightly with plastic wrap or a damp cloth. Let it rise in a warm, draft-free area for 1.5 to 2 hours or until doubled in size.
The dough should look puffy and airy. To check if it’s ready, gently press your finger into the surface—if the indentation remains, it’s good to go.
Shaping and Second Proof for Perfect Texture
Deflating and Rolling Out the Dough
Once your dough has doubled in size, it’s time to punch it down gently to release the built-up gases. This step helps prevent overly large air pockets and prepares the dough for shaping.
Lightly flour your work surface and transfer the dough onto it. Use your hands or a rolling pin to flatten the dough into a rectangle or square, making sure the length fits your baking pan. Press it firmly and evenly to avoid thin or thick spots that can bake unevenly.
This shaping stage sets the foundation for uniform rolls or slices, depending on how you decide to cut it.
Rolling and Tucking the Dough
Begin at the edge closest to you and roll the dough tightly into a cylinder, gently tucking the sides inward as you go. Tucking is key to creating tension in the outer layer, which results in a smoother rise during baking.
Once rolled, pinch the seam closed along the bottom to seal it. Turn the roll so the seam is down and use a serrated or very sharp knife to slice the cylinder into equally thick pieces. Aim for clean cuts that don’t compress the dough.
Whether you prefer large rolls or smaller slices, consistent sizing helps everything bake at the same rate.
Arranging in the Pan
Prepare your baking pan by lightly greasing it. Then, arrange the dough pieces with the seam side down, leaving a bit of space between each piece. This gives them room to rise again during the second proof.
Use a pan size that allows the rolls to expand and touch slightly as they bake, creating that beautiful pull-apart structure. A snug fit ensures even baking and soft sides, while too much space can lead to overbaking and drier edges.
Second Proof for Final Rise
Cover the arranged dough loosely with plastic wrap or a clean towel. Allow it to proof again for 1 to 1.5 hours until nearly doubled in size. The dough should feel light and spring back slowly when gently pressed.
This second proof is crucial. It sets the final texture and ensures a tender, pillowy crumb after baking. Skipping or shortening this step can lead to dense, under-risen bread.
While the dough is rising, it’s a good time to prepare your egg wash by whisking together one egg and a tablespoon of whole milk. This will give your bread a golden, glossy crust.
Baking Techniques for a Soft, Golden Crust
Preheating the Oven Correctly
Start by preheating your oven to 350°F (175°C) at least 15 to 20 minutes before baking. A consistent, fully-heated oven is critical to ensuring even rise and color once the bread hits the heat. If the oven is under-heated, your dough may expand too slowly and dry out before it bakes through.
Place the oven rack in the center. This allows the bread to bake evenly from all directions without browning too quickly on top or bottom.
Applying the Egg Wash for Color
Right before the dough goes into the oven, brush the top gently with your egg wash mixture. This simple step gives the bread its signature golden, glossy finish. Use a pastry brush with soft bristles to apply the wash evenly, being careful not to deflate the proofed dough.
Avoid overloading the egg wash, as it may drip into the sides and cause uneven browning. A light, even coat is all you need.
Baking Time and Rotation
Place the bread into the preheated oven and bake for 35 to 40 minutes. About halfway through, rotate the pan to ensure even color and doneness, especially if your oven has hot spots.
You’ll know it’s ready when the top is deep golden brown and the internal temperature reaches 190°F to 200°F. If you tap the top of the loaf, it should sound hollow, indicating that it’s fully baked inside.
Be cautious not to overbake, as this can cause the bread to dry out and lose its signature fluffiness. If your bread is browning too quickly before it’s done inside, loosely tent a piece of foil over the top for the last 10 minutes of baking.
Brushing with Condensed Milk Glaze
As soon as the bread comes out of the oven, while it’s still hot, brush it with your condensed milk glaze—made from softened butter and sweetened condensed milk. This step adds a silky shine and enhances the sweetness with a final flavorful touch.
Storing, Serving, and Enjoying Your Condensed Milk Bread
Cooling and Serving Tips
After removing the bread from the oven and brushing with the glaze, allow it to cool fully at room temperature before slicing. This resting time—usually about 1 to 2 hours—helps the structure set and prevents steam from softening the crust.
Once cooled, slice with a serrated knife using gentle, back-and-forth motions. The interior should be tender, soft, and slightly sweet. It’s perfect on its own, with a pat of butter, or topped with jam, nut butters, or even fresh fruit slices.
If you baked it as rolls, serve them pull-apart style for family dinners or brunch spreads. The airy texture makes them ideal for breakfast or afternoon snacks.
Proper Storage Methods
Condensed milk bread stays soft longer than most due to the high moisture from the condensed milk and butter. To keep it fresh:
- Wrap in plastic wrap tightly or place it in an airtight container.
- Store at room temperature in a cool, dry spot for up to 3 days.
- Avoid refrigeration, which can dry it out faster.
For longer storage, wrap tightly and freeze for up to one month. To use, simply thaw at room temperature or warm gently in a low oven.
Making It Ahead or Freezing
If you want to prepare ahead, you can freeze the dough after shaping but before the second proof. When ready to bake, thaw it overnight in the fridge and allow it to come to room temperature. Then proof for 1 to 1.5 hours before baking as usual.
Alternatively, you can freeze the fully baked loaf or rolls, glaze included. When reheating, wrap in foil and warm at 300°F for 10 to 15 minutes. This keeps the bread soft and prevents drying.
Creative Ways to Use Leftovers
If you have leftovers or slightly stale slices, transform them into something new:
- French toast: The slightly sweet base makes for an ideal soak.
- Bread pudding: Cube and bake with custard for a rich dessert.
- Toasted with spreads: Toast and top with cream cheese, fruit preserves, or cinnamon honey.
Troubleshooting and Pro Tips for Fluffy Condensed Milk Bread
Why Your Bread Might Not Rise Properly
Even the best recipes can run into trouble if key steps aren’t followed carefully. One common issue is underproofing or overproofing the dough. Underproofed dough will bake up dense and heavy, while overproofed dough may collapse in the oven.
Make sure your yeast is fresh and active. If your dough hasn’t doubled in size after the recommended time, give it more time in a warmer spot rather than moving ahead too early.
Other factors that affect rise include:
- Cool room temperatures: Extend proofing time if your kitchen is chilly.
- Too much flour: Avoid adding extra flour during kneading unless absolutely necessary. A sticky dough at first is normal and becomes smoother as gluten develops.
- Improper shaping: Tension in the dough surface helps create a strong structure for rising. Always roll and tuck tightly.
How to Achieve a Super Soft Texture
The softness of this bread comes from a few essential practices:
- Incorporate butter properly: Don’t rush this step. Allow each piece of butter to fully blend in before adding the next.
- Knead until smooth and elastic: Whether using a mixer or kneading by hand, the dough should pass the windowpane test.
- Be gentle during shaping and proofing: Rough handling can deflate air pockets and weaken gluten structure.
Always use room temperature ingredients, especially milk, eggs, and butter, to ensure even mixing and better fermentation.
Tips for Even Baking
To avoid uneven browning or baking:
- Use an oven thermometer to confirm your oven temperature.
- Rotate your baking pan halfway through baking.
- Make sure dough pieces are uniform in size when cutting and arranging in the pan.
If your bread browns too quickly on top, tent it loosely with foil for the final 10 minutes. That will protect the crust while the interior finishes baking.
Adjusting the Recipe to Your Needs
While the base recipe is ideal for one large loaf or a pan of pull-apart rolls, you can scale it down or double it depending on your needs. You can also:
- Shape into individual buns or braided loaves.
- Add fillings like cinnamon or raisins before rolling (optional for variations).
- Use milk alternatives like oat or almond milk, though results may vary slightly in richness and rise.
Experiment once you’ve mastered the original recipe to create new favorites tailored to your taste.
Conclusion: Mastering the Art of Homemade Fluffy Condensed Milk Bread
With its velvety texture, golden crust, and slightly sweet taste, this Fluffy Condensed Milk Bread Recipe is a true homemade treasure. The key lies in a slow, methodical process—developing gluten, proofing the dough fully, and baking at the right temperature.
Whether you’re a beginner or experienced home baker, this recipe offers both comfort and versatility. Use it for special occasions or weekend baking sessions when you want to create something deeply satisfying and shareable.
Follow each step carefully, trust your instincts, and soon you’ll be pulling perfectly fluffy, warm milk bread from your oven—ready to slice, serve, and savor.


