
Few desserts are as indulgent and comforting as a dreamy peanut butter cake recipe. The combination of fluffy cake layers and rich, creamy peanut butter frosting creates the perfect balance of sweetness and nutty flavor. This cake is a true crowd-pleaser, ideal for family gatherings, casual get-togethers, or simply as a treat when you want something extraordinary.
What makes this peanut butter cake so special is its simplicity. The recipe uses everyday ingredients you likely already have in your pantry, yet the result tastes like something from a professional bakery. With a moist and tender crumb, a luscious frosting that spreads like velvet, and just the right touch of peanut butter in every bite, this dessert offers the ultimate comfort food experience.
In this guide, we’ll break down the process into clear steps to help you recreate this cake with ease. You’ll learn how to make the batter perfectly balanced, achieve smooth and airy frosting, and assemble the cake into a show-stopping centerpiece. Along the way, we’ll cover baking tips, ingredient insights, and variations so you can customize the recipe to your taste.
If you’ve ever dreamed of baking a cake that combines the nostalgia of childhood with the sophistication of a modern dessert, this is the recipe to try. The dreamy peanut butter cake recipe is more than just a sweet dish, it’s a creation that transforms simple flavors into a luxurious delight.
The Heart of the Cake – Peanut Butter Layers
The foundation of any great cake lies in its layers. With peanut butter as the star ingredient, the cake base delivers a warm, nutty essence while remaining moist and fluffy. Understanding how each ingredient contributes to the structure and flavor of the cake will ensure that your baking experience is both successful and enjoyable.
Choosing the Right Ingredients
When preparing the cake layers, flour provides the essential structure. All-purpose flour works beautifully here, offering just the right balance of protein to hold the cake together without making it dense. Baking powder and baking soda are equally important since they provide the lift that makes the layers light and airy. A touch of salt is added to enhance the peanut butter’s natural flavor and balance out the sweetness.
For fat, this recipe uses vegetable oil, which contributes to the cake’s tender crumb. Unlike butter, oil remains liquid at room temperature, keeping the cake moist for longer periods. This makes it a great choice if you plan to bake in advance or store leftovers. Brown sugar adds depth with its molasses notes, while peanut butter brings in the unmistakable nuttiness that defines this dessert. Eggs bind the mixture, giving the cake structure and stability. Milk is the final component that adds richness and moisture, ensuring a soft bite.
Vanilla flavoring also plays a subtle but critical role. Opting for alcohol-free vanilla flavor, such as Simply Organic or Watkins Clear Vanilla Flavor, gives the cake an aromatic touch without overpowering the peanut butter. These high-quality options guarantee a smooth, rounded flavor profile.
Mixing Technique for Perfect Texture
Once the ingredients are gathered, the method of combining them matters just as much as the ingredients themselves. Begin by whisking the dry components, ensuring the leavening agents and salt are evenly distributed. In a separate bowl, blending the oil, sugar, and peanut butter creates a smooth base. This step is essential because it ensures that the sugar dissolves evenly, which in turn helps the cake rise properly.
Eggs and vanilla are added next, one at a time, to create a homogenous mixture. It’s important not to overmix at this stage, as doing so can lead to a tough cake. Gradually whisking in milk ensures that the batter remains smooth and well-hydrated. Finally, the dry mixture is incorporated carefully into the wet base. Folding rather than vigorous stirring keeps the air bubbles intact, resulting in a light, fluffy cake once baked.
Once the batter is ready, it’s divided between two 8-inch cake pans. Preparing the pans correctly—lining the bottoms with baking paper and lightly greasing the sides—prevents sticking and allows the cakes to release easily. Baking at 350F ensures even cooking, with the cakes ready when a toothpick inserted into the center comes out clean. The edges should gently pull away from the pan, signaling that they are baked to perfection.
Cooling the layers completely before assembling the cake is crucial. Warm cakes can cause the frosting to melt, leading to a messy finish. By taking the time to cool the layers properly, you create a sturdy foundation for the frosting that will hold up beautifully when sliced and served.
Print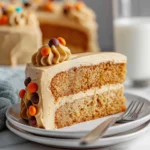
Dreamy Peanut Butter Cake Recipe
- Total Time: 3 hours 30 minutes
- Yield: 10 slices
- Diet: Vegetarian
Description
This dreamy peanut butter cake recipe combines fluffy peanut butter cake layers with smooth peanut butter frosting for a decadent dessert that melts in your mouth.
Ingredients
Peanut Butter Cake:
2 cups all-purpose flour (250 g)
1 1/2 teaspoons baking powder
1/2 teaspoon baking soda
1/4 teaspoon salt
3/4 cup vegetable oil (180 ml)
1 1/2 cups light brown sugar (300 g) or 3/4 cup dark brown sugar + 3/4 cup granulated sugar
3/4 cup smooth peanut butter (180 g)
3 large eggs (room temperature)
2 teaspoons alcohol-free vanilla flavor (Simply Organic or Watkins Clear Vanilla Flavor)
1 1/4 cup milk (180 ml, room temperature)
Peanut Butter Frosting:
3/4 cup unsalted butter (170 g), softened
2 ounces cream cheese (56 g), full-fat brick style
3/4 cup smooth peanut butter (180 g)
1/4 teaspoon salt
1 teaspoon alcohol-free vanilla flavor
3 1/2 – 4 1/2 cups powdered sugar (420 – 540 g)
1–2 tablespoons heavy cream (15–30 ml, if needed)
Instructions
1. Preheat oven to 350F (180C or 160C fan).
2. Line and grease two 8-inch round pans.
3. Whisk flour, baking powder, baking soda, and salt.
4. In a large bowl, beat oil, sugar, and peanut butter until smooth.
5. Mix in eggs and vanilla until combined.
6. Whisk in milk until smooth.
7. Fold in flour mixture gently until just combined.
8. Divide batter into pans and bake 28–33 minutes or until toothpick comes out clean.
9. Cool cakes fully before frosting.
10. For frosting, beat butter until smooth.
11. Mix in cream cheese, then peanut butter.
12. Add powdered sugar gradually with salt and vanilla.
13. Adjust texture with cream if needed.
14. Trim cake layers flat if domed.
15. Place one layer on serving plate and spread frosting.
16. Top with second layer, add crumb coat, chill 20–30 minutes.
17. Frost cake fully, decorate with swirls, peanut butter drizzle, or chopped peanuts
Notes
Storage: Keep covered at room temperature for 3 days, or refrigerate up to 4 days. Bring to room temperature before serving.
Make Ahead: Bake cake layers one day before and wrap tightly. Frost on serving day.
Variations: Add sliced bananas or strawberries between layers, swirl chocolate ganache, or top with peanut butter cups.
- Prep Time: 60 minutes
- Cook Time: 30 minutes
- Category: Dessert
- Method: Baking
- Cuisine: American
The Magic of Peanut Butter Frosting
While the cake layers form the foundation, it is the frosting that transforms this dessert into something unforgettable. The peanut butter frosting strikes a perfect balance between rich, nutty flavors and smooth, creamy texture. It not only enhances the taste of the cake but also provides the visual appeal that makes this dessert stand out.
Building a Creamy Base
The key to a silky frosting lies in starting with quality butter. Unsalted butter is ideal since it allows you to control the salt level precisely. Softened butter creates the perfect foundation for a spreadable texture that holds its shape when piped or swirled. A small amount of cream cheese adds tang and depth while ensuring the frosting remains firm yet smooth. If desired, the cream cheese can be substituted with extra butter, though this variation results in a slightly sweeter finish.
Peanut butter is, of course, the star here. Using smooth, commercially prepared peanut butter ensures consistency and prevents separation. Natural peanut butter may taste delicious on toast, but in frosting it can split and create a grainy finish. For best results, stick to a reliable, creamy option. A small pinch of salt is included to highlight the nutty flavor and keep the sweetness in balance.
The vanilla flavoring enhances the frosting’s aroma and rounds out the flavor profile. Once again, alcohol-free vanilla brands such as Simply Organic or Watkins Clear Vanilla Flavor work beautifully, complementing the richness of the peanut butter without introducing any bitterness.
Achieving the Perfect Sweetness and Texture
Powdered sugar is gradually added to the butter and peanut butter mixture to build both sweetness and stability. Adding the sugar slowly, a little at a time, prevents lumps and ensures that the frosting stays light and airy. The exact amount of powdered sugar depends on personal preference. Some people enjoy a more delicate frosting with less sugar, while others prefer a thick, sweet version.
If the frosting becomes too dense, a splash of cream can loosen it into a perfectly spreadable texture. Just one tablespoon at a time makes a noticeable difference, so it’s best to add slowly. This step also allows you to customize the consistency depending on whether you plan to spread the frosting smoothly, pipe it into decorative swirls, or layer it generously between cake slices.
The result should be a frosting that is fluffy, creamy, and indulgent without being overly sweet. When spread over the cooled cake layers, it clings beautifully to the surface and holds its shape. The frosting not only seals in the moisture of the cake but also creates a luxurious finish that melts in your mouth.
Frosting Tips for a Professional Finish
To achieve a bakery-worthy look, apply a crumb coat first. This is a thin layer of frosting that locks in any stray crumbs from the cake. Once this layer sets, usually after a short rest in the refrigerator, the final coat of frosting can be applied smoothly. For a more rustic presentation, swirls of frosting across the top and sides provide a homemade charm that feels warm and inviting.
If you want to take the decoration a step further, small touches like drizzles of melted peanut butter or a sprinkling of chopped peanuts can add both texture and visual flair. Some bakers enjoy topping the cake with peanut butter cups or chocolate candies for an extra treat, though the frosting alone is more than satisfying on its own.
By mastering the frosting, you elevate the peanut butter cake from a simple dessert to a centerpiece worthy of admiration. It brings together all the flavors, ties the layers into a cohesive whole, and ensures that each bite offers the perfect balance of sweetness and nutty richness.
Assembling and Decorating the Cake
Once the cake layers have cooled completely and the frosting is ready, it is time for the most exciting part: assembling and decorating the dreamy peanut butter cake. This stage is where all the effort in mixing, baking, and preparing comes together to create a dessert that looks as impressive as it tastes.
Preparing the Cake Layers
The first step is ensuring that the cake layers are level. Cakes often rise with a dome in the center, which can make stacking uneven. To fix this, use a serrated knife to carefully trim off the rounded tops, creating flat, even surfaces. This small adjustment ensures that the cake layers sit securely on top of one another, preventing tilting or sliding once frosted.
Next, place one cake layer bottom-side up on a serving plate or cake stand. Positioning it this way provides a flat, stable surface to build upon. Spread a generous layer of frosting across the top of the cake, using about three-quarters of a cup to one full cup of frosting. Spreading the frosting evenly guarantees that the flavors distribute properly with each bite.
The second layer is then placed on top, again with the bottom facing upward for a smooth finish. This creates a stable surface for the frosting to glide over effortlessly. Before applying the final coat, a thin crumb coat should be added. This base layer locks in any loose crumbs and prevents them from mixing into the top layer of frosting. Refrigerating the cake for about 20 to 30 minutes after the crumb coat helps the frosting set and makes the next step easier.
Decorating with Style
After the crumb coat sets, it’s time to frost the entire cake. Using an offset spatula or a flat knife, spread the frosting smoothly along the top and sides. You can keep it sleek and polished for a professional bakery-style appearance or create rustic swirls for a more homemade charm. Both approaches work beautifully, depending on the mood you want to set.
For an extra touch of indulgence, decorative toppings can be added. A drizzle of melted peanut butter across the top not only enhances the flavor but also adds an eye-catching finish. Chopped roasted peanuts sprinkled around the edges provide a pleasing crunch and contrast to the creamy frosting. If you want to impress guests, peanut butter cups or colorful candies like Reese’s Pieces can be placed strategically as garnish.
Presentation is just as important as flavor, and decorating is your chance to personalize the cake. Whether you choose a clean and modern design or a playful, candy-studded finish, the decoration highlights the dreamy character of the cake and makes it irresistible to anyone who sees it.
Serving for the Best Experience
Once decorated, the cake should rest for a short while before serving. This allows the frosting to firm up and makes slicing easier. Using a sharp knife dipped in warm water between cuts creates clean slices without smearing the frosting. Each piece should reveal even layers of golden peanut butter cake and rich frosting, giving the perfect balance of flavors in every bite.
When presented at the table, this dreamy peanut butter cake is guaranteed to capture attention. The combination of smooth frosting, fluffy layers, and optional toppings creates an irresistible centerpiece that feels both luxurious and comforting.
Tips, Variations, and Make-Ahead Options
One of the joys of baking is making a recipe your own. The dreamy peanut butter cake recipe is already a show-stopper, but with a few tweaks and thoughtful adjustments, it can be customized to suit different tastes, occasions, and dietary preferences. Beyond that, preparing parts of the recipe ahead of time can save effort and ensure smooth baking on the day you plan to serve it.
Baking Tips for Success
To achieve the best results every time, consistency is key. Always measure ingredients carefully using proper tools. Flour, for example, should be spooned into the measuring cup and leveled off rather than scooped directly from the bag, which can cause compacting and lead to dense cake layers.
Room temperature ingredients also make a difference. Eggs and milk blend more smoothly into the batter when not chilled, creating a uniform mixture and preventing curdling. Similarly, butter for the frosting should be softened but not melted. This allows the frosting to whip into a light, fluffy texture.
Keeping an eye on the bake time is another essential tip. Every oven runs slightly differently, so it’s wise to begin checking the cakes a few minutes before the suggested time. Look for visual cues: edges pulling slightly away from the pan, a golden surface, and a toothpick that comes out clean.
Flavor Variations to Try
The dreamy peanut butter cake can be adapted with small flavor changes to keep it exciting each time you make it. For a touch of chocolate richness, swirl melted chocolate into the batter before baking or layer chocolate ganache between the cakes along with the frosting. This transforms the dessert into a peanut butter chocolate delight that appeals to anyone who loves the classic pairing.
For a lighter twist, you can incorporate fruit. A layer of sliced bananas between the cake and frosting adds natural sweetness and pairs beautifully with peanut butter. Fresh strawberries or raspberry preserves are another option, offering a bright contrast to the richness of the frosting.
If you want a crunchier texture, folding chopped roasted peanuts or chocolate chips into the batter works well. This creates little bursts of flavor and texture throughout the cake, making every bite unique.
Make-Ahead Convenience
Preparing a cake for a gathering can feel overwhelming, but this recipe allows for plenty of flexibility. The cake layers can be baked a day in advance, cooled completely, and then wrapped tightly in plastic before storing in an airtight container. This not only saves time but also helps the flavors settle, often resulting in an even better texture.
The frosting can also be prepared ahead, stored in the refrigerator, and whipped briefly before use to restore its creamy consistency. Assembling the cake is best done on the day of serving to maintain freshness, but having both the layers and frosting ready to go makes the final steps quick and stress-free.
Leftovers store well too. Covered at room temperature, the cake remains fresh for up to three days. For longer storage, refrigerate it and allow slices to come to room temperature before serving so that the texture remains soft and enjoyable.
By following these tips and experimenting with variations, the dreamy peanut butter cake becomes more than just one recipe—it becomes a versatile dessert you can reinvent again and again.
Nutrition, Storage, and Serving Ideas
A cake as indulgent as this dreamy peanut butter cake recipe is meant to be enjoyed without hesitation, but it’s still helpful to understand its nutritional profile, storage guidelines, and creative serving ideas. Knowing how to handle leftovers and present the cake in different ways ensures that you make the most of every slice.
Nutritional Insights
Each slice of this cake is undeniably rich, with a balance of carbohydrates, fats, and proteins that make it a satisfying dessert. A typical serving of this recipe offers around 858 calories, 105 grams of carbohydrates, and 11 grams of protein. The higher fat content, including 46 grams per slice, largely comes from the peanut butter and frosting, which provide both creaminess and flavor.
Although this cake is not a light option, its nutrition is similar to many celebratory desserts. The peanut butter does contribute some benefits, including plant-based protein and heart-friendly monounsaturated fats. It also provides potassium, magnesium, and small amounts of fiber. Enjoying a modest portion as part of a balanced diet allows you to savor its decadence while keeping moderation in mind.
Storing the Cake Properly
The way you store this cake makes a big difference in how long it stays fresh. At room temperature, the cake can be covered and kept for up to three days. This works well in cooler environments where the frosting will hold its shape without melting. If your kitchen tends to be warm, storing the cake in the refrigerator is a safer choice.
When refrigerated, the cake will last up to four days. To maintain its best texture, allow it to sit at room temperature for about 30 minutes before serving. This softens the frosting and crumb, making each slice taste as fresh as when it was first assembled.
For longer storage, the cake layers can be frozen individually before frosting. Wrap them securely in plastic wrap and place in an airtight container. They can be stored for up to two months. When ready to use, thaw the layers at room temperature, then frost and assemble as usual. This method makes it easy to prepare the cake in advance for special occasions or busy schedules.
Creative Serving Ideas
This peanut butter cake is delightful on its own, but pairing it with complementary flavors can enhance the experience. A cold glass of milk is a classic choice, balancing the richness of the cake with a refreshing finish. Coffee and tea also pair beautifully, with their subtle bitterness cutting through the sweetness of the frosting.
For a more decadent twist, consider serving slices with a drizzle of warm chocolate sauce or caramel. A scoop of vanilla or chocolate ice cream alongside the cake makes it feel like a restaurant-style dessert. You can even add a dollop of whipped cream and sprinkle chopped peanuts on top for an extra layer of indulgence.
Presentation matters too. Serving on a simple white plate allows the cake’s golden tones and creamy frosting to stand out. For gatherings, pre-slicing and arranging the pieces neatly on a platter can make it easier for guests to help themselves while also showing off the beautiful layers inside.
By paying attention to nutrition, storage, and serving, you not only maximize the enjoyment of this dreamy peanut butter cake recipe but also ensure that it remains delicious from the first slice to the last.
Conclusion
The dreamy peanut butter cake recipe is more than just a dessert, it is an experience that blends nostalgic flavors with rich, indulgent textures. From the fluffy cake layers infused with peanut butter to the velvety frosting that melts in your mouth, every bite delivers comfort and delight. What makes this recipe stand out is its balance of simplicity and elegance. With basic pantry ingredients and easy-to-follow steps, anyone can bake a cake that looks and tastes like it came from a professional bakery.
Along the way, we explored how to prepare the perfect cake base, whip up a smooth and creamy frosting, assemble the layers for a stunning presentation, and even add personal touches with variations and decorations. We also covered storage tips, nutritional insights, and creative serving ideas, ensuring that this cake remains as enjoyable after the first slice as it is fresh out of the oven.
Whether you serve it at a family gathering, share it with friends, or simply bake it as a treat for yourself, this peanut butter cake offers warmth, comfort, and indulgence in every slice. It is a recipe that you can return to time and time again, experimenting with small twists or enjoying it in its classic form.
The next time you want to impress guests or simply satisfy a craving for something extraordinary, turn to this dreamy peanut butter cake recipe. It is the perfect combination of ease, flavor, and presentation, making it a dessert that always leaves a lasting impression.


