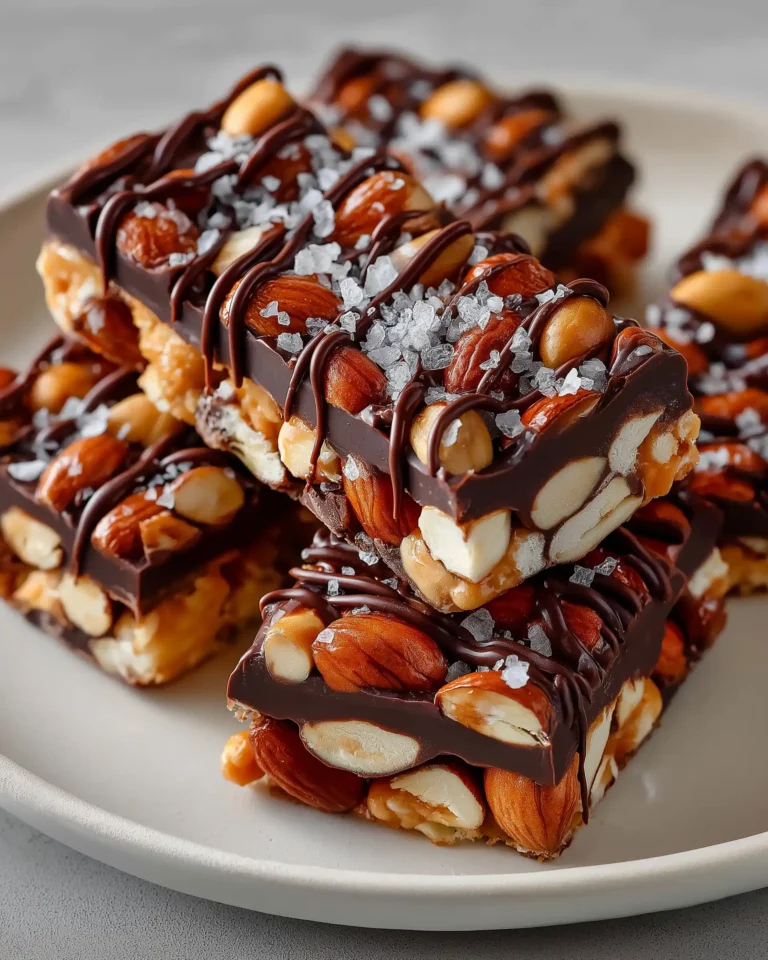
Looking for a snack that’s healthy, satisfying, and deliciously indulgent? These Dark Chocolate Sea Salt Nut Bars with Peanuts are the perfect blend of crunchy, salty, and sweet. Made with a wholesome mix of roasted nuts, puffed rice, and a rich coating of dark chocolate, these bars are a go-to treat whether you need an afternoon energy boost or a better-for-you dessert.
This recipe strikes the ideal balance between nutritious and crave-worthy. With protein-packed nuts, fiber-rich ingredients, and heart-healthy fats, you can feel good about reaching for one of these bars. What makes them even more appealing is the dark chocolate drizzle with a touch of flaky sea salt — creating a gourmet flavor in every bite.
In this article, you’ll discover how to make these bars from scratch, the best ingredient swaps to keep them clean and suitable for all diets, and pro tips to get perfect results every time. If you’re tired of overly processed store-bought bars, it’s time to make your own. These chocolatey, nutty treats are freezer-friendly, gluten-free, and ideal for meal prep.
The Power of Homemade Energy Bars
Why Make Your Own Nut Bars?
Store-bought snack bars are often filled with added sugars, preservatives, and artificial ingredients. When you make your own Dark Chocolate Sea Salt Nut Bars with Peanuts, you’re in control of every component. That means fewer additives, cleaner ingredients, and better flavor. Plus, you can customize the recipe to match your dietary needs.
Homemade bars are budget-friendly too. Buying individual bars adds up quickly, but by purchasing your ingredients in bulk, you’ll save money and get more for your effort. You also reduce waste from excess packaging and get to enjoy a fresher product that tastes just how you like it.
Clean Ingredients with Big Benefits
These bars are made using simple pantry staples, and each one offers a nutritional punch:
- Nuts (Almonds, Peanuts, Cashews): These are rich in healthy fats, protein, and essential minerals like magnesium and zinc. They also keep you feeling full longer.
- Puffed Rice: Adds a light crunch and keeps the bars from being too dense or heavy. It’s a great way to add volume without a lot of calories.
- Brown Rice Syrup: A natural, slow-digesting sweetener that binds everything together. It has a mild flavor that doesn’t overpower the chocolate and nuts.
- Alcohol-Free Vanilla Flavor: A simple tweak that adds aroma and depth to the recipe without introducing any ingredients that may be unsuitable for clean diets.
- Coconut Oil: Helps thin the melted chocolate and gives the final layer a smooth, shiny finish.
- Dark Chocolate Chips: High in antioxidants and lower in sugar than milk chocolate, dark chocolate adds richness and pairs beautifully with the salty crunch of the nuts.
These ingredients not only taste amazing but also support overall wellness. From heart health to blood sugar balance, they work together to make this snack a smart choice.
Print
Dark Chocolate Sea Salt Nut Bars (With Peanuts)
- Total Time: 1 hour 15 minutes
- Yield: 10–12 bars
- Diet: Gluten Free
Description
A rich and crunchy snack bar made with roasted peanuts, almonds, cashews, dark chocolate, and a touch of flaky sea salt. Gluten-free, freezer-friendly, and naturally sweetened.
Ingredients
2 1/2 cups unsalted nuts (3/4 cup cashews, 3/4 cup peanuts, 1 cup almonds)
1/2 cup puffed rice
1/4 cup brown rice syrup
1 1/2 teaspoons alcohol-free vanilla flavor
1/2 teaspoon sea salt
1 cup dark chocolate chips
2 teaspoons coconut oil
Optional: flaky salt for topping
Instructions
1. Preheat oven to 325°F.
2. Spread nuts on a sheet pan in a single layer and toast for 5–8 minutes until lightly golden and fragrant.
3. Line an 8×8-inch pan with parchment paper and set aside.
4. In a large bowl, combine toasted nuts and puffed rice.
5. Microwave brown rice syrup for 30 seconds, then whisk in vanilla flavor and sea salt.
6. Pour the syrup mixture over the nut mixture and stir until well coated.
7. Transfer to the prepared pan and press into an even layer.
8. Bake for 18–20 minutes.
9. Let cool for 30 minutes, then cut into bars.
10. Melt chocolate chips with coconut oil in a microwave-safe bowl in 30-second intervals, stirring until smooth.
11. Dip the bottoms of each bar in chocolate and drizzle the tops.
12. Sprinkle with flaky salt while chocolate is still soft.
13. Refrigerate until chocolate is set.
14. Enjoy or store as directed.
Notes
Bars can be stored in an airtight container at room temperature for up to a week, or frozen for up to 3 months.
Use parchment paper between layers to avoid sticking.
For a thinner chocolate layer, let excess drip off before setting bars down.
If brown rice syrup is unavailable, honey can be used as a substitute, though the texture may be slightly stickier.
- Prep Time: 15 minutes
- Cook Time: 20 minutes
- Category: Snacks
- Method: Baking
- Cuisine: American
Step-by-Step Guide to Perfect Nut Bars
Prepping Your Ingredients
Start by gathering everything you need. Using a combination of unsalted nuts ensures you control the salt level and achieve a well-balanced flavor. The recommended blend is:
- ¾ cup cashews
- ¾ cup peanuts
- 1 cup almonds
These three types of nuts each bring their own texture and taste. Toasting them lightly in the oven enhances their natural flavor and gives the bars a satisfying crunch. Simply spread them on a sheet pan and roast at 325°F for about 5 to 8 minutes until golden and fragrant. This quick step makes a big difference in the final result.
Puffed rice adds a lightness to balance the dense nuts. Make sure you’re using unsweetened, plain puffed rice — not rice cereal — to avoid unnecessary sugars or additives.
Mixing and Binding
The binding mixture is what holds the bars together. Brown rice syrup is ideal because it’s thick, sticky, and has a neutral taste. If brown rice syrup isn’t available, honey can be used as a backup, though it may result in a stickier texture.
To make the syrup easier to mix, microwave it for 30 seconds. Then whisk in alcohol-free vanilla flavor and sea salt. This combination not only binds the bars but also adds subtle sweetness and contrast to the savory notes of the nuts.
Pour the warm mixture over the nuts and puffed rice in a large bowl and stir thoroughly. Be sure every piece is coated evenly. This ensures the bars don’t fall apart when sliced.
Shaping and Baking
Transfer the coated mixture into a parchment-lined 8×8-inch pan. Use a spatula or press with your hands (lightly oiled or using parchment paper) to compact the mixture into an even layer. This compression helps the bars hold their shape after baking and cooling.
Bake at 325°F for 18 to 20 minutes. The syrup will bubble slightly and set as it cools. Let the pan rest at room temperature for about 30 minutes before slicing. For clean, sharp edges, use a long knife and cut the slab into bars — first halving lengthwise, then slicing into 5 or 6 pieces per half.
Let them cool completely to firm up before adding the chocolate.
The Chocolate Dip
To elevate these bars from healthy snack to indulgent treat, dip them in melted dark chocolate. Combine dark chocolate chips with a bit of coconut oil and microwave in short intervals, stirring between each to avoid burning.
Dip the bottom of each bar into the chocolate and place it on parchment paper. Then drizzle more chocolate on top for a decorative finish. Sprinkle flaky sea salt while the chocolate is still wet to give each bite a touch of gourmet flair.
Refrigerate until the chocolate is set — about 20 to 30 minutes. This final chill locks in the shape and texture, making them easy to store and even easier to grab on the go.
Customization and Flavor Variations
Make It Your Own: Nut and Seed Swaps
One of the best features of these homemade bars is how easy they are to customize. Whether you’re working around allergies or just want to mix up the flavor, here are some great substitutions:
- Nut-Free Version: Replace all nuts with a mix of sunflower seeds, pumpkin seeds, and hemp hearts. These options provide healthy fats and protein without triggering nut sensitivities.
- Different Nut Combos: Try pecans, walnuts, hazelnuts, or macadamia nuts for a different texture or flavor profile. Toasting them beforehand enhances their taste and crunch.
- Add Dried Fruit: Want a hint of natural sweetness? Mix in ¼ cup of chopped dried cranberries, raisins, or chopped dates. Just be sure they’re unsweetened and added sparingly to avoid making the bars overly sticky.
Sweetener Alternatives
While brown rice syrup is ideal for binding these bars, it’s not always easy to find. If you need a substitute, here are some workable options:
- Honey: This is the closest alternative in terms of texture and binding power. Use the same amount, but note that the bars might be a little softer and stickier.
- Maple Syrup: Works in a pinch, though it’s thinner and might require an extra few minutes of baking. Also has a more pronounced flavor, which pairs nicely with the nuts and chocolate.
- Date Syrup: A whole-food option that adds a deep, rich sweetness. Best for those looking to minimize processed ingredients.
Make sure whichever sweetener you choose is alcohol-free and free from additives. Heating your syrup slightly before mixing is key for smooth blending and even distribution.
Flavor Boosters and Texture Add-Ins
To keep things interesting, you can add a few extra ingredients for texture and flavor:
- Unsweetened shredded coconut for a tropical twist
- Chia seeds for added fiber and omega-3s
- Cinnamon or cardamom for warm spice notes
- Roasted cocoa nibs for added crunch without extra sugar
Mix-ins should be kept under ¼ cup total to maintain the structure of the bars. Too many add-ins can make them crumbly or affect the binding.
Chocolate Variations
Dark chocolate is rich, bold, and less sweet — perfect for pairing with salty nuts. But if you’re customizing, you can try:
- Semi-sweet chocolate for a slightly sweeter bar
- Sugar-free chocolate chips for low-carb needs
- Dairy-free chocolate if you’re avoiding milk ingredients
Whichever chocolate you use, combine it with a small amount of coconut oil for smoother dipping and faster setting. Avoid any chocolate that contains artificial flavorings or dairy byproducts if you’re aiming for a cleaner label.
Storage Tips and Make-Ahead Options
Keeping Your Bars Fresh
One of the biggest advantages of homemade snack bars is the ability to store them long-term without sacrificing taste or texture. To ensure your Dark Chocolate Sea Salt Nut Bars with Peanuts stay fresh and delicious, proper storage is key.
Once the chocolate has fully set, transfer the bars into an airtight container. You can store them at room temperature for up to one week. They should be kept in a cool, dry place away from direct sunlight or heat, which could cause the chocolate to melt or the bars to soften.
For extended freshness, place the bars in the refrigerator. They’ll last for about two to three weeks chilled. If you prefer a firmer texture and a crisper bite, refrigerating is your best bet.
Freezer-Friendly for Meal Prep
These bars are ideal for batch cooking and meal prepping. You can make a double batch and freeze them for up to three months without losing flavor or texture.
Here’s how to do it right:
- Wrap each bar individually in parchment paper or wax paper. This prevents sticking and makes it easier to grab a single serving when needed.
- Place the wrapped bars in a zip-top freezer bag or freezer-safe container. Label it with the date so you can keep track of freshness.
- To enjoy, simply let a bar thaw at room temperature for 10–15 minutes, or enjoy straight from the freezer if you like a firmer bite.
These frozen bars are great for tossing into lunchboxes, gym bags, or briefcases. By the time you’re ready for a snack, they’ll be perfectly defrosted and ready to eat.
Preventing Common Storage Mistakes
Here are a few things to avoid so your bars stay fresh and intact:
- Don’t skip the parchment lining: Bars can stick to the container or each other without it.
- Avoid high humidity areas: Moisture can soften the chocolate and puffed rice, changing the texture of the bars.
- Separate layers with parchment paper: If storing multiple bars in one container, place a piece of parchment between layers to prevent them from sticking together.
By following these storage tips, you’ll keep your homemade snack bars just as fresh and satisfying as the day you made them.
Nutritional Breakdown and Health Benefits
Balanced Macros in Every Bite
Each bar of this Dark Chocolate Sea Salt Nut Bars with Peanuts recipe delivers a satisfying blend of nutrients that makes it ideal as a midday snack, a post-workout bite, or even a quick breakfast on the go.
Here’s a snapshot of the nutrition per serving (based on a 10-bar yield):
- Calories: 248
- Protein: 6.9 g
- Fat: 18.1 g
- Carbohydrates: 17.3 g
- Sugar: 10.3 g
- Fiber: 3.2 g
- Sodium: 68.2 mg
This well-rounded profile helps fuel your day in multiple ways. The healthy fats and protein from the nuts help you feel full and satisfied, while the natural sweeteners provide quick energy without the crash that comes from refined sugar.
Benefits of Key Ingredients
- Nuts (Almonds, Peanuts, Cashews): These are rich in monounsaturated fats, which support heart health. They also provide plant-based protein, essential for muscle repair and metabolic function.
- Dark Chocolate: Known for its antioxidant properties, dark chocolate contributes to improved brain function and reduced inflammation when consumed in moderation.
- Puffed Rice: A low-calorie grain that adds volume and crunch without overloading on carbohydrates.
- Coconut Oil: Contains medium-chain triglycerides (MCTs), which are quickly absorbed and used as energy, making it popular among those looking to support metabolism.
- Natural Sweeteners: Brown rice syrup or honey provide a lower-glycemic alternative to refined sugar. They help keep blood sugar levels more stable and prevent energy dips.
Ideal for Various Lifestyles
Whether you follow a gluten-free diet, a clean-eating plan, or just want to avoid highly processed snacks, these bars fit right in. They’re:
- Naturally gluten-free
- Free from artificial additives
- Customizable for nut-free or dairy-free diets
- Shelf-stable and portable
With no need for refrigeration (unless storing long-term), these bars are perfect for those on the move. Whether you’re at the office, traveling, hiking, or just want something sweet but smart, this recipe checks all the boxes.
Conclusion: Make the Better Bar at Home
If you’ve been searching for a snack that strikes the perfect balance between flavor, nutrition, and convenience, these Dark Chocolate Sea Salt Nut Bars with Peanuts are your answer. With just a handful of clean ingredients and an easy prep process, you get a satisfying treat that supports your health goals without sacrificing taste.
Homemade bars let you skip the added sugars and preservatives found in many store-bought options. You control the quality, the flavors, and the level of sweetness. Whether you enjoy them post-workout, as an afternoon pick-me-up, or a late-night snack, these bars offer long-lasting energy and indulgence in every bite.
They’re portable, freezer-friendly, and endlessly customizable — making them an ideal addition to your meal prep routine or snack drawer. With dark chocolate, a touch of sea salt, and a crunchy mix of nuts, they’re guaranteed to become a go-to favorite.
Skip the supermarket snack aisle and make your own bars with this easy, crowd-pleasing recipe. Once you taste that first bite of sweet, salty, chocolatey goodness, you’ll wonder why you ever bought packaged ones in the first place.


