Finding a satisfying snacks that fits within a keto lifestyle can be quite a challenge.
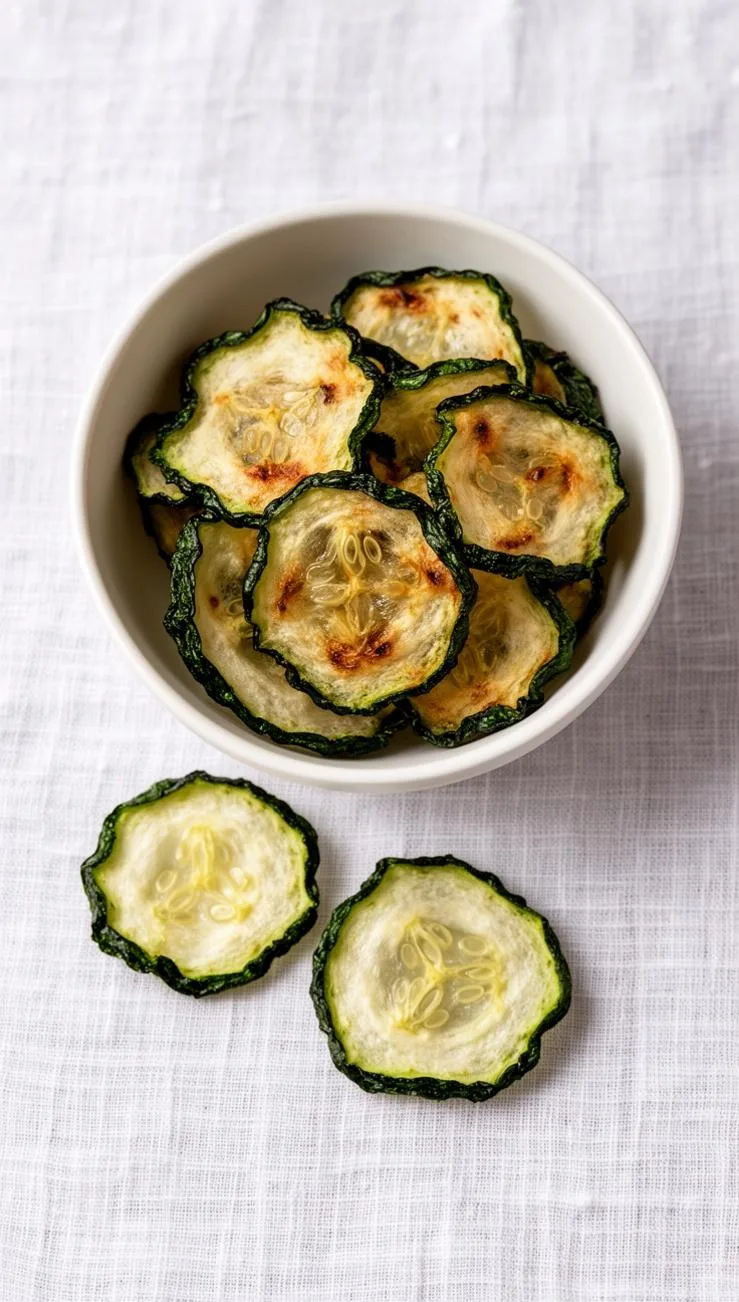
Crunchy Low Carb Cucumber Chips offer a refreshing alternative to traditional potato chips without the carbs.
These dehydrated gems provide a satisfying snap and a burst of flavor in every single bite.
Mastering this simple recipe will transform your snack game and keep your nutrition on track.
This snack is exceptionally high in Vitamin K and contains decent amounts of Vitamin C.
The high water content of the base vegetable helps with hydration even after the dehydration process.
Potassium and magnesium are present, making these chips a great choice for heart health and muscles.
Those following a ketogenic or paleo diet will find these an essential addition to their pantry.
Individuals looking to manage blood sugar or lose weight benefit most from this fiber rich snack.
The low calorie density allows for larger portions without the guilt of high fat processed foods.
However, people with sensitive digestive systems should consume these in moderation to avoid any bloating issues.
Always consult a doctor if you have specific restrictions regarding sodium or high fiber intake levels.
Ingredients List
450 grams Firm English Cucumbers (roughly 2 large ones)
2 tablespoons Extra Virgin Olive Oil or Avocado Oil
1/2 teaspoon Fine Himalayan Pink Salt or Sea Salt
1/4 teaspoon Smoked Paprika for a subtle earthy depth
1/8 teaspoon Garlic Powder to enhance the savory profile
1/2 teaspoon Dried Dill or Onion Powder for extra zing
1 tablespoon Nutritional Yeast for an optional cheesy dairy free flavor
1/2 teaspoon Freshly Cracked Black Pepper for a gentle spicy kick
Equipment
Mandoline slicer for achieving perfectly uniform and thin vegetable slices.
Large mixing bowl to toss ingredients and ensure even coating.
Food dehydrator or a standard kitchen oven with a low setting.
Parchment paper or silicone baking mats to prevent any sticking.
Paper towels or a clean kitchen cloth for removing moisture.
Small whisk to blend the dry spices thoroughly before application.
Airtight glass jars or containers for optimal long term storage.
Cooling rack to allow air circulation after the drying process.
Detailed Preparation Method
Begin by selecting the freshest cucumbers available, ensuring they are firm and free of soft spots.
Wash the skins thoroughly under cold running water to remove any wax or organic debris.
Dry the vegetables completely using a lint free kitchen towel before you start the slicing.
Excess moisture on the skin can prevent the oil and spices from adhering properly later.
Set your mandoline slicer to a thickness of approximately 3 millimeters for the best results.
Carefully slice the cucumbers, keeping your fingers away from the sharp blade using a safety guard.
If you do not have a mandoline, use a very sharp chef’s knife for precision.
Try to keep every slice identical so they all finish drying at the exact same time.
Lay the slices out in a single layer on top of several paper towels.
Sprinkle a tiny pinch of salt over them and let them sit for ten minutes.
This process, known as sweating, draws out internal water which is vital for achieving crunchiness.
Blot the tops of the slices firmly with another paper towel to remove the liquid.
In a large mixing bowl, combine the olive oil with your selected dry spices and herbs.
Whisk the mixture until the spices are suspended evenly throughout the golden oil base.
Add the cucumber slices to the bowl and toss them very gently with your hands.
Ensure every single piece is lightly coated but not dripping with excess oil or fat.
If using a dehydrator, arrange the pieces on the trays without letting them overlap at all.
Set the temperature to 135 degrees Fahrenheit and allow them to dry for several hours.
The process usually takes between 8 to 12 hours depending on the ambient humidity levels.
Rotate the trays every few hours to ensure the air circulates evenly through the machine.
If using an oven, preheat it to its lowest possible setting, usually around 170 degrees Fahrenheit.
Line your baking sheets with parchment paper and arrange the slices in a neat grid.
Prop the oven door open slightly with a wooden spoon to allow steam to escape.
Bake for 3 to 4 hours, checking frequently to ensure they do not accidentally burn.
The chips are done when they feel totally dry to the touch and slightly brittle.
They may seem a little soft while warm, but they will crisp up significantly during cooling.
Remove them from the heat source and let them rest on a wire cooling rack.
This step is essential for reaching that perfect texture associated with Crunchy Low Carb Cucumber Chips.
Storage and Shelf Life
Once the chips have cooled to room temperature, move them immediately to an airtight container.
Glass jars with rubber seals are the best option for maintaining the desired crisp texture.
Store the container in a cool, dark, and dry place like a pantry or cupboard.
Avoid storing them near the stove or sink where heat and humidity are prevalent.
These chips generally stay crunchy for about three to five days if stored correctly and sealed.
If they become slightly soft due to humidity, you can recrisp them in the oven briefly.
Freezing is not recommended as the delicate cell structure of the chips will break down completely.
For the best flavor and texture experience, consume your batch within forty-eight hours of making.
Variations and Substitutions
You can easily swap the spices to create different flavor profiles like salt and vinegar.
Simply add a teaspoon of apple cider vinegar powder to the spice mix for tanginess.
For a spicy version, incorporate cayenne pepper or red chili flakes into the seasoning blend.
Using lemon pepper instead of black pepper provides a bright and zesty citrus finish.
If you don’t have English cucumbers, Persian cucumbers work excellently because of their small seeds.
Avoid using thick skinned slicing cucumbers as they can become quite bitter when they dry.
You can replace olive oil with melted coconut oil for a slightly sweeter flavor profile.
Experimenting with different dried herbs like rosemary or thyme adds a gourmet touch to snacks.
Tips and Tricks for Success
The most important factor in this recipe is moisture control before the dehydration begins.
The more water you remove during the sweating process, the faster the chips will dry out.
Always use a mandoline because uneven slices will result in some being burnt and others soggy.
Be patient with the drying time as rushing the heat will result in bitter chips.
Avoid over-crowding the dehydrator trays or baking sheets to allow for maximum air flow throughout.
Check for doneness by taking one chip out and letting it cool for one minute.
If it snaps cleanly in half, the entire batch is likely ready to be removed.
Using a silicone mat can sometimes trap moisture, so parchment paper is often a better choice.
Additional Cooking Advice
Cucumbers have a very high water content, nearly ninety-five percent, which means they shrink significantly.
Do not be alarmed if your large bowl of slices turns into a small handful.
This concentration of the vegetable makes the flavor much more intense than a fresh cucumber slice.
It is better to under-salt initially as the flavors concentrate during the long drying period.
If you find the seeds are falling out, try using younger, smaller cucumbers for your chips.
The seasoning can be customized to match your favorite dip, like ranch or spicy sriracha.
Cleaning the dehydrator trays immediately after use prevents the spices from sticking and hardening there.
Keep a close eye on the oven during the last hour to prevent any over-browning.
Serving Suggestions
Serve these delightful rounds alongside a bowl of creamy Greek yogurt dip or fresh guacamole.
They make an excellent gluten free cracker substitute for soft cheeses like goat or brie.
Crumble them over a salad to add a unique texture and a concentrated savory punch.
They are perfect for school lunches or a quick afternoon snack at the office.
Conclusion
Creating Crunchy Low Carb Cucumber Chips at home is a rewarding way to enjoy healthy snacking.
By following the steps of slicing, sweating, and slow drying, you achieve a perfect texture.
These chips offer a wealth of nutrients while keeping your carbohydrate intake to a minimum level.
With endless seasoning possibilities, you can customize this recipe to suit any of your cravings.
Enjoy the process of making a snack that supports your wellness goals and tastes amazing.
Start your batch today and experience the satisfying crunch of these guilt free, vegetable based treats.
Frequently Asked Questions
Why are my cucumber chips soggy?
Soggy chips usually result from not removing enough moisture before drying or high humidity levels.
Ensure you salt and blot the slices and dry them until they snap when cooled.
If they lose crispness later, a quick toast in a low oven usually fixes them.
Can I make these in an air fryer?
Yes, you can use an air fryer on the lowest dehydrate setting for faster results.
Make sure the slices do not blow around and overlap during the rapid air circulation.
Check them every fifteen minutes as the air fryer works much faster than an oven.
Which cucumber variety is best for chips?
English or Persian cucumbers are preferred because they have very thin skins and tiny seeds.
Standard garden cucumbers have large seeds and thick skins that can become tough or bitter.
Seedless varieties ensure the chip stays whole and maintains a consistent, pleasant circular shape.


