If you’re searching for a warm, slightly sweet, and nutty loaf that fills your kitchen with irresistible aromas, this Cranberry Walnut Bread Recipe is exactly what you need. Whether you enjoy it for breakfast, a midday snack, or paired with a spread of nut butter, this bread offers the perfect texture—crispy on the outside, soft and chewy inside.
In this guide, we’ll break down everything you need to create bakery-quality cranberry walnut bread right in your home kitchen. From the best ingredients to dough-kneading tips, proofing techniques, and flavor variations, you’ll learn how to get consistently delicious results. The recipe is vegan-friendly, made without any dairy or animal-based products, and avoids common non-vegetarian pairings, making it suitable for a wide range of diets.
Understanding the Basics of Cranberry Walnut Bread
What Makes Cranberry Walnut Bread Special
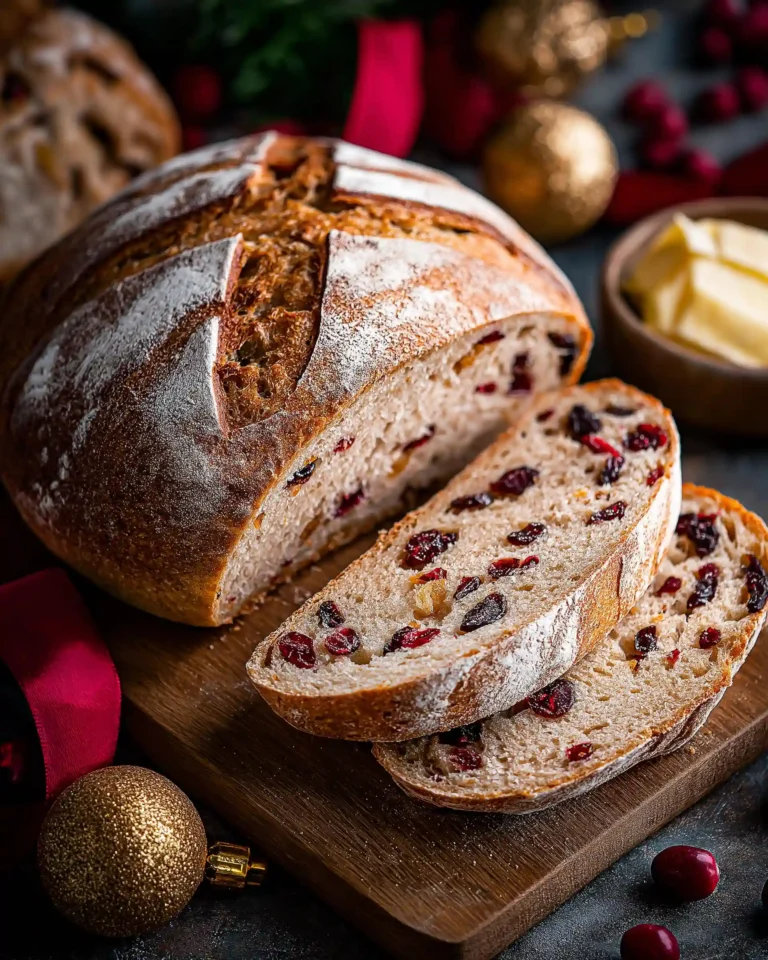
This bread isn’t just another loaf. It’s a harmony of texture and flavor. The soft crumb is enhanced by the slight tartness of sweetened dried cranberries and the satisfying crunch of chopped walnuts. Unlike plain white or wheat loaves, this variety adds color, character, and contrast to your breadbasket. The aroma from the cranberries caramelizing in the oven is a sensory bonus.
Key Ingredients and Their Functions
Each ingredient in this recipe plays a specific role in creating the perfect loaf:
- Water: Hydrates the flour and activates the yeast. Proper temperature is crucial.
- Yeast: Helps the dough rise. Rapid-rise yeast speeds up proofing, while active dry yeast gives a slower but richer rise.
- Sugar: Feeds the yeast and enhances sweetness.
- Sea Salt: Balances flavors and strengthens gluten development.
- Olive Oil: Adds tenderness and moisture.
- Unbleached All-Purpose Flour: Provides structure. It’s versatile and creates a soft, chewy crumb.
- Craisins (Sweetened Dried Cranberries): Introduce sweetness and chewiness.
- Walnuts: Add crunch and nutty flavor.
Choosing Between Yeast Types
This recipe offers flexibility between Rapid Rise Instant Yeast and Active Dry Yeast. While both work well, your choice affects both your process and the flavor. Instant yeast doesn’t require proofing time and allows for quicker baking. Active dry yeast needs to be dissolved in warm water first but can yield slightly deeper flavor notes due to the longer rise.
Tools You’ll Need for Success
Using the right tools can make baking more efficient and improve your results. Here’s a quick checklist:
- Measuring cups and spoons
- Large mixing bowl or stand mixer
- Stirring utensil or dough hook
- Baking sheet (13 x 9)
- Parchment paper (optional)
- Bread lame or sharp razor
- Cooling rack
An instant-read thermometer is optional but helpful to check the water temperature and the internal doneness of the bread.
Tips for the Perfect Texture
- Knead until the dough becomes smooth and elastic. This ensures proper gluten formation, which gives the bread its structure.
- Always monitor the dough’s moisture. If it feels too wet, sprinkle in the reserved flour gradually.
- For a rustic touch, dust the shaped dough with flour before the second proof.
Cranberry Walnut Bread Recipe
- Total Time: 2 hours 15 minutes
- Yield: 2 16-ounce loaves
Description
This Cranberry Walnut Bread is soft, slightly sweet, and packed with tart dried cranberries and crunchy walnuts. Perfect for breakfast, snacking, or as a hearty side, this vegan-friendly bread is a bakery-style loaf you can make at home.
Ingredients
1 ½ cups Water
1 (¼-ounce) packet Rapid Rise Instant Yeast OR 2 ¼ teaspoons Active Dry Yeast
¼ cup Sugar
1 teaspoon Sea Salt
2 tablespoons Olive Oil
4 ½ cups Unbleached All-Purpose Flour (reserve ½ cup for kneading)
1 cup Sweetened Dried Cranberries (chopped)
½ cup Walnuts (chopped)
Instructions
1. Heat water to 120–130°F for instant yeast or 100–110°F for active dry yeast. If using active dry yeast, mix with water and let sit for 5 minutes until foamy.
2. In a large mixing bowl or stand mixer, combine water, yeast, sugar, salt, olive oil, and 4 cups of flour. Mix until a shaggy dough forms.
3. Add chopped cranberries and walnuts. Continue mixing until well incorporated.
4. If kneading by hand, transfer dough to a floured surface and knead for 3–5 minutes. If using a mixer, knead on medium speed for 5–6 minutes until smooth and elastic.
5. Shape the dough into a ball and place in an oiled bowl. Cover and let rise in a warm place for 30–45 minutes until doubled in size.
6. Punch down dough to release air. Shape into one large loaf or divide into two smaller loaves.
7. Place dough onto an oiled or parchment-lined baking sheet. Cover and let rise again for 30–45 minutes until doubled.
8. Preheat oven to 375°F during final proof. Score the dough with a lame or sharp blade.
9. Bake for 35–40 minutes until golden brown. Internal temperature should be 200°F.
10. Transfer to a cooling rack and cool completely before slicing. Store in an airtight container at room temperature for up to 5 days.
Notes
To make the cranberries softer, soak them in warm water for 10 minutes and drain before adding.
All-purpose flour can be substituted with bread flour for a chewier texture.
Add orange zest for a citrus twist.
Shape dough into dinner rolls, braids, or a boule for visual variety.
Make sure yeast is active by checking for foaming after blooming (if using active dry yeast).
Cool bread completely before storing to avoid a soggy crust.
- Prep Time: 15 minutes
- Cook Time: 30 minutes
- Category: Bread
- Method: Baking
- Cuisine: American
How to Prepare the Dough for Cranberry Walnut Bread
Prepping the Water and Activating the Yeast
The yeast is the heart of your dough, and it needs the right environment to thrive. Begin by heating your water to the correct temperature based on the yeast type:
- For Rapid Rise Instant Yeast: Heat water to 120–130°F. There’s no need to wait—just proceed with mixing.
- For Active Dry Yeast: Warm the water to 100–110°F, combine it with the yeast, and let it rest for 5 minutes until it looks foamy. This step confirms the yeast is active.
Tip: If the yeast doesn’t foam, the water might have been too hot or the yeast may be expired.
Mixing the Ingredients to Form a Shaggy Dough
Once the yeast is ready, it’s time to bring all your ingredients together. In a large mixing bowl or the bowl of a stand mixer fitted with a dough hook, combine:
- Warm water and yeast mixture
- Sugar
- Sea salt
- Olive oil
- 4 cups of all-purpose flour (reserve ½ cup for later)
Start mixing at low speed or stir manually until a rough dough begins to form. At this point, add the chopped cranberries and walnuts. Mix again until these add-ins are evenly distributed.
This is when the dough takes on its signature texture and character. The cranberries add vibrant color and sweet bursts, while the walnuts introduce a welcome crunch.
Kneading the Dough to Elastic Perfection
Depending on your preferred method, follow one of these kneading approaches:
- By Hand: Turn the dough out onto a lightly floured surface. Knead using the heel of your hand, pushing and folding the dough for 3 to 5 minutes until it becomes smooth and elastic. Sprinkle small amounts of the reserved flour as needed to keep it from sticking.
- Using a Stand Mixer: Set to medium speed and knead for 5 to 6 minutes, pausing occasionally to scrape the bowl. Add flour gradually if the dough sticks excessively to the sides.
You’re aiming for a soft dough that doesn’t stick to your hands or the bowl but remains moist and pliable. Over-flouring will result in a dry, dense loaf, so add only what’s necessary.
Dough Consistency Checkpoints
Your dough should:
- Feel slightly tacky, not sticky
- Stretch without tearing easily
- Bounce back when gently pressed
If your dough tears quickly when pulled, continue kneading a little longer. This elasticity comes from well-developed gluten, and it’s what helps trap air during proofing for a lighter, taller loaf.
Proofing and Shaping the Cranberry Walnut Bread Dough
First Proofing: Let the Dough Rise
Once your dough is smooth and elastic, it’s time for the first rise. Lightly oil a clean bowl and place the dough inside. Rotate it once so the surface is coated with oil to prevent drying out.
Cover the bowl with a clean kitchen towel, plastic wrap, or a reusable cover. Let it rest in a warm, draft-free spot until the dough doubles in size. This usually takes 30 to 45 minutes. If your kitchen is cool, consider proofing in an oven with the light on or using a proofing setting if your oven supports it.
You can also use the Instant Pot’s yogurt setting as a warm environment to speed up the rise.
How to Know When Proofing Is Done
Here are a few signs the dough is ready:
- It has doubled in size
- When you press a finger lightly into the surface, the indentation remains
- It feels puffed and airy
Don’t rush this step. Under-proofed dough will be dense, while over-proofed dough can collapse when shaped.
Punching Down and Shaping the Dough
Once the dough has risen, remove it from the bowl and gently punch it down to release the built-up gas. This improves the flavor and helps redistribute the yeast.
Now decide your loaf style:
- For two smaller loaves: Divide the dough in half using a dough cutter or knife
- For one large loaf: Leave it whole
Shape the dough into a round, oval, or loaf form, depending on your preference. Flatten it slightly and then fold the edges inward to build surface tension. Flip it seam-side down and shape it by cupping your hands around the sides and gently turning.
For rustic, artisan-style bread, round boules work beautifully. You can also form baguette-style loaves or even rolls from this dough.
Second Proofing: Final Rise Before Baking
Transfer the shaped dough onto a lightly oiled or parchment-lined baking sheet. Leave enough space between loaves if you made two. Cover them again and allow the shaped dough to rise a second time, 30 to 45 minutes, until it visibly puffs up and nearly doubles in size.
This second proof creates the final structure that locks in air and helps the bread spring in the oven.
Optional: Add a Rustic Look
For a rustic finish, dust the surface lightly with flour before baking. This enhances the visual texture and gives it that artisanal touch you’d see in a bakery. You can also leave it plain if you prefer a glossy crust.
The dough is now ready for scoring and baking.
Baking the Perfect Cranberry Walnut Bread
Preheating Your Oven for Success
During the final 15 minutes of your second proof, start preheating your oven to 375°F (190°C). Place the oven rack in the center to ensure even baking. If you plan to bake two loaves at once and use the top and bottom racks, be sure to rotate them halfway through to avoid uneven browning.
A fully preheated oven is essential. If the oven isn’t hot enough when the bread goes in, it won’t get that crucial initial rise—known as oven spring—and could turn out dense or flat.
Scoring the Dough
Just before placing your dough in the oven, score the tops using a bread lame or sharp razor blade. This step isn’t just for decoration—it allows the steam to escape and controls how the bread expands in the oven. Without scoring, the crust may tear unpredictably as the dough rises during baking.
Popular scoring patterns for rustic loaves include:
- A single deep slash across the top
- A crisscross or hashtag pattern
- Leaf or curved designs for more artistry
Make your cuts quickly and confidently to avoid dragging the dough.
Baking Time and Doneness Cues
Place the scored dough in the oven and bake for 35 to 40 minutes, depending on the shape and size of your loaves. The exterior should turn a deep golden brown.
To test for doneness:
- Tap the bottom of the loaf. It should sound hollow.
- Use a thermometer if you have one. The internal temperature should reach 200°F (93°C).
If your crust is browning too fast before the interior is done, loosely tent the bread with foil for the final 10 minutes.
Cooling the Bread Before Slicing
Once baked, transfer the loaves to a wire cooling rack immediately. This prevents steam from getting trapped underneath, which can lead to a soggy bottom crust.
Let the bread cool completely before slicing. Cutting too early will release steam and alter the texture, making the bread gummier than desired.
Cooling time generally takes about 1 hour. Once cool, use a serrated bread knife for clean slices.
Storing, Serving, and Enhancing Flavor
Storing Your Cranberry Walnut Bread
To maintain freshness and texture, allow the bread to cool completely before storing. Once cooled, wrap the loaf in plastic wrap, foil, or place it in an airtight container. Store at room temperature for up to 5 days.
Avoid refrigeration—it can cause the bread to dry out quickly. For longer storage, freeze it instead.
Freezing Tips:
- Slice the loaf before freezing, so you can take out only what you need
- Wrap individual slices or halves in plastic and store in a freezer-safe bag
- Defrost at room temperature or reheat slices in a toaster or warm oven
Best Ways to Serve Cranberry Walnut Bread
This bread is versatile and pairs well with both sweet and savory toppings (without needing meat-based or alcohol-related pairings). Try these delicious, plant-based ideas:
- Spread with almond butter or peanut butter for a protein-rich snack
- Top with coconut-based cream cheese and a drizzle of maple syrup
- Serve alongside roasted vegetables or a hearty soup
- Enjoy plain—the cranberries and walnuts offer enough flavor on their own
For breakfast, toast slices and top with your favorite fruit preserves. For lunch, it makes a delightful base for a veggie sandwich or open-faced avocado toast.
Flavor Enhancements and Variations
Want to elevate the flavor? Try one or more of these adjustments:
- Add citrus zest: A bit of orange zest enhances the cranberry’s brightness
- Rehydrate the cranberries: Soak them briefly in warm water before adding to the dough for a plumper texture
- Use bread flour: Swapping all-purpose flour with bread flour gives a chewier crust and a more robust bite
- Shape creatively: Turn the dough into a festive braid, rustic boule, or even dinner rolls
These tweaks keep the base recipe intact but allow for personal expression and flavor upgrades based on your preferences.
Dietary Notes, and Expert Tips
Dietary Considerations
This recipe is friendly for both vegan and vegetarian diets. It contains no eggs, dairy, or animal products and uses plant-based fats (olive oil). It’s also versatile enough for those reducing processed sugar or salt—just adjust the measurements accordingly.
If you’re gluten-sensitive, this recipe would require significant adjustments with gluten-free flour blends, which often change hydration needs and texture.
Troubleshooting Common Baking Issues
Even experienced bakers run into the occasional issue. Here are common problems and solutions:
- Dough is too sticky: Add the reserved flour slowly while kneading. Do not over-flour, or it’ll turn dense.
- Bread didn’t rise: Check yeast freshness. Make sure water isn’t too hot or cold.
- Loaf is dense or heavy: Under-kneading or short proofing times can result in poor structure.
- Crust too hard: Overbaking or a dry baking environment. Tent with foil halfway through baking if needed.
- Bread collapsed: Likely over-proofed during the second rise. Keep second proof time under 45 minutes.
Expert Baking Tips for Success
- Always weigh your ingredients when possible for accuracy, especially flour.
- Use an instant-read thermometer to test both your water and the finished loaf.
- Allow the dough to rest between kneading and shaping for better elasticity.
- Practice makes perfect: Your dough-handling skills will improve over time.
Creative Presentation Ideas
To make your cranberry walnut bread more visually appealing:
- Lightly score decorative patterns into the dough
- Dust with flour or coarse sugar for a rustic finish
- Shape into individual rolls or a pull-apart loaf for gatherings
This bread doesn’t just taste good, it can also become the centerpiece of your table.
Conclusion: Bring the Bakery to Your Kitchen
Baking homemade Cranberry Walnut Bread is more than just mixing ingredients—it’s a flavorful, rewarding experience that fills your home with warmth and comfort. With a golden crust, tender crumb, tart cranberries, and crunchy walnuts, this bread offers an ideal balance of sweetness and texture.
It’s a recipe that fits every season and occasion, from cozy winter mornings to spring brunches and family get-togethers. Whether you’re new to baking or looking to expand your repertoire, this bread is a fantastic place to start.
Take your time with each step, enjoy the process, and savor the results. You don’t need fancy ingredients or tools—just care, patience, and this trusty recipe.


