There’s something undeniably satisfying about making fresh baguettes from scratch. The crunchy crust, airy interior, and unmistakable aroma that fills your kitchen make it a true baking adventure worth every moment. In this comprehensive guide, we’ll walk you through the process of making classic French baguettes using a simple poolish starter method and just a few pantry staples. This is not just a recipe, but a full bakealong experience that demystifies the steps, explains the science, and helps you troubleshoot for best results.
The following parts will guide you through six essential stages of the bakealong journey: understanding your ingredients and equipment, preparing the starter, making and fermenting the dough, shaping your loaves, perfecting the rise and scoring, and finally, baking and storing your baguettes. Let’s start with the foundation—knowing what you’re working with and why each detail matters.
Ingredients, Tools, and Technique Essentials
Understanding Classic Baguette Ingredients
French baguettes are proof that magic can come from simplicity. Each ingredient plays a pivotal role in the final result. Here’s a closer look at what goes into this classic recipe:
- Flour: The quality and protein content of your flour will determine the structure and crumb of your baguettes. King Arthur all-purpose or bread flour is ideal due to its balanced protein content. All-purpose flour yields a tender crumb while bread flour delivers a bit more chew.
- Water: You’ll use water at two different temperatures—cool water for the starter and lukewarm water for the dough. Water hydrates the flour and supports yeast development, contributing to dough extensibility and oven spring.
- Yeast: A small amount of yeast is used to develop flavor slowly over time. The poolish (starter) uses a pinch of yeast to ferment overnight, while the dough uses a full teaspoon to provide the right rise during mixing and proofing.
- Salt: Often underestimated, salt strengthens gluten, controls fermentation speed, and enhances flavor. Never forget it.
Essential Equipment for Home Bakers
Baking baguettes at home requires a few tools, but nothing too specialized. Here’s what helps create a professional result:
- Kitchen scale: Precision is key. Measuring by grams ensures consistent hydration and texture.
- Mixing bowls: At least two medium-sized bowls for making the starter and mixing the dough.
- Stand mixer (optional): Speeds up the kneading process. Otherwise, hand-kneading is totally viable.
- Baguette pan or baking sheet: A perforated baguette pan helps shape and crisp the crust.
- Baker’s lame or sharp knife: For scoring your baguettes just before baking. The angle and depth of your cuts matter.
- Cast iron skillet or steam tray: Used to introduce steam into the oven, which creates that beautiful crackly crust.
- Parchment paper and tea towels: Help with proofing and gentle handling of dough.
Techniques You’ll Master in This Recipe
This bakealong isn’t just about following a list of steps—it’s about learning the why behind each action:
- Poolish fermentation: A slow ferment starter adds flavor and improves crust development.
- Autolyse and gluten formation: Letting the flour absorb water before full kneading improves dough extensibility.
- Folding and turning: Gentle folding strengthens gluten without overworking the dough.
- Shaping and tensioning: Proper shaping ensures even crumb and iconic baguette structure.
- Steam baking: Moisture in the oven supports oven spring and crust sheen.
You’re now ready to begin with the first hands-on step: building your poolish starter. The flavor of your baguettes starts here.
Building and Resting the Poolish Starter
What Is Poolish and Why Use It?
Poolish is a type of pre-ferment made with flour, water, and a tiny bit of yeast. It’s mixed and allowed to ferment for 12 to 16 hours at room temperature. This long fermentation enhances flavor complexity, improves texture, and helps develop a beautiful crust without added sugars or enhancers.
Unlike sourdough, poolish doesn’t rely on natural wild yeasts. It uses a controlled amount of commercial yeast for consistent results. This method is ideal for those who want a deeper flavor without the unpredictability of sourdough.
Print
Classic Baguettes Bakealong Recipe
- Total Time: 15 hours approx
- Yield: 2 baguettes
- Diet: Vegetarian
Description
This Classic Baguettes Bakealong Recipe uses a poolish starter and simple pantry ingredients to create crispy, golden-brown French baguettes with a chewy interior and complex flavor.
Ingredients
STARTER (POOLISH)
75g cool water
1/16 teaspoon active dry yeast or instant yeast
80g King Arthur all-purpose or bread flour
DOUGH
1 teaspoon active dry yeast or instant yeast
170g lukewarm water
All of the starter
278g King Arthur all-purpose or bread flour
1 teaspoon or 7g salt
Instructions
1. Mix starter ingredients until a soft dough forms. Cover and rest at room temperature for 14 hours.
2. In a large bowl, mix starter, flour, yeast, water, and salt into a cohesive dough.
3. Knead by hand or mixer until soft and slightly tacky.
4. Place dough in a greased bowl, cover, and let rise for 90 minutes, folding after 45 minutes.
5. Turn dough onto a greased surface, gently deflate, and divide into two equal parts.
6. Shape each into a ball, cover, and rest for 15–60 minutes.
7. Shape into 16″ logs, taper ends, and place seam-side down on baguette pan.
8. Cover and let rise until puffy, about 45–60 minutes.
9. Preheat oven to 450°F. Heat 1 ½ cups water to boiling and place a cast iron pan on the bottom rack.
10. Score each baguette with 3–5 diagonal slashes.
11. Place baguette pan in oven. Pour boiling water into the hot cast iron pan and close door quickly.
12. Bake for 24–28 minutes until deep golden brown.
13. Cool on a wire rack, or leave in oven with door cracked open for crispier crust.
14. Store in paper bag for 1 day or freeze for longer storage.
Notes
For crispier results, allow baguettes to cool inside the oven after baking.
Use a kitchen scale for best accuracy.
Avoid adding too much flour during kneading. A slightly sticky dough yields a better crumb.
- Prep Time: 14 hours (starter) + 15 mins
- Cook Time: 28 minutes
- Method: Baking
- Cuisine: French
Step-by-Step: Making Your Poolish Starter
Here’s how to make the starter for your baguettes:
Ingredients:
- 75g cool water
- 1/16 teaspoon active dry or instant yeast
- 80g King Arthur all-purpose or bread flour
Instructions:
- Combine all the ingredients in a medium bowl. Stir until there’s no dry flour remaining.
- Cover the bowl loosely with plastic wrap or a reusable lid.
- Let it rest at room temperature, away from direct sunlight, for about 14 hours. Overnight works great.
By morning, your poolish should be bubbly, risen, and have a pleasant aroma that smells slightly sweet and yeasty. The surface may have collapsed slightly, which is a good sign that it’s fully fermented.
Tips for Poolish Success
- Timing is flexible: While 14 hours is ideal, a window between 12 to 16 hours is forgiving.
- Temperature control: Room temperature (around 68°F) is optimal. If your kitchen is warmer, your starter may mature faster.
- Visual cues: Look for bubbles, a slight dome, and a mild aroma. Overfermented poolish will look watery and smell sour.
Mixing and Kneading the Dough
Bringing the Starter to Life
Once your poolish has fully developed, it’s time to build the main dough. This is where everything starts coming together into a cohesive, elastic structure that will eventually become your baguettes. You’ll be incorporating the rest of the flour, yeast, salt, and water along with your fully fermented poolish.
Ingredients for the Dough:
- 1 teaspoon active dry or instant yeast
- 170g lukewarm water
- All of the poolish starter
- 278g King Arthur all-purpose or bread flour
- 1 teaspoon salt (7 grams)
Step-by-Step Dough Mixing Process
1. Combine the ingredients:
Add all of the ingredients—including your bubbly poolish—to a mixing bowl. Use a spatula or your hand to stir until the mixture forms a shaggy, rough mass.
2. Begin kneading:
Kneading helps develop gluten, which is crucial for structure and rise. You can knead by hand on a lightly floured surface for about 8–10 minutes until the dough becomes smoother and less sticky. If using a stand mixer, mix on speed 2 for 4–5 minutes. The dough will cling slightly to the bottom of the bowl but should pull away from the sides.
3. Look for the right texture:
The dough should be soft, slightly tacky, and smooth. It should hold its shape when poked but still feel tender.
The Importance of Dough Hydration
The hydration of this dough—meaning its water-to-flour ratio—is relatively high. This creates the baguette’s classic open crumb. Working with higher hydration doughs can feel tricky at first, but they produce superior texture and flavor. Be patient and avoid adding too much extra flour.
First Rise and Dough Strengthening
Bulk Fermentation Explained
Bulk fermentation, or the first rise, is where the yeast begins working in earnest. This step helps develop structure and flavor through gas retention and gluten alignment.
Here’s how to do it:
- Lightly oil or grease a medium-sized bowl. Place the dough inside.
- Cover with a clean tea towel or loose plastic wrap.
- Let it rise at room temperature for 90 minutes.
At the 45-minute mark, you’ll gently fold and turn the dough. This isn’t just a casual pat—it’s a purposeful way to redistribute yeast and build internal strength.
Folding Technique
- Reach into the bowl and grab one edge of the dough.
- Stretch it upward gently and fold it over to the opposite side.
- Rotate the bowl and repeat 3 more times.
- Flip the dough over so the seams face downward.
This folding step mimics a light knead and helps create surface tension, improving the final loaf’s shape and crumb.
What to Expect
By the end of the rise, your dough should appear puffier and feel more elastic. It might not double in size, but it will be noticeably looser and smoother.
If your kitchen is particularly cool, you can extend the fermentation slightly. Warmer environments may require shortening it to avoid overproofing.
Dividing, Resting, and Shaping the Dough
Portioning for Perfect Baguettes
Once your dough has completed its first rise, it’s time to divide and pre-shape. This step sets the foundation for final shaping and allows the gluten to relax before rolling out into classic baguette forms.
- Gently turn the dough out onto a lightly greased surface.
- Deflate it slightly by pressing down with your fingertips.
- Cut the dough into two equal portions.
Use a scale for precision if you want identical loaves. This ensures even baking and a uniform appearance.
Pre-shaping and Resting
Take each portion and gently pull the edges toward the center to form a rough ball. Flip it over so the seam side is down. Cover the rounds with a tea towel and let them rest for 15 to 60 minutes.
Why this rest matters:
Letting the dough rest allows the gluten to relax, which makes final shaping much easier. If you skip this, the dough may tear or resist elongation.
Final Shaping Step-by-Step
- Flatten the dough slightly into a rectangle.
- Fold it almost in half lengthwise. Press the seam gently with your hand.
- Rotate the dough 180°, fold and press again.
- Repeat once more to elongate.
With the seam down, gently roll the dough into a log about 16 inches long. The rolling motion should be light, using your fingers to taper each end to the traditional baguette points.
Proofing, Scoring, and Baking for the Perfect Crust
Final Proofing for Structure and Texture
Place the shaped logs seam-side down onto a parchment-lined or lightly greased baguette pan. Cover loosely with a tea towel and let them proof at room temperature for 45 minutes to 1 hour.
Look for a subtle puffiness. The dough should feel lighter but not completely airy. This “marshmallow” consistency signals readiness for baking.
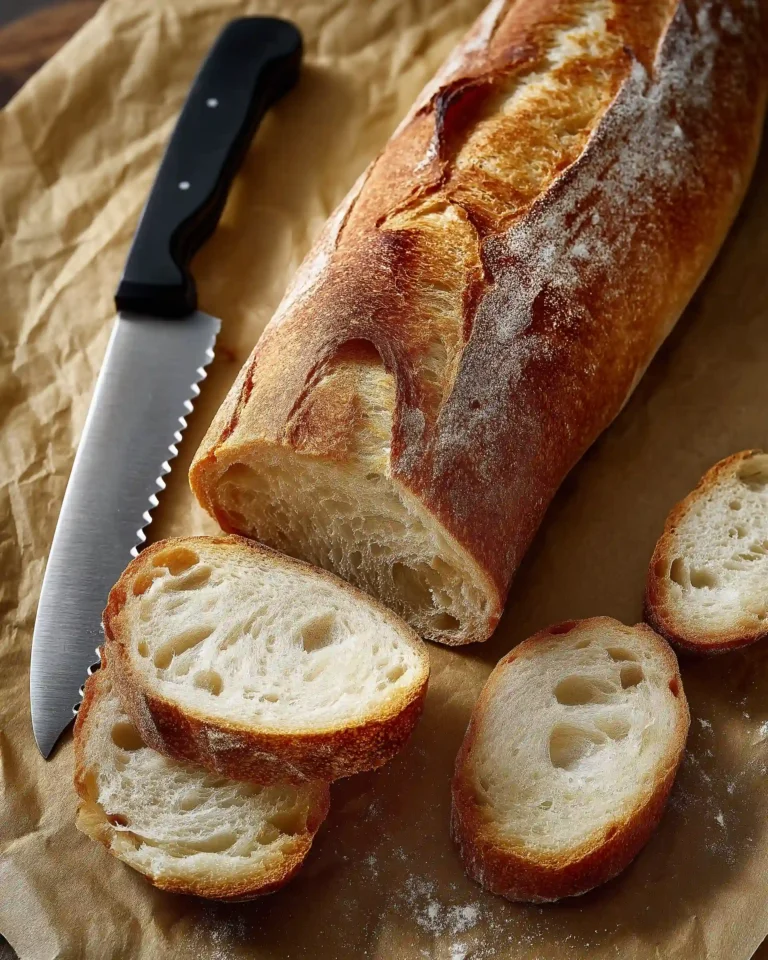
Scoring Techniques
Scoring isn’t just decorative—it helps control how the bread expands in the oven. Use a baker’s lame or a sharp knife to make 3 to 5 angled cuts along the top of each loaf.
Tips:
- Hold the blade at a 45° angle.
- Make confident, quick slashes.
- Space the cuts evenly to promote controlled oven spring.
Creating Steam and Baking
- Preheat your oven to 450°F. Place a cast iron skillet on the floor or bottom rack.
- As you load the baguettes onto a baking stone or oven rack, pour 1 ½ cups boiling water into the skillet.
- Quickly close the door to trap the steam.
Bake for 24 to 28 minutes until deep golden brown. For an extra crispy crust, turn off the oven, crack the door open about 2 inches, and let the loaves cool inside.
Cooling and Storage
Let your baguettes cool on a wire rack completely before slicing. This ensures the interior finishes setting up and avoids a gummy crumb. Store leftovers in a paper bag for a day or freeze them for later use. Reheat in the oven for 5 to 10 minutes to refresh the crust.
Conclusion: Your Homemade Baguette Journey Starts Now
Baking classic baguettes at home is both an art and a rewarding science. With a few simple ingredients, some patience, and thoughtful technique, you can create bakery-quality loaves right from your kitchen. From the deep flavor developed by the poolish starter to the crackly crust formed in a steamy oven, each step builds toward a result you’ll be proud to serve.
Now that you’ve mastered the essential process, feel free to personalize it. Try baking smaller demi-baguettes, add whole wheat flour for depth, or practice advanced scoring patterns for visual flair. With each batch, you’ll build skill, intuition, and confidence.
There’s no better time than now to dive into the joy of breadmaking. With your newfound knowledge, your classic baguette bakealong is just the beginning of your artisan bread journey.


