If you’ve ever marveled at the beautifully airy holes and crisp crust of Italian ciabatta bread and thought, “I could never make that at home,” this guide will change your mind. With the right method and a bit of patience, you can achieve bakery-quality ciabatta from your own kitchen.
This article walks you through the step-by-step process of making ciabatta bread using a traditional biga (preferment), and explains the purpose behind each rest, stretch, and fold. You’ll learn how to mix a hydrated dough, shape it without deflating it, and bake it into golden, rustic loaves or rolls with that signature chewy bite. Whether you’re a seasoned baker or just starting, this guide will help you master a ciabatta recipe that’s truly worth the effort.
Understanding the Ciabatta Bread Foundation
What is Ciabatta Bread?
Ciabatta is a classic Italian bread that means “slipper” in Italian, referring to its flat, elongated shape. First developed in the early 1980s as an alternative to French baguettes, ciabatta quickly became known for its unique open crumb, crispy crust, and soft, chewy texture. Unlike sandwich breads, ciabatta’s interior is full of large, uneven holes formed by a high hydration dough and minimal shaping.
This bread is rustic and freeform, meaning it doesn’t require a pan or mold to bake. The key to its structure and taste lies in using a fermented dough starter and understanding how to handle the wet dough properly.
The Role of the Biga (Preferment)
The biga is a type of preferment, which is a mixture of flour, water, and a small amount of yeast allowed to ferment slowly. This process enhances the flavor, texture, and structure of the final dough. By developing over 8 to 24 hours, the biga breaks down the flour and boosts the bread’s aroma and chewiness without needing a sourdough starter.
Using a biga creates subtle complexity and supports gluten development, which gives ciabatta its strength despite its high hydration. It also helps the dough produce that famous web of holes during baking.
Flour, Hydration, and Texture: The Science Behind It
Bread flour is the base of this recipe because of its high protein content, which supports the dough’s structure as it stretches and ferments. Hydration—how much water is added compared to flour—is another critical factor. Ciabatta dough is highly hydrated, often upwards of 75 percent, which makes it stickier and softer but ultimately more airy and flavorful after baking.
Don’t be intimidated by a sticky dough. That moist, elastic texture is exactly what leads to an authentic, soft interior with a golden, crisp shell.
Print
Ciabatta Recipe
- Total Time: 14 hours, 10 minutes
- Yield: 8 rolls or 2 loaves
- Diet: Vegetarian
Description
This rustic Italian ciabatta recipe delivers perfectly chewy bread with a crisp crust and airy crumb. Made with a fermented biga starter and a high hydration dough, this two-day process rewards you with bakery-quality results at home.
Ingredients
Biga / Preferment:
1 cup (130g) bread flour
1/8 teaspoon active-dry or instant yeast
1/2 cup (120g/ml) room-temperature water (about 70°F)
Dough:
1 teaspoon (3g) active-dry or instant yeast
1 cup (240g/ml) warm water (100–110°F)
2 and 1/2 cups (325g) bread flour
1 and 1/2 teaspoons (8g) salt
Olive oil, as needed (for coating hands and spatula)
Instructions
1. In a bowl, combine bread flour, yeast, and water for the biga. Mix and cover with plastic wrap. Let sit at room temperature for 8–24 hours.
2. Dissolve yeast in warm water. Add biga, bread flour, and salt. Mix with dough hook or spatula until uniform.
3. Cover and let rest for 30 minutes.
4. Perform the first stretch-and-fold around the dough. Repeat three more times, resting 30 minutes between each. Then refrigerate for 1–24 hours.
5. Generously flour your surface. Gently scrape dough out. Shape into a rectangle.
6. Cut into 8 rolls (2.5×3.5 inches) or 2 loaves (5×7 inches). Transfer to floured parchment paper.
7. Lightly flour the tops, cover, and proof for 1 hour.
8. Preheat oven to 450°F for 1 hour with baking sheet inside. Add ice cubes to a lower rack tray for steam.
9. Slide parchment with rolls onto hot baking sheet. Bake for 20–25 minutes until golden and hollow-sounding.
10. Cool for at least 45 minutes before slicing.
Notes
Use bread flour for best structure and chew. The dough is very sticky—do not add extra flour.
Refrigerate dough after stretch-and-fold for up to 24 hours.
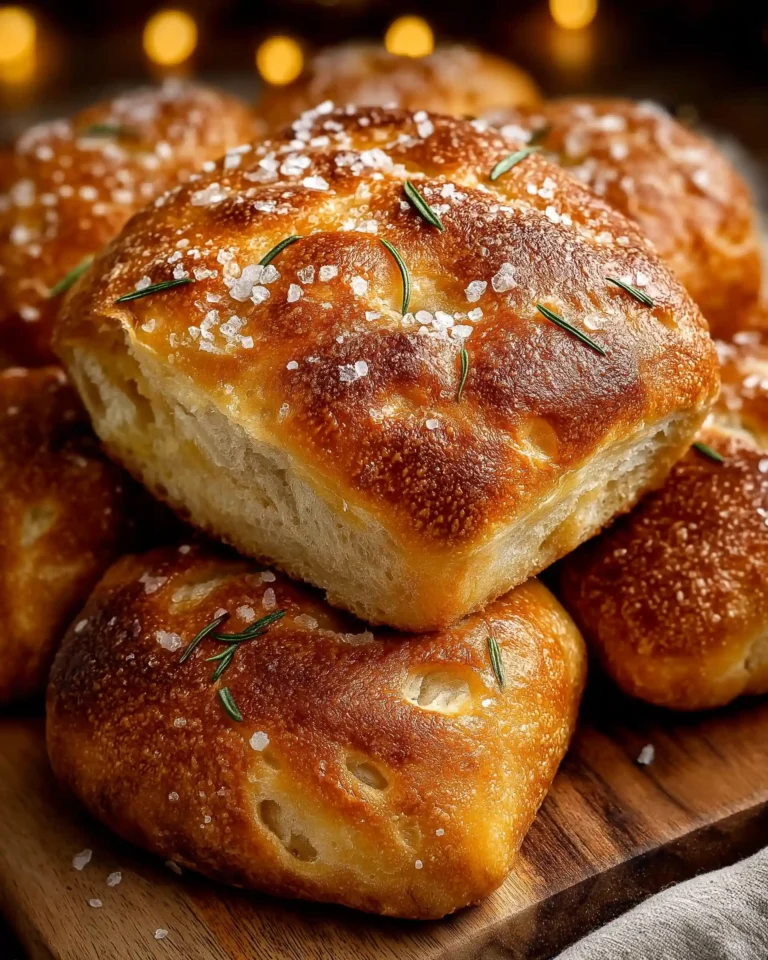
Add fresh rosemary and garlic for an herbed version.
Can be shaped into focaccia or baked on a pizza stone.
Freeze baked loaves for up to 3 months. Thaw and reheat before serving.
- Prep Time: 13 hours
- Cook Time: 25 minutes
- Category: Bread
- Method: Baking
- Cuisine: Italian
Preparing the Biga and Dough
Day 1: Mixing the Biga
Begin your ciabatta journey by preparing the biga. In a large mixing bowl, combine 1 cup of bread flour and a pinch (1/8 teaspoon) of instant or active dry yeast. Add 1/2 cup of room temperature water—about 70°F (21°C). Mix everything using a silicone spatula until the ingredients are fully combined and the mixture is sticky.
Cover the bowl tightly with plastic wrap and let it sit at room temperature. The biga should ferment for at least 8 hours, and up to 24 hours for a deeper flavor. During this time, it will develop bubbles and expand, becoming more elastic and slightly sour-smelling. This is the foundation of your bread.
Day 2: Mixing the Final Dough
Once your biga is ready, you’ll combine it with more flour, water, salt, and a small amount of yeast to form the final dough. Start by dissolving 1 teaspoon of yeast in 1 cup of warm water (around 100–110°F or 38–43°C) in a separate large bowl or the bowl of your stand mixer.
Let the yeast sit for 5 to 10 minutes until it’s fully dissolved. Then add the biga, 2 and 1/2 cups of bread flour, and 1 and 1/2 teaspoons of salt. Stir everything together with a wooden spoon or dough hook on medium speed. Initially, the dough will look rough and dry, but keep working it. Soon, it will transform into a shaggy, wet dough.
The texture will be sticky, which is exactly what you want. Lightly coat your hands and spatula with olive oil to prevent sticking, then gently knead the dough until it becomes uniform. Avoid adding more flour unless absolutely necessary, as this can reduce the lightness of the final bread.
Resting and Stretching the Dough
First Rest and Initial Stretch-and-Fold
Once your dough is fully mixed, cover the bowl and let it rest for 30 minutes at room temperature. This resting period allows the gluten to begin developing and makes the dough more elastic.
After the first rest, you’ll begin the stretch-and-fold process. Think of a clock face and start by pulling the dough from the 12 o’clock position, stretching it upwards, and folding it down to 6 o’clock. Turn the bowl 90 degrees and repeat. Do this for a total of 8 folds (around the bowl twice). Cover and let rest again for 30 minutes.
Continuing Stretch-and-Fold Cycles
Repeat the stretch-and-fold method three more times, with 30-minute rests in between each. By the end of the fourth round, your dough will have transformed—it will be smoother, more elastic, and full of bubbles. This method strengthens the dough without aggressive kneading and helps preserve its delicate structure.
Once complete, cover the bowl and place it in the refrigerator for at least 1 hour. You can leave it for up to 24 hours if you need flexibility with timing. The cold rest also makes the dough easier to handle during shaping.
Shaping the Ciabatta Dough
Preparing the Work Surface
After the dough has rested in the refrigerator, you’re ready to shape it. This is a crucial step where gentle handling is key. First, generously flour your work surface. The dough is sticky and delicate, so the flour will help prevent tearing and sticking.
Using a lightly oiled spatula or your floured hands, carefully release the dough from the bowl and transfer it to the work surface. Do not punch it down. Avoid pressing or kneading—this is all about keeping those precious air bubbles intact.
Sprinkle more flour on top of the dough, then gently stretch it into a rectangle about 10 inches by 7 inches. Use your hands to pat and coax it into shape rather than pulling. The rustic look is part of ciabatta’s charm.
Dividing the Dough
At this point, you can choose whether to make individual ciabatta rolls or full loaves. For rolls, use a floured bench scraper to cut the dough into eight roughly even pieces, about 2.5 x 3.5 inches each. For two loaves, divide it down the center into two equal 5 x 7-inch pieces.
Gently transfer each piece to a floured sheet of parchment paper, spacing them at least two inches apart to allow room for rising. If any pieces lose their shape, use floured fingers to softly reshape them. Don’t worry about perfection—the irregular, rustic appearance is what makes ciabatta so inviting.
Lightly dust the tops with flour and cover them with a clean kitchen towel or a piece of parchment. Let them rest at room temperature for 1 hour before baking.
Baking the Ciabatta
Preheating and Steam Setup
While the dough is proofing, begin preheating your oven to 450°F (232°C). Place one rack in the center and another at the very bottom. On the center rack, place a flat baking sheet that will serve as your baking surface. On the bottom rack, have a rimmed metal sheet pan or cast-iron skillet ready. These will help create steam, which is crucial for ciabatta’s crispy crust.
Allow the oven and pans to preheat for at least an hour. A hot baking surface and steamy environment ensure even baking and crust development.
Creating Steam and Transferring the Dough
Once proofed, uncover the dough and mist it lightly with water. This is optional, but helps promote extra blistering on the crust. Carefully remove the hot baking sheet from the oven and slide the parchment with the dough directly onto it.
Immediately place the tray back in the oven. Then, pour several cups of ice cubes into the pan on the bottom rack and quickly close the door. The burst of steam from the melting ice will help develop a golden, crispy exterior.
Bake for 20 to 25 minutes. You’ll know it’s done when the bread is golden and sounds hollow when tapped on the bottom. An internal temperature of 205°F to 210°F (96°C to 99°C) is ideal.
Cooling, Storing, and Tips
Cooling for Best Texture
Once baked, transfer the ciabatta to a cooling rack and resist the urge to cut into it immediately. Allow it to cool for at least 45 minutes. Cutting too soon can compress the crumb and leave a gummy texture inside.
The bread continues to cook slightly as it cools, and this rest helps set the structure. When ready, slice and enjoy with your favorite spreads, dips, or meals.
Storage Tips and Make-Ahead Options
Store ciabatta loosely covered at room temperature for up to 5 days. You can also refrigerate it for up to 1 week, though it’s best eaten fresh. To reheat, place in a 350°F (177°C) oven for a few minutes to restore its crispness.
For longer storage, freeze cooled loaves or rolls in a freezer bag for up to 3 months. Thaw at room temperature, then refresh in a warm oven.
Bonus Tips for Flavor Variations
To enhance your dough, consider mixing in herbs or aromatics during the final dough step. A favorite combination is fresh or dried rosemary with minced garlic. Add these ingredients when you mix in the salt. Other excellent options include thyme, basil, or oregano. Just be sure any additions are finely chopped to distribute evenly.
Conclusion
Mastering ciabatta is all about understanding the process and respecting the dough’s delicate nature. With this recipe, you’ve got everything you need to create rustic Italian loaves that rival bakery versions. From the flavorful biga to the sticky, hydrated dough and precise steam baking method, each step contributes to that signature crispy crust and airy interior.
Give yourself time, stay patient through the folds and rests, and you’ll be rewarded with loaves that are both beautiful and delicious. Once you’ve tasted homemade ciabatta fresh from your oven, store-bought versions just won’t compare.


