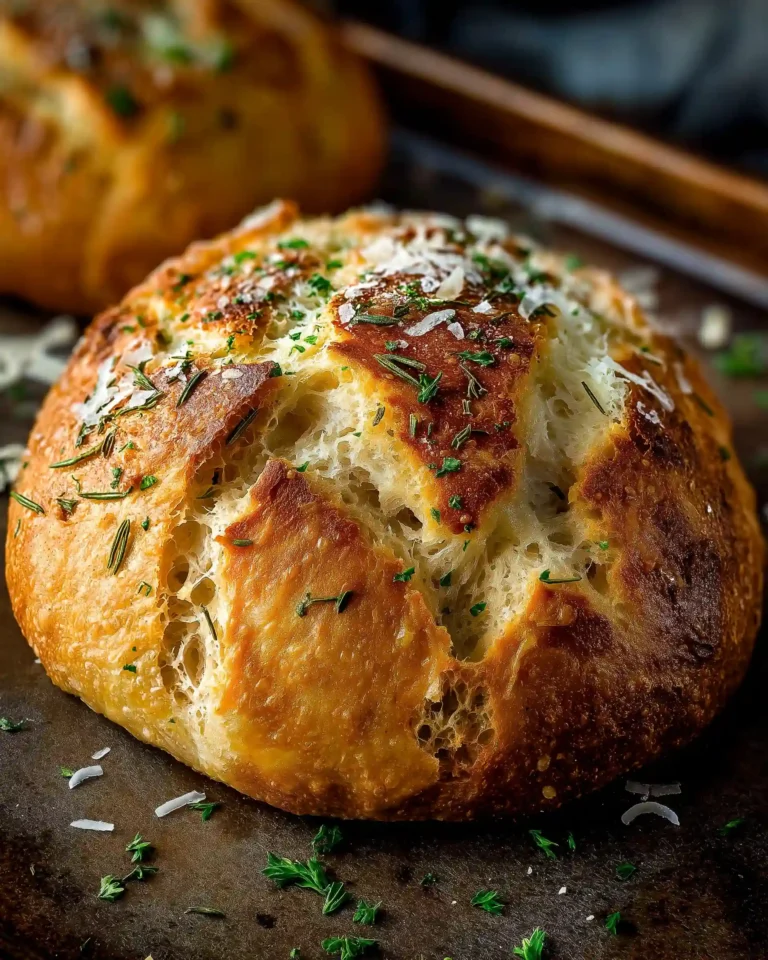
There’s nothing quite like the aroma of freshly baked bread filling your kitchen. But when that bread is infused with fragrant herbs, nutty parmesan cheese, and rich garlic, it becomes more than just a side dish – it becomes the centerpiece of your meal. Rustic Garlic parmesan Herb Bread is one of those comforting recipes that takes basic pantry ingredients and transforms them into something truly magical.
This artisan-style bread is packed with bold flavors, a golden crust, and a tender, chewy center that’s irresistible. Whether you’re serving it with a hearty bowl of soup, a fresh garden salad, or just enjoying it with a dab of butter, this bread fits any occasion. Even better, you don’t need to be a professional baker to make it. With simple steps, a little patience, and the right combination of ingredients, this homemade rustic loaf will rival anything you’d find at a bakery.
In this article, you’ll discover a detailed guide to making Rustic Garlic parmesan Herb Bread at home. From essential ingredients and prep tips to baking techniques and serving suggestions, we’ll cover every part of the process to help you master this flavorful favorite. Let’s start with the foundational elements that make this recipe so successful.
Ingredients That Make Rustic Garlic parmesan Herb Bread Special
Aromatic Herbs and Garlic – The Heart of Flavor
At the core of this rustic bread’s appeal is its vibrant herbal and garlic infusion. The combination of dried rosemary, basil, oregano, and minced garlic gives the loaf its signature savory depth. Rosemary offers a piney, peppery brightness. Basil contributes a sweet and slightly minty aroma, while oregano adds earthiness that complements both the cheese and the garlic.
Fresh garlic, minced finely and blended into the dough, creates bursts of flavor with every bite. Unlike garlic powders, using real cloves brings complexity and freshness that dried alternatives can’t match.
Parmesan Cheese – A Nutty, Salty Boost
The inclusion of grated parmesan cheese does more than just add richness. It enhances the overall flavor with a sharp, nutty, and slightly salty character that melds beautifully with the herbs. As the bread bakes, the parmesan melts into the dough, helping create a tender interior and a lightly crisp crust.
Grated cheese ensures even distribution, and because parmesan is naturally low in moisture, it integrates seamlessly into the dough without affecting its texture.
Flour, Yeast, and Warm Water – The Base of the Dough
To create the perfect rustic bread, choosing the right base ingredients is key. All-purpose flour works well here, providing enough gluten to create structure while keeping the crumb soft. You’ll use between 2 to 2½ cups to get the dough to the ideal consistency – soft, elastic, and slightly tacky but not sticky.
The yeast is what brings the dough to life. Instant dry yeast is reliable and fast-acting. When activated with warm water (between 100℉ and 110℉) and a touch of sugar, it begins to ferment, creating the carbon dioxide bubbles that give the bread its airy texture.
Olive Oil and Butter – For Texture and Crust
Olive oil does more than prevent sticking. It adds a subtle richness to the dough and promotes browning on the crust. A drizzle on the baking sheet gives the loaf a golden, lightly crisp bottom. Butter, placed on top before baking, melts over the loaf, seeping into cracks and enhancing the color, aroma, and final mouthfeel.
Seasoning and Enhancers – Bringing It All Together
Salt is essential not just for flavor but also for controlling yeast activity. Without it, the bread would lack balance and structure. Sugar, though used in small amounts, helps activate the yeast and adds a mild hint of sweetness that contrasts beautifully with the savory notes from the garlic and cheese.
Each component works in harmony to create a balanced, flavorful bread that’s rustic in texture but refined in taste. With this base, you’re ready to move into the preparation stage, where the magic of baking begins.
Print
Rustic Garlic Parmesan Herb Bread Recipe
- Total Time: 1 hour 55 minutes
- Yield: 2 loaves
- Diet: Vegetarian
Description
Rustic Garlic parmesan Herb Bread is a homemade artisan-style bread full of savory herbs, minced garlic, and Cabot Parmesan cheese or Tillamook cheese. With a crispy golden crust and a soft chewy center, this loaf is perfect for meals, snacks, or dipping.
Ingredients
1 tablespoon instant dry yeast
1 tablespoon granulated sugar
1 cup warm water (100–110℉)
1 teaspoon salt
2 teaspoons dried rosemary
1 teaspoon dried basil
1 teaspoon dried oregano
6 cloves minced garlic
2 to 2 1/2 cups all-purpose flour
1/3 cup grated Cabot Parmesan cheese or Tillamook cheese
2 tablespoons olive oil
1 tablespoon butter
Instructions
1. In a large mixing bowl, combine instant dry yeast, sugar, and warm water.
2. Stir in salt, rosemary, basil, oregano, and minced garlic.
3. Add 2 cups of flour and grated parmesan. Stir to form a rough dough.
4. Gradually add remaining flour until dough is smooth, soft, and slightly tacky.
5. Transfer dough to a greased bowl. Cover and let rise for 1 hour or until doubled.
6. Preheat oven to 375°F. Drizzle baking sheet with olive oil.
7. Divide dough into two portions. Shape into loaves and place on sheet.
8. Let rise for another 15–20 minutes, covered.
9. Top each loaf with 1/2 tablespoon of butter.
10. Bake for 18–20 minutes or until golden brown and sounds hollow when tapped.
11. Cool on wire rack before slicing.
Notes
You can freeze the shaped dough before baking. Thaw and proof before baking.
For a crispier crust, place a small pan of water in the oven while baking.
- Prep Time: 15 minutes
- Cook Time: 20 minutes
- Category: Bread
- Method: Baking
- Cuisine: American
Mixing and Preparing the Dough for Rustic Garlic parmesan Herb Bread
Step-by-Step Dough Creation – Building the Perfect Base
Creating the dough for Rustic Garlic parmesan Herb Bread is both simple and satisfying. Begin by activating the yeast. In a large mixing bowl, combine 1 tablespoon of instant dry yeast, 1 tablespoon of granulated sugar, and 1 cup of warm water between 100 to 110℉. The warmth helps activate the yeast quickly, and the sugar gives it a little jumpstart by acting as its food source.
Let the mixture sit for about 5 minutes, or until it starts to bubble slightly. This means your yeast is alive and ready to go. If you don’t see bubbles forming, it’s best to start over with new yeast and double-check your water temperature.
Incorporating the Herbs, Garlic, and Cheese
Once the yeast is activated, stir in 1 teaspoon of salt, 2 teaspoons of dried rosemary, 1 teaspoon of dried basil, 1 teaspoon of dried oregano, and 6 cloves of minced garlic. These ingredients begin to infuse the dough with deep savory flavor right from the start.
Next, add 2 cups of all-purpose flour and 1/3 cup of grated parmesan cheese. Use a wooden spoon or a silicone spatula to mix everything together until a rough dough forms. This first blend should be shaggy and uneven, which is completely normal.
Kneading – Finding the Right Dough Texture
Once your rough dough has come together, gradually mix in up to 1/2 cup more flour, just a little at a time. You’re aiming for a dough that is soft, slightly tacky, but not sticky. Too much flour will make the bread dry and dense, while too little will make it hard to shape.
At this point, transfer the dough to a lightly floured surface and begin kneading. This process strengthens the gluten and creates the structure the bread needs to rise properly. Knead for about 8 to 10 minutes, pushing the dough with the heel of your hand, then folding and turning it.
You’ll know it’s ready when it becomes smooth, elastic, and springs back slightly when poked.
First Rise – Letting the Dough Double in Size
Place the dough into a lightly greased bowl. Cover it with plastic wrap or a clean kitchen towel. Set it in a warm, draft-free space – a turned-off oven or a spot near a sunny window works great.
Let it rise for about 1 hour, or until it has doubled in size. During this time, the yeast is actively fermenting the dough, building flavor, and creating the airy texture that defines rustic bread.
Shaping, Proofing, and Baking the Rustic Garlic parmesan Herb Bread
Shaping the Dough – Creating Artisan Loaves
Once your dough has doubled in size after the first rise, it’s time to shape it. Start by gently deflating the dough to release excess gas. Turn it out onto a clean, lightly floured surface. Using a sharp dough scraper or knife, divide the dough into two equal portions.
Each portion will become its own small, round loaf. With floured hands, shape the dough by tucking the sides underneath, forming a smooth, round dome. Be careful not to flatten it too much – you want to maintain some of the airy structure you built during the first rise.
The key to rustic bread is in its handmade appearance. Perfect symmetry isn’t necessary. Slight variations in shape and size give the loaves their charming, artisan character.
Second Rise – Final Proof for Light Texture
Place the shaped loaves onto a baking sheet drizzled with 2 tablespoons of olive oil. The oil not only prevents sticking, but also helps crisp and brown the bottom crust.
Cover the loaves loosely with a towel or plastic wrap and let them rise for another 15 to 20 minutes. This shorter proof allows the dough to relax and puff up slightly without over-proofing. Over-proofed dough can collapse in the oven, while under-proofed loaves may not rise fully during baking.
During this second rise, preheat your oven to 375°F (190°C) to ensure it’s hot and ready when it’s time to bake.
Butter Topping – For Richness and Golden Finish
Just before baking, top each loaf with about 1/2 tablespoon of butter. Simply place a small pat right in the center of each round. As the bread bakes, the butter will melt and baste the top, creating a golden, slightly crisp finish and enhancing the bread’s savory richness.
This step adds a visual and textural appeal that elevates the final product from basic to bakery-worthy.
Baking – Creating the Signature Crust and Aroma
Bake the loaves in the preheated oven for 18 to 20 minutes, or until the tops are golden brown and the bottoms sound hollow when gently tapped. The internal temperature of the bread should reach around 190°F to 200°F if using a thermometer.
As they bake, your kitchen will fill with the irresistible aroma of herbs, garlic, and cheese. The crust forms quickly due to the olive oil base and butter topping, while the inside remains soft and chewy.
Avoid overbaking – once the tops are golden and the loaves feel firm, they’re ready to come out.
Cooling – The Final Step Before Slicing
Once baked, remove the loaves from the oven and transfer them to a wire rack to cool. Letting them rest for at least 15 to 20 minutes is crucial. Slicing too early can result in gummy or uneven texture, as the bread continues to set as it cools.
Once fully cooled, slice into thick wedges or thin rounds, depending on your serving style. Each bite will offer a rustic blend of herbs, garlic, and parmesan with a golden crust and soft center.
Serving Suggestions for Rustic Garlic parmesan Herb Bread
Perfect Pairings for Any Meal
Rustic Garlic parmesan Herb Bread isn’t just a side item. Its bold flavors and satisfying texture make it incredibly versatile across a range of meals. You can serve it with lunch, dinner, or even as a savory snack. It’s a go-to companion for soups, stews, and salads, thanks to its chewy crumb and herbaceous aroma.
Pair this bread with a warm vegetable soup, creamy tomato bisque, or a hearty lentil stew. The garlic and herbs enhance earthy notes, while the parmesan adds a savory contrast to lighter broths. It’s especially satisfying when dipped into thick, comforting dishes, where it soaks up flavors without becoming soggy.
If you’re serving it with salad, a simple garden mix or a Caesar-style salad without meat makes a fresh pairing. The crisp greens balance the richness of the bread, and the herbs tie the plate together naturally.
Ideal for Dipping, Toasting, or Spreads
Slice this bread thick and serve it toasted with a pat of butter or a spread like herbed cream cheese or garlic hummus. The crisp crust contrasts beautifully with creamy toppings, making it perfect for appetizers or light snacks.
For a cozy breakfast or brunch, top toasted slices with scrambled eggs, avocado, or even roasted vegetables. Its hearty structure holds up well under a variety of toppings, providing a flavorful base for almost anything.
If you’re entertaining, serve small wedges with a simple olive oil and herb dip or a savory garlic spread to let the bread shine as a centerpiece. Guests will appreciate the homemade touch and the complex flavor built into every bite.
Creative Uses – Going Beyond the Basics
Rustic Garlic parmesan Herb Bread can also serve as the foundation for more creative dishes. Try using leftover slices in:
- Homemade croutons: Cube and toast them in the oven for a crunchy salad topper.
- Bread pudding: Use the savory flavor in a cheesy bread bake or casserole.
- Stuffing base: Turn stale slices into a hearty herb stuffing mix for vegetables.
This kind of flexibility makes it not just a bread, but a staple component in your kitchen for many meals ahead.
Storing, Reheating, and Keeping Rustic Bread Fresh
Best Practices for Storing Your Loaves
Once your Rustic Garlic parmesan Herb Bread has cooled completely, you’ll want to store it in a way that preserves its texture and flavor. The key is to protect it from air while also avoiding too much moisture, which can cause sogginess or mold.
The ideal method is to wrap the bread in parchment paper or a clean cotton towel, then place it in a bread box or paper bag. This keeps the crust from getting too soft and maintains the rustic structure. If a bread box isn’t available, a loosely sealed paper bag inside a kitchen cabinet works fine.
Avoid storing your bread in plastic bags or airtight containers at room temperature. These trap moisture and can make the crust rubbery within a day.
Short-Term Storage – Keeping Bread Fresh for a Few Days
Rustic Garlic parmesan Herb Bread will stay fresh at room temperature for up to 3 days if stored properly. To enjoy the best texture and flavor, slice only what you need, and keep the remaining loaf whole.
If you plan to use the bread within a day or two, leaving it uncut helps preserve its internal moisture. Cutting into it too early exposes the inside to air and dries it out faster.
For pre-sliced loaves, wrapping the cut end tightly with foil or beeswax wrap can help slow down staling.
Freezing – Long-Term Storage Without Losing Quality
For longer storage, freezing is your best option. Rustic bread freezes well and retains its texture when reheated correctly.
Here’s how to do it:
- Allow the loaves to cool completely.
- Wrap each loaf tightly in plastic wrap, then again in foil or place in a freezer-safe bag.
- Label and date the packages.
You can freeze whole loaves or individual slices. For best results, use within 2 to 3 months.
When you’re ready to eat it, thaw whole loaves at room temperature for a few hours. To revive the crust, warm them in the oven at 350°F for about 10 minutes.
Reheating Tips – Restoring Fresh-Baked Texture
Reheating brings back the crust’s crispiness and the soft center. Use one of these methods:
- Whole loaf: Wrap in foil and place in the oven at 350°F for 10 to 15 minutes.
- Sliced bread: Toast slices lightly in a toaster or oven for 3 to 5 minutes until warm and slightly crisp.
Avoid microwaving unless absolutely necessary, as it can make the bread chewy and uneven in texture.
By following these storage and reheating steps, you’ll get the most out of your homemade bread without wasting a crumb.
Nutritional Insights and Health Benefits of Rustic Garlic parmesan Herb Bread
Balanced Nutrients in Every Slice
Rustic Garlic parmesan Herb Bread doesn’t just taste amazing—it also delivers a balanced blend of nutrients that can fit into a healthy diet. Each quarter loaf serving provides about 215 calories, making it a satisfying choice that doesn’t overload your plate.
With 33g of carbohydrates, it gives your body quick energy, perfect for fueling your day or balancing a light meal. The carbs come from all-purpose flour, which provides a steady source of energy and contributes to the bread’s soft, chewy texture.
The inclusion of 6g of protein per serving—thanks to both the flour and parmesan cheese—adds a bit more staying power, helping you feel fuller for longer.
Healthy Fats from Olive Oil and parmesan
One of the standout ingredients here is olive oil, a healthy fat known for its heart-friendly monounsaturated fats. These fats help lower bad cholesterol and support overall cardiovascular health when used in moderation. The bread contains 7g of total fat per serving, with only 2g being saturated, mostly from the small amount of butter and cheese used.
parmesan cheese, though rich and flavorful, is used in a modest amount. It contributes calcium for bone health and enhances the flavor profile without overwhelming the nutrition.
Herbs and Garlic – Small Additions, Big Benefits
Don’t overlook the nutritional boost from the herbs and garlic in this recipe. Garlic, in particular, contains compounds like allicin, which have been studied for their potential immune-boosting and anti-inflammatory properties. Even in small quantities, garlic can support heart health and promote better circulation.
The trio of rosemary, basil, and oregano each brings antioxidants and phytochemicals that support digestion, reduce inflammation, and contribute to overall wellness. While they don’t add much in terms of calories, their health benefits are widely recognized in traditional and modern nutritional science.
Low Sugar, Reasonable Sodium
With only 2g of sugar per serving and 370mg of sodium, this bread stays within sensible nutritional boundaries. The sugar helps activate the yeast and lightly sweetens the dough without tipping into unhealthy territory.
The salt adds flavor and supports yeast control during rising, and although parmesan adds some sodium, it’s balanced well within the serving.
Vitamins and Minerals Overview
Here’s a quick look at the nutrient highlights per quarter loaf:
| Nutrient | Amount |
|---|---|
| Calories | 215 kcal |
| Carbohydrates | 33g |
| Protein | 6g |
| Fat | 7g |
| Saturated Fat | 2g |
| Cholesterol | 7mg |
| Sodium | 370mg |
| Potassium | 61mg |
| Fiber | 1g |
| Sugar | 2g |
| Vitamin A | 80 IU |
| Vitamin C | 0.7mg |
| Calcium | 63mg |
| Iron | 2.1mg |
This breakdown shows that Rustic Garlic parmesan Herb Bread is a flavorful, satisfying addition to your table that offers more than just great taste. It provides a wholesome blend of macro and micronutrients with benefits beyond simple indulgence.
Conclusion: Why Rustic Garlic parmesan Herb Bread Deserves a Spot in Your Kitchen
Rustic Garlic parmesan Herb Bread is more than just a loaf—it’s a warm, flavorful experience made right in your own kitchen. With a golden crust, a soft chewy interior, and rich notes of garlic, herbs, and parmesan , it checks every box for comfort, flavor, and versatility. Whether you’re pairing it with a cozy soup, turning it into a savory breakfast slice, or enjoying it as a standalone snack, this bread delivers on all fronts.
Beyond taste, it’s a practical recipe that uses pantry staples and requires no fancy equipment. You don’t need to be a professional baker to achieve impressive results. With a bit of patience for rising and a few thoughtful ingredients, you’ll have two beautiful loaves ready to serve, freeze, or share.
It’s also surprisingly wholesome. With moderate calories, balanced nutrients, and real, flavorful ingredients like olive oil, herbs, and garlic, you’re enjoying something that satisfies without compromise.
Once you make this Rustic Garlic parmesan Herb Bread once, it will likely become a repeat favorite. It’s homemade comfort at its finest—simple, rustic, and absolutely delicious. So roll up your sleeves, get your mixing bowl ready, and bring the aroma of fresh, herby bread into your home today.


I followed the directions exactly, and after the one-hour rest, I took the dough out to divide it. It deflated a bit. The water temperature was correct, and I set a timer for the resting so I wouldn’t forget about it. Any ideas?