There’s something undeniably magical about a rustic Italian pizza dough recipe that captures the authentic flavors of Italy. Whether you’re aiming for a thin, crispy crust or a chewy, bubbly base, the secret starts with the dough. This recipe isn’t just flour and water—it’s a well-balanced combination of cold fermentation, quality ingredients, and simple yet essential techniques.
In this article, we’ll guide you through making rustic Italian pizza dough that works with any topping while achieving the golden-brown perfection of wood-fired pizzerias — right in your own kitchen. From choosing the right flour to the final bake, you’ll learn the essential steps for creating pizza dough that holds up beautifully and tastes even better. Let’s begin with what makes this dough stand out.
Understanding the Foundation of Rustic Italian Pizza Dough
The Key Ingredients and Why They Matter
When creating an authentic rustic Italian pizza dough recipe, each ingredient plays a crucial role. You only need five core ingredients to build the perfect base: flour, water, yeast, salt, and olive oil.
- Flour: Opt for all-purpose or 00 flour, both capable of creating that perfect blend of chewiness and crispness. 00 flour, more traditional in Italy, results in a silkier dough.
- Cold Water: Using cold water slows down yeast activity, allowing for a longer fermentation and deeper flavor.
- Yeast: Instant dry yeast or active dry yeast works well. It gives the dough its rise and airy texture.
- Sea Salt: Enhances flavor and tightens the dough structure.
- Extra Virgin Olive Oil: Adds richness and helps with dough elasticity.
The beauty of this rustic dough lies in its simplicity. No sugar, no milk—just natural ingredients that highlight the purity of Italian cuisine.
The Science Behind Cold Fermentation
Cold water combined with slow rising time (about 2 hours or more) allows enzymes to break down starches into sugars. This process:
- Enhances the flavor complexity
- Improves texture
- Results in better browning during baking
This slower method mirrors traditional Italian techniques that develop a depth of flavor impossible with fast-rise recipes. It also leads to a more digestible dough.
Print
Rustic Italian Pizza Dough Recipe
- Total Time: 2 hours 17 minutes
- Yield: 6 pizza pies
- Diet: Vegetarian
Description
An authentic rustic Italian pizza dough recipe made with cold water fermentation and simple ingredients for a perfectly crispy yet chewy crust every time.
Ingredients
5 cups all-purpose or 00 flour (plus extra for dusting)
1.5 tsp instant dry yeast or active dry yeast
1.5 tsp sea salt
2.25 cups cold water
1 tbsp extra virgin olive oil
Semolina flour or cornmeal (for dusting)
Arrabiata sauce
Smoked mozzarella cheese
Caramelized onions
Sautéed mushrooms
Ricotta meatballs
Roasted peppers
Heirloom tomatoes (thinly sliced, firm)
Green onions
Fresh basil
Grated Parmigiano Reggiano
Instructions
1. Preheat oven to 525°F or highest temperature possible with a pizza stone inside for 45 minutes to 1 hour.
2. In a stand mixer, mix flour, yeast, and salt on low speed with paddle attachment. Slowly add cold water.
3. Switch to dough hook and mix for 8 to 10 minutes until dough is smooth and only slightly sticky.
4. Divide dough into 6 equal portions. Shape each into a ball and place on a lightly oiled baking sheet. Drizzle with olive oil, cover with plastic wrap, and let rise for 2 hours at room temperature.
5. Dust counter with flour and stretch one dough ball into a 10-inch circle using your fingers and knuckles.
6. Place on a peel dusted with semolina or cornmeal to prevent sticking.
7. Spread 2–3 tbsp of Arrabiata sauce, sprinkle mozzarella, and add toppings of choice without overcrowding.
8. Slide onto preheated stone and bake for 5 to 7 minutes, or until golden and bubbly.
9. Remove from oven, top with fresh basil and grated Parmigiano Reggiano, let rest a few minutes, then serve.
Notes
You can refrigerate dough for up to 2 days or freeze for up to 3 months.
Allow pizza to rest a few minutes before slicing so the cheese sets.
Do not overload the crust with toppings to prevent sogginess.
Use firm, thinly sliced heirloom tomatoes to avoid excess moisture.
- Prep Time: 10 minutes
- Cook Time: 7 minutes
- Method: Baking
- Cuisine: Italian
Mixing and Kneading the Dough to Perfection
How to Mix the Dough with a Stand Mixer
For the most consistent results, using a stand mixer with a paddle and dough hook attachment is ideal. Start by adding the dry ingredients—5 cups of all-purpose or 00 flour, 1.5 teaspoons of sea salt, and 1.5 teaspoons of instant dry yeast—into the mixing bowl. Using the paddle attachment on low speed ensures everything blends evenly.
Next, pour in 2.25 cups of cold water while the mixer is still running. The cold temperature of the water slows fermentation, allowing the flavor to develop fully. After combining, switch to the dough hook. Mix on low speed for 8 to 10 minutes. You’re looking for a smooth, elastic dough that gently clings to the bottom of the bowl but doesn’t stick to the sides.
If the dough feels too wet and clings to the bowl’s sides, sprinkle in extra flour gradually. On the flip side, if it’s too stiff or dry, add a little cold water. Dough texture varies depending on humidity and flour type, so stay flexible.
Kneading by Hand Like an Italian Nonna
If you don’t have a mixer, you can still achieve excellent results by kneading by hand. Combine the flour, salt, yeast, and cold water in a large bowl. Mix with a wooden spoon until a shaggy dough forms. Transfer it onto a floured surface and knead with both hands for 10 to 15 minutes.
The goal is a dough that becomes soft, smooth, and slightly tacky on the bottom but not sticky overall. This traditional method requires a bit more effort but offers a hands-on connection to the old-world technique that makes rustic pizza so special.
Dough Resting, Shaping, and Storage Tips
The Importance of Proper Resting and Rising
After kneading, divide the dough into six equal pieces and shape them into smooth rounds. Place each piece on a lightly oiled cookie sheet, then drizzle about 1 tablespoon of extra virgin olive oil across the top to prevent drying. Cover the sheet with plastic wrap and let the dough rest for 2 hours at room temperature in a draft-free space. A cold oven with the light off is a perfect environment for this.
This resting period allows the gluten to relax and the yeast to slowly do its work. The dough will become airy, soft, and easy to stretch—critical qualities for creating the signature rustic Italian crust.
How to Shape the Pizza Dough Like a Pro
When you’re ready to bake, dust your countertop with flour and gently press one dough ball into a round, about ½ inch thick. Using your knuckles and fists, stretch the dough into a 10-inch circle. Avoid overworking or tearing the dough. You want to keep those air bubbles that will puff up and char beautifully in the oven.
Don’t use a rolling pin—it presses out the gases that give the crust its light texture. Instead, go slow, letting the dough guide you.
How to Store or Freeze Dough for Later Use
At the 2-hour rise point, you can choose to bake immediately or store the dough:
- Refrigerate: Keep dough balls in airtight containers for up to 2 days. Bring them to room temperature before shaping.
- Freeze: Wrap each ball in plastic wrap and freeze. Thaw in the fridge overnight, then rest at room temperature for 1 hour before using.
Storing dough this way allows you to always have some ready for spontaneous pizza nights, without compromising on texture or flavor.
Building and Baking Your Rustic Italian Pizza
Preheating the Oven and Using a Pizza Stone
Achieving that rustic, slightly charred crust begins long before the pizza enters the oven. Preheat your oven to its highest setting—ideally 525°F or more—for at least 45 minutes to 1 hour with a pizza stone already inside. This extended preheating allows the stone to retain high heat, mimicking the conditions of a traditional wood-fired oven.
A properly heated pizza stone ensures the bottom of the crust cooks quickly and evenly, producing a golden, crispy finish with a soft interior. If you’re using a baking steel or cast-iron slab, the same method applies.
Layering the Pizza with Balance
Once your dough is shaped and ready, dust a pizza peel or a sturdy piece of cardboard with semolina or cornmeal. This helps the dough slide easily onto the hot stone without sticking.
Add 2 to 3 tablespoons of arrabiata sauce to the center of the dough. Using the back of a spoon, spread it evenly while leaving a 1-inch border around the edges. The sauce should be thinly applied so it doesn’t weigh down the crust.
Then sprinkle a generous handful of smoked mozzarella cheese. Add just a few toppings from the following list to keep the pizza light and balanced:
- Caramelized onions
- Sautéed mushrooms
- Ricotta meatballs
- Roasted peppers
- Heirloom tomato slices (use firm ones, sliced thin)
- Green onions
Too many toppings can lead to soggy crusts and uneven cooking. With rustic pizza, less is truly more.
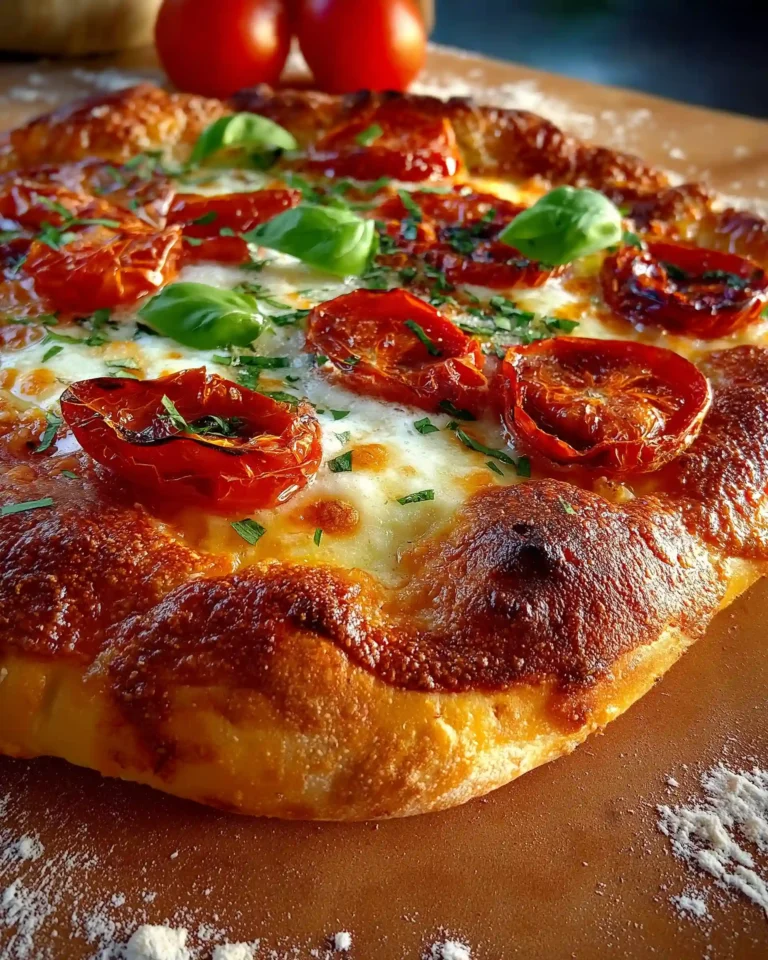
Baking to Golden-Brown Perfection
Gently slide your pizza onto the preheated stone. Bake for 5 to 7 minutes or until the edges are golden and crisp, and the cheese has melted with a slight bubble. If your oven has a broiler, use it during the last 30 seconds to develop those gorgeous charred spots.
Once baked, remove the pizza and top with fresh basil and a sprinkle of grated Parmigiano Reggiano. Let it rest for a few minutes so the cheese sets before slicing.
Customizing Your Pizza and Serving Suggestions
Choosing the Best Toppings for Rustic Pizza
The beauty of this rustic Italian pizza dough recipe is its versatility. While the dough provides a perfect neutral base, the toppings can reflect the seasons or your own flavor preferences. Here are some topping combinations that enhance without overwhelming the crust:
- Classic Garden Fresh: Heirloom tomatoes, smoked mozzarella, fresh basil
- Earthy and Savory: Sautéed mushrooms, caramelized onions, roasted peppers
- Hearty and Creamy: Ricotta meatballs, green onions, a touch of mozzarella
Avoid overloading your pie. Each 10-inch pizza is best with 2 or 3 toppings to keep the crust light, airy, and crisp. Layer them in a way that each bite offers contrast and balance.
Serving and Enjoying Rustic Pizza the Right Way
Once out of the oven, let your pizza rest for a few minutes before slicing. This short pause allows the cheese to set and the crust to maintain its texture.
Serve the pizza on a wooden board or large platter, cut into traditional wedges. A drizzle of olive oil over the top or a pinch of sea salt can elevate the flavors even further.
For family meals, consider pairing the pizza with:
- A side salad made with arugula, lemon juice, and olive oil
- Grilled seasonal vegetables
- Fresh fruit for a light dessert
Rustic pizza is a communal dish meant to be shared. Let the flavors, textures, and warmth of the fresh dough bring everyone together.
Conclusion: Bringing Italy to Your Kitchen, One Crust at a Time
Crafting the perfect rustic Italian pizza dough recipe isn’t about shortcuts. It’s about honoring the time-tested methods that give pizza its heart and soul. From choosing the right flour to letting the dough rest, shaping it by hand, and baking it on a blazing-hot stone, every step adds depth, character, and a touch of Italy to your meal.
This dough recipe allows you to build pizza pies that are crisp yet chewy, light but satisfying. Whether topped with roasted vegetables, creamy cheeses, or fresh herbs, this crust holds everything together beautifully without overpowering the flavors.


