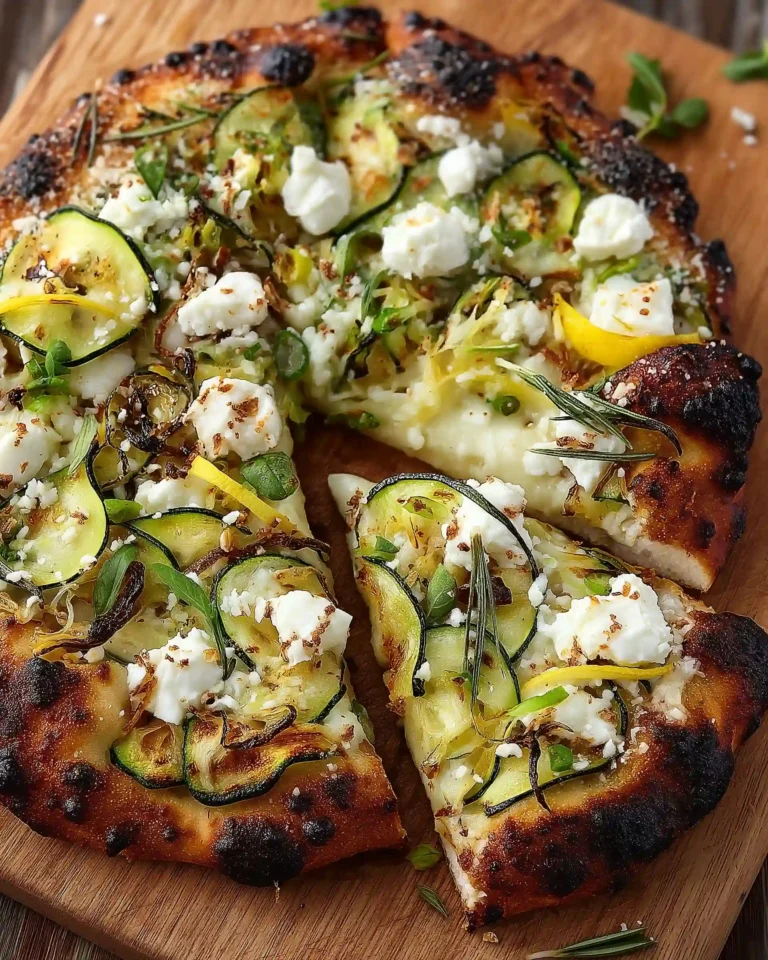
Craving a homemade pizza that’s light, tangy, and packed with garden-fresh flavor? This Pizza With Zucchini, Feta, Lemon, and Garlic recipe is just the ticket. It’s a perfect balance of creamy cheese, crisp-tender zucchini, bright lemon, and rich olive oil, all laid over a crispy Neapolitan-style crust. Whether you’re entertaining or treating yourself to something special, this pizza delivers a refreshing spin on traditional pies. In this article, we’ll walk you through the exact ingredients, pro tips for preparation, equipment recommendations, and everything else you need to make this pizza recipe a showstopper.
Ingredients and Why They Matter
The Dough: Foundation of Flavor and Texture
A great pizza starts with a great dough. For this recipe, using Neapolitan pizza dough creates that ideal combination of a chewy interior and crisp exterior. You can prepare it from scratch or pick up a high-quality store-bought dough. What matters most is that the dough is allowed to rest properly—at least two hours at room temperature—which gives it time to relax and become easier to stretch, ensuring a thin, even crust that puffs beautifully in the oven.
Why Neapolitan-style dough?
- Cooks fast at high heat
- Develops bubbly, airy edges
- Provides the perfect platform for fresh toppings without overwhelming them
Zucchini: A Crisp, Mild Base Ingredient
Zucchini brings a light texture and subtle sweetness, which contrasts nicely with the creamy cheeses and sharp garlic. By salting and draining it before baking, you remove excess moisture, which prevents a soggy crust and concentrates the vegetable’s flavor.
Prep tip: Use a sharp knife or mandoline to create matchstick-sized slices. This helps them cook evenly and blend seamlessly with the other toppings.
Garlic: Layered for Depth
Garlic plays a dual role here—minced garlic is used to season the zucchini, while sliced garlic adds flavor directly to the pizza. This layering introduces two different profiles of garlic: mellow and roasted from the slices, and intense and aromatic from the minced form.
How much?
- 2 cloves minced for seasoning the zucchini
- 6 cloves sliced thin for the pizza itself
Fresh Mozzarella and Feta: Creamy and Tangy Duo
This pizza uses both fresh mozzarella and feta cheese, creating a creamy, tangy contrast that stands out against the crisp crust. The mozzarella melts beautifully into pools of gooey richness, while the goat or sheep’s milk feta crumbles stay firm, providing bold bursts of saltiness in every bite.
Cheese breakdown:
- 1 pound fresh mozzarella, drained and torn into chunks
- 8 ounces feta, crumbled into ½-inch pieces
Lemon: Unexpected but Game-Changing
Thin lemon slices (seeds removed) might sound unusual, but they bring a burst of brightness that balances out the richness of the cheese and oil. Make sure the slices are paper-thin to ensure they cook quickly and don’t overpower the pizza.
Pro tip: Use a sharp knife or mandoline and remove all seeds to avoid bitterness.
Scallions: Finishing Touch
Sprinkled on just after baking, scallions bring a crisp bite and fresh color. Only the white and light green parts are used for their milder, slightly sweet onion flavor.
Olive Oil: For Flavor and Perfect Browning
A generous drizzle of extra-virgin olive oil helps everything roast and caramelize perfectly under the broiler. This adds not just flavor, but also that signature golden sheen.
Usage: 1 tablespoon per pizza, for a total of 4 tablespoons
Print
Pizza With Zucchini, Feta, Lemon, and Garlic Recipe
- Total Time: 3 hrs 25 mins
- Yield: 4 to 6 servings
- Diet: Vegetarian
Description
A fresh and vibrant pizza with zucchini, feta, lemon, garlic, and mozzarella on a crisp Neapolitan crust. A perfect summer-inspired recipe.
Ingredients
1 recipe Neapolitan pizza dough or 2 pounds store-bought pizza dough
1 large zucchini (about 12 oz), cut into 1/4-inch-thick matchsticks
8 medium garlic cloves (2 minced, 6 thinly sliced)
1 teaspoon kosher salt, plus more for sprinkling
1 pound fresh mozzarella, torn and drained
1 lemon, very thinly sliced with seeds removed
8 ounces goat or sheep’s milk feta cheese, crumbled into 1/2-inch pieces
4 tablespoons extra-virgin olive oil, divided
1/2 cup scallions, thinly sliced (white and light green parts only)
Instructions
1. Divide dough into 4 equal pieces and place in covered deli containers or bags. Rest at room temperature for 2 hours.
2. In a bowl, toss zucchini with minced garlic and 1 teaspoon salt. Let sit in a strainer over a bowl for 30 minutes.
3. Squeeze out excess moisture from zucchini and set aside on paper towels.
4. Place a pizza stone or steel 6 inches under the broiler and preheat oven to 500°F–550°F for at least 45 minutes.
5. Stretch one dough ball into a 10–12 inch circle on a floured surface. Transfer to a floured wooden pizza peel.
6. Top with 1/4 of mozzarella, a few lemon slices, 1/4 of zucchini, 1/4 of feta, and sliced garlic. Sprinkle salt and drizzle with 1 tablespoon olive oil.
7. Transfer to preheated stone and broil, rotating for even cooking, until puffed and lightly charred, 3–6 minutes.
8. Remove pizza, let rest 1 minute, and top with scallions. Slice and serve.
9. Repeat for remaining dough and toppings.
Notes
Use a mandoline for even lemon and zucchini slices.
Make sure to squeeze out all the moisture from the zucchini to prevent a soggy crust.
Preheat the oven thoroughly for best crust texture.
Avoid overloading with toppings to keep the crust crisp.
- Prep Time: 20 mins
- Cook Time: 30 mins
- Method: Broiled
- Cuisine: Italian
Preparing and Stretching the Pizza Dough
Dough Division and Resting for Flexibility
Before anything else, divide your pizza dough into four equal portions. This step is crucial if you’re making multiple pizzas and want uniform size and cooking time. Once divided, place each piece into a covered quart-sized deli container or a zipper-lock freezer bag. Let the dough rest at room temperature for at least two hours. This waiting period allows the gluten to relax, making the dough more stretchable and less likely to tear.
Why it matters:
- Rested dough is easier to shape
- Prevents shrinkage during baking
- Ensures an even cook throughout the pizza
Preparing the Work Surface
Use a clean, lightly floured surface before working with the dough. Avoid adding too much flour, which can toughen the crust and impact flavor. A wooden pizza peel works best for transferring the pizza to the oven.
Pro tips:
- Dust the peel lightly with flour to avoid sticking
- Avoid overworking the dough—it should be soft and elastic
Shaping: The Gentle Stretch Method
Begin by gently pressing the dough into an 8-inch round, keeping the outer inch slightly thicker to form a natural crust. Then lift the dough and use the backs of your hands and knuckles to gently stretch it into a 10- to 12-inch circle. Take your time—rushing can cause tears or uneven thickness.
Key goals during shaping:
- Uniform thickness, especially in the center
- Air bubbles preserved in the crust area
- Avoiding rips or holes
What Not to Do
- Don’t use a rolling pin. It crushes air bubbles and ruins the texture.
- Don’t skip resting time. Cold, tight dough won’t stretch properly.
- Don’t pull too fast. Let the dough move naturally under your fingers.
Transferring to the Peel
Once the dough is stretched, transfer it to a floured wooden pizza peel. If the dough sticks, it won’t slide into the oven cleanly, which can ruin the shape or cause burning. Check that the dough slides freely before you start adding toppings.
Layering and Prepping the Toppings
Salting and Draining the Zucchini
Zucchini holds a lot of water, which can lead to a soggy pizza if not handled correctly. To avoid this, combine the zucchini matchsticks with minced garlic and kosher salt, then toss thoroughly. Place the mixture in a strainer over a bowl and let it rest for 30 minutes. During this time, the salt will draw out the excess moisture.
Next steps:
- After resting, squeeze the zucchini with your hands to remove all moisture
- Spread it on a paper towel–lined plate to absorb remaining dampness
Why it’s important:
- Prevents water from pooling on the crust
- Concentrates zucchini flavor
- Helps zucchini cook faster and more evenly
Preparing the Cheese
Use fresh mozzarella and feta for the best texture and flavor contrast. Tear the mozzarella into rough chunks and drain thoroughly before use. This reduces water content, helping the pizza cook with a bubbly top and crisp bottom.
Crumble the feta cheese into ½-inch chunks. Don’t over-crumble it—bigger pieces give bolder bites and melt slower, adding texture contrast.
Lemon Slices: Thin and Even
The lemons should be very thinly sliced, almost translucent. Remove all seeds, as they’ll add bitterness. These slices will roast in the oven and release oils that brighten the entire pizza.
Pro tip: Use a mandoline for perfectly even slices
Slicing the Garlic for Roasting
Slice the remaining garlic cloves thinly. These slices roast under high heat, becoming golden and sweet rather than harsh or overpowering.
Two garlic uses in the recipe:
- Minced for flavoring zucchini
- Sliced for layering directly on the pizza
Topping the Pizza in the Right Order
Each pizza is topped just before it goes into the oven to prevent sogginess. Here’s the ideal order for balance and browning:
- Mozzarella chunks: Base layer, spread evenly
- Lemon slices: Just a few rings per pizza
- Zucchini matchsticks: A thin, even layer
- Feta crumbles: Scatter generously
- Sliced garlic: Spread across the top
- Kosher salt: Light sprinkle to enhance flavors
- Drizzle with olive oil: About 1 tablespoon per pizza
By layering this way, you ensure a crisp crust, even cooking, and a perfect blend of flavors in every bite.
Baking for Perfect Texture and Flavor
Setting Up Your Oven the Right Way
To get that pizzeria-quality crust at home, you need extremely high heat. Begin by positioning your oven rack about 6 inches under the broiler. Place a pizza stone or steel on that rack, then preheat your oven to its highest setting—either 500°F or 550°F (260°C to 290°C)—for at least 45 minutes. This ensures the stone or steel is thoroughly heated, which is key to crisping the bottom of your pizza quickly and evenly.
Alternative setup: If you have a grill insert like a KettlePizza with a Baking Steel, that’s a great option too.
Broiler Method for Fast, Intense Heat
Just before baking, switch your broiler to high. This delivers top-down heat that chars the crust edges and bubbles the cheese, giving you that rustic, Neapolitan-style finish.
Why this matters:
- Rapid cooking prevents toppings from over-drying
- Charred edges create flavor and texture contrast
- Keeps crust light and airy instead of dense
Transferring the Pizza Smoothly
Slide your prepared pizza off the floured peel and directly onto the hot stone or steel. The dough should glide effortlessly. If it sticks, gently lift the edge and blow air under it or sprinkle a touch more flour or semolina underneath before trying again.
Pro tip: Work quickly once the dough is topped to keep it from sticking
Timing and Rotation
Each pizza takes 3 to 6 minutes under the broiler. Since home broilers can vary in intensity, keep a close eye and rotate the pizza regularly using a metal peel. This promotes even browning and ensures no spots get overly burnt.
Key signs it’s done:
- Crust edges are puffed and lightly charred
- Bottom is crisp and golden
- Cheese is melted and bubbling
Post-Bake Rest and Garnish
Once the pizza is done, retrieve it using your metal peel and transfer it to a cutting board. Let it rest for about one minute before slicing. This brief pause helps the cheese set slightly, so slices hold together better.
Finally, sprinkle thinly sliced scallions across the hot pizza. Their freshness cuts through the richness of the cheese and garlic, adding a final touch of color and flavor.
Serving, Storing, and Customizing
How to Serve Pizza With Zucchini, Feta, Lemon, and Garlic
This pizza is best served fresh out of the oven while the crust is hot, crisp, and lightly charred. Once rested for a minute, slice it using a sharp pizza cutter or kitchen shears for clean, precise cuts. Serve immediately to enjoy the contrasting textures—gooey mozzarella, crumbly feta, crisp zucchini, and aromatic roasted garlic—all balanced by the burst of lemon and freshness of scallions.
Serving ideas:
- Pair it with a simple arugula salad with lemon vinaigrette
- Serve alongside a bowl of roasted vegetables for a full meal
- Offer with fresh lemon wedges on the side for a flavor boost
Storing Leftovers the Right Way
Though this pizza is at its best fresh, leftovers can be stored and enjoyed later. Follow these simple steps to keep the crust crisp and the flavors intact.
Storage instructions:
- Allow pizza slices to cool completely
- Wrap each slice in parchment paper or store in an airtight container
- Refrigerate for up to 3 days
Avoid stacking slices without protection between them, as this can cause the crust to turn soggy.
Reheating Tips for a Crispy Result
Reheating pizza in the microwave leads to limp crust and uneven melting. For the best results, use the stovetop or oven.
Reheating methods:
- Stovetop: Heat a slice in a dry skillet over medium heat, covered loosely with a lid, until the bottom crisps and the cheese is melty (about 5 minutes).
- Oven: Reheat in a preheated 375°F oven for 8 to 10 minutes on a baking sheet.
Avoid using foil directly under the pizza, as it can trap moisture. Use a baking rack if possible.
Customizing Your Pizza the Smart Way
This recipe is a flavor masterpiece as-is, but you can make subtle swaps to suit your taste without compromising the balance. Here’s how to personalize your pizza while keeping it light and fresh.
Ingredient variations:
- Cheese swaps: Use ricotta salata or queso fresco in place of feta if you prefer a milder tang
- Zucchini alternates: Thinly sliced yellow squash works just as well and adds color
- Herb additions: Add fresh basil or thyme after baking for extra aroma
Toppings to avoid: Heavy or greasy meats and overly wet vegetables, which can overpower or unbalance the light, citrusy flavor of this recipe.
Crust options: While Neapolitan dough is ideal, you can use thin whole-wheat crust or gluten-free pizza bases as long as they can handle high heat without drying out.
Conclusion
Pizza With Zucchini, Feta, Lemon, and Garlic is a refreshing, flavor-packed twist on traditional pizza that celebrates simplicity, balance, and bold ingredients. With its crisp, chewy Neapolitan crust and vibrant toppings—from tangy lemon slices to creamy feta and roasted garlic—this pizza offers something truly special. The prep may take a bit of time, but the results are worth every minute.
Whether you’re an experienced home cook or trying artisan-style pizza for the first time, this recipe gives you all the steps to deliver a pie that’s crisp, light, and layered with flavor. With the right dough, high heat, and attention to detail, you can transform everyday ingredients into an unforgettable meal. From slicing zucchini to broiling under intense heat, every element in this pizza plays a part in creating a dish that’s both rustic and elegant.


