Mini Pizzas are the ultimate blend of festive fun and savory delight. Perfectly bite-sized, these spooky little creations are great for parties, school lunches, or just a fun fall family activity. Made with simple ingredients like English muffins, cheese, sauce, and colorful vegetables, they’re easy to make, incredibly customizable, and a creative way to get kids involved in the kitchen. Whether you’re planning a bash or just want a themed meal to celebrate the season, these mini pizzas are a delicious way to get into the spooky spirit.
In this article, we’ll explore everything you need to make the perfect Mini Pizza. From ingredient tips and preparation techniques to ideas for decorating your pizzas with edible creepy faces, we’ve got you covered. We’ll also dive into kid-friendly cooking tips, storage and reheating, and creative veggie additions. Let’s begin with the basic foundation of your spooky snack — the ingredients and how to prepare them.
Ingredients and Preparation for Mini Pizza
Selecting the Right Base
The foundation of your mini pizza starts with a good base. In this case, classic English muffins are ideal. They’re sturdy, easy to toast, and provide the perfect crispy-chewy texture. When split in half with a fork instead of a knife, you preserve their nooks and crannies, giving your sauce and cheese better grip and flavor.
Choosing the Best Sauce and Cheese
For the sauce, a rich and thick pizza sauce is key. You’ll want one that’s not too watery so it doesn’t make the muffins soggy. A 14 oz jar should be plenty to cover all your mini pizzas generously. Spread one to two spoonfuls on each muffin half, depending on how saucy you like them.
Next comes the cheese. This recipe uses both fresh mozzarella and aged cheddar, offering a nice balance of creaminess and tang. Cut some into triangles for ghostly shapes, slice others into strips, and shred the rest into thick pieces that will melt beautifully in the oven. Using two types of cheese also adds color and flavor depth, making the pizzas both spooky and scrumptious.
Fresh Veggies for Designs
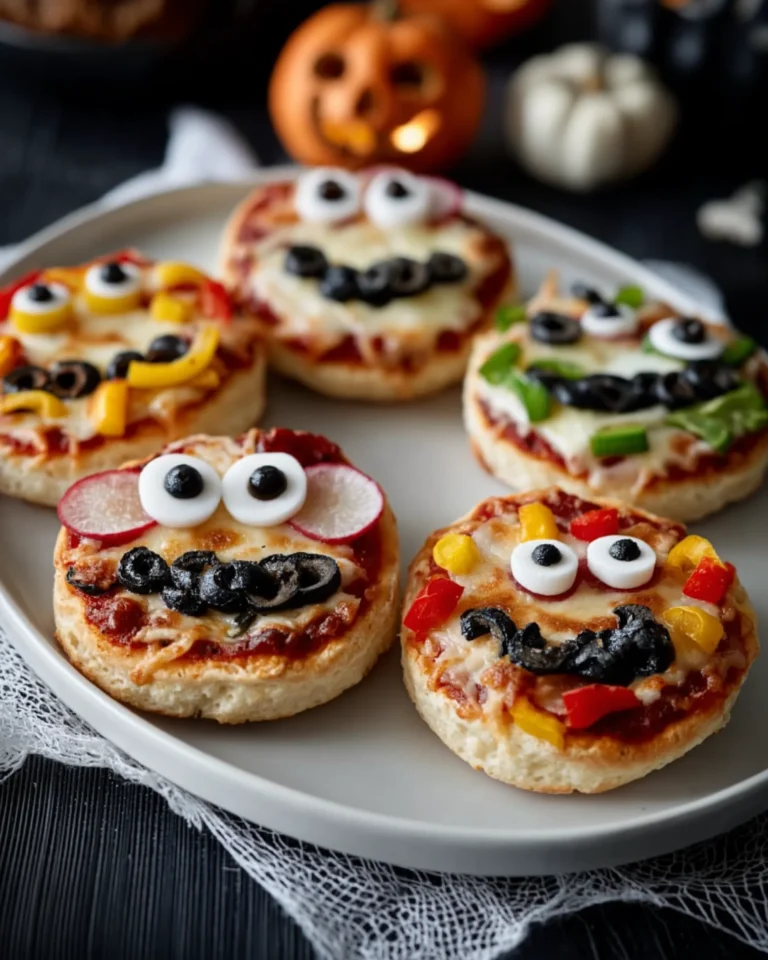
Now the fun part begins. The real visual magic comes from how you prep your vegetables. Use a paring knife to slice green bell pepper and mini sweet peppers into various shapes — strips for hair, triangles for teeth, circles for eyes, and half-moons for scary smiles. Add thinly sliced radishes and black olive rounds to finish off your spooky faces. Kids can easily help with this part, creating wild expressions on their own mini pizzas.
For extra creative designs, consider arranging the vegetables to look like jack-o’-lantern faces, mummies, or even one-eyed monsters. The more diverse your cuts and colors, the more fun each mini pizza becomes. This step also encourages kids to eat their veggies by turning them into edible art.
Print
Mini Pizza Recipe
- Total Time: 30 minutes
- Yield: 4 servings
- Diet: Vegetarian
Description
Mini Pizza is a fun, spooky snack perfect for kids and family celebrations. These easy-to-make mini pizzas are loaded with fresh veggies, melted cheese, and creepy decorations that everyone will love.
Ingredients
1 package English Muffins (6 total), split in half
14 oz pizza sauce
1 green bell pepper
6 mini sweet peppers (red, orange, yellow)
4 oz fresh mozzarella cheese
4 oz aged cheddar cheese
½ cup black olive slices
3 radishes, thinly sliced
Instructions
1. Preheat oven to 350°F.
2. Line a baking sheet with a silicone mat.
3. Wash and cut vegetables into strips, triangles, and circles.
4. Slice cheese into triangles and strips, and shred some thickly.
5. Split the English muffins in half with a fork.
6. Spread 1–2 spoonfuls of pizza sauce on each muffin half.
7. Use vegetables and cheese to create spooky faces.
8. Place decorated muffins on the baking sheet.
9. Bake for 8–10 minutes until cheese is melted.
10. Cool slightly and serve immediately.
Notes
Feel free to add other vegetables like broccoli, shredded carrot, red onion, or corn kernels.
These pizzas are best fresh from the oven but can be stored in the fridge and reheated.
- Prep Time: 10 minutes
- Cook Time: 10 minutes
- Method: Baking
- Cuisine: American
Creative Pizza Designs
How to Build Spooky Faces with Veggies
The heart of the Mini Pizza experience is in the design. Once you’ve spread the sauce and arranged your cheese, it’s time to decorate using your chopped vegetables. Turn your pizzas into mini monsters, ghosts, or jack-o’-lanterns with just a few clever cuts. Use bell pepper strips as hair or eyebrows, radish slices for eerie eyes, and olive rounds for pupils or mouths. Triangular pieces of cheddar can be placed like sharp teeth or fangs. Let your imagination run wild — there are no wrong ways to build a spooky face.
If you’re involving kids, give each person a variety of veggie pieces and let them build their own character. It’s a hands-on, mess-friendly project that allows creativity to shine. Set a timer if needed, especially for younger kids, to keep things fun but efficient. Ten minutes is usually enough to craft a creepy face without stalling the baking.
Design Ideas Kids and Adults Will Love
Need inspiration? Here are a few themed suggestions:
- Jack-o’-Lantern: Use orange sweet pepper rounds as the face, cheddar triangles for eyes, and a small piece of green pepper as the stem.
- Monster Face: Use a mix of colorful peppers for a wild hairdo, radish slices as eyes, and olives for a mouth full of “teeth.”
- Mummy: Lay mozzarella strips across the muffin to resemble bandages, with two olive slices peeking through as eyes.
- Ghost: Use a single piece of fresh mozzarella shaped like a blob with black olive slices for eyes.
These ideas are simple yet effective. They don’t require cookie cutters or elaborate steps, just thoughtful placement of everyday ingredients. Plus, they make for a super fun and memorable food display. You can even assign themes to different batches, turning your baking tray into a haunted pizza gallery.
Baking the Perfect Mini Pizza
Proper Oven Prep and Baking Time
Once your spooky designs are complete, it’s time to get baking. Start by preheating your oven to 350°F. This moderate temperature allows the muffins to toast slightly and the cheese to melt evenly without burning the toppings. Line a rimmed baking sheet with a silicone baking mat to prevent sticking and ensure easy cleanup.
Place each decorated English muffin half cut-side up on the baking mat, giving each enough space so the heat can circulate properly. This helps the edges crisp up just right without overcrowding. Bake for 8 to 10 minutes, or until the cheese is visibly melty and just starting to bubble.
If you’re working in batches or using multiple trays, you can rotate them halfway through to make sure every pizza bakes evenly. Avoid overbaking, as this can cause the vegetables to dry out or the muffins to get too hard.
Visual and Texture Cues for Doneness
Your mini pizzas are ready when the cheese is fully melted, and the edges of the English muffins are crisp but not burned. You might see some of the mozzarella bubbling slightly or the cheddar turning golden around the edges — that’s a good sign.
The vegetables should still be vibrant in color and slightly tender. The olives may darken a bit, and the peppers may look glossy. These visual cues are just as important as the time listed in the recipe, so keep an eye on them during the final few minutes in the oven.
Once done, allow them to cool slightly before serving. This not only prevents burned mouths but also helps the toppings set a bit, so they don’t slide off during the first bite.
Making It a Kid-Friendly Kitchen Experience
Getting Kids Involved Safely
Mini Pizzas are a fantastic way to engage kids in the kitchen, especially during the spooky season. Start by assigning age-appropriate tasks. Little ones can wash vegetables and arrange toppings, while older kids can help with slicing soft items like olives or spreading sauce with a spoon. Always supervise closely when knives are in use, even small ones. Using a butter knife for spreading and a child-safe knife for cutting soft vegetables can build confidence while keeping safety a priority.
Keep things structured but fun. Turn the process into a mini pizza-making station. Lay out pre-cut ingredients in small bowls, and offer visual examples of faces to spark creativity. Giving kids a role in preparing their food makes them more likely to eat it — especially when it’s decorated with silly smiles or spooky eyes.
Encouraging Healthy Choices with Play
Involving children in meal prep also opens the door for teaching good nutrition. This recipe is packed with veggies, and turning them into characters makes healthy eating more appealing. Talk about the colors and textures as you go. For example, you could say, “Let’s use red peppers for monster hair,” or “These olives make perfect eyes!”
This activity also builds motor skills and sparks imagination. Kids aren’t just decorating food, they’re expressing themselves — and getting a little messy in the process. To manage cleanup, use parchment paper or a washable mat under each child’s workspace. Have a damp towel nearby and set a fun timer to keep everyone on track.
Mini Pizzas are more than just food — they’re an experience. One that teaches skills, builds family memories, and fills the house with the smells of cheese and sauce bubbling in the oven.
Storage, Reheating, and Make-Ahead Tips
Best Ways to Store Leftover Mini Pizzas
While these mini pizzas are best enjoyed straight from the oven, you can absolutely store leftovers for later. After they cool completely, place them in an airtight container and store them in the refrigerator for up to 3 days. To prevent sogginess, consider layering them with parchment paper if you’re stacking multiple layers.
If you’re meal prepping for a party or want a quick grab-and-go snack throughout the week, make a double batch. Once baked and cooled, these mini pizzas hold up nicely in the fridge and reheat well, especially in a toaster oven or air fryer.
Reheating Without Losing Quality
The key to successful reheating is restoring that crispy base without drying out the toppings. Avoid the microwave if you want a toasty bottom — it tends to make the English muffins rubbery. Instead, reheat them in the oven at 325°F for about 7 minutes, or in a toaster oven on medium heat until the cheese is bubbly and the muffin is warm.
For a quick fix, the microwave works in a pinch. Place one or two on a microwave-safe plate and cover lightly with a paper towel. Heat for about 30–40 seconds. While the base won’t be as crispy, the flavors will still be delicious and comforting.
Can You Make Them Ahead of Time?
Absolutely. You can prep all your ingredients ahead — wash and cut the veggies, shred the cheese, split the muffins — and store each in separate containers in the fridge. When you’re ready, simply assemble and bake. If you want to take it one step further, you can fully assemble the pizzas (without baking) and refrigerate them on a baking tray covered with foil. Bake them just before serving for a fresh-out-of-the-oven result.
Mini pizzas are also freezer-friendly. Lay the unbaked, decorated pizzas on a tray and freeze until solid. Then transfer them to a freezer-safe bag. When ready to bake, no need to thaw — just pop them in the oven and add 2–3 extra minutes to the bake time.
Customizing Your Mini Pizzas
Adding More Veggies and Flavor Variations
One of the best things about Mini Pizzas is their flexibility. You can easily adapt the toppings based on what you have in your fridge or what your family loves. Aside from the green bell pepper, mini sweet peppers, black olives, and radishes already in the recipe, here are other vegetables that work wonderfully:
- Red onion: Add for a mild bite and pop of color.
- Shredded carrots: Great for creating textured hair or stripes on your pizza creatures.
- Broccoli florets: Cut into small pieces, they make perfect “brains” or monster fur.
- Corn kernels: Bright and sweet, they add fun color and extra flavor.
The key is to cut everything into fun shapes that inspire creativity. Thin slices are best so the vegetables soften slightly during the short bake time. Kids might even enjoy trying new veggies just because they look cool on their pizza monster.
Cheese Swaps and Dairy-Free Options
While mozzarella and cheddar are the stars in the base recipe, don’t be afraid to switch it up. For different colors and textures, try:
- Provolone: Melts smoothly and has a mild taste.
- Monterey Jack: Creamy and easy to shred.
- Colby: Offers a bold orange hue.
If you’re serving guests with dietary restrictions, there are great plant-based cheeses available that melt nicely and still offer a gooey, cheesy texture. Just make sure to check for ones that are firm enough to cut into shapes and shred thickly. This way, everyone can enjoy the spooky fun without feeling left out.
Fun Themes and Seasonal Touches
Want to take your game to the next level? Try theming your mini pizzas for different characters. Create a tray of witches with pepper hats and radish eyes, or monsters with wild shredded carrot hair. You can even design a mummy family or a haunted graveyard scene with broccoli trees and olive tombstones.
These themes can be matched to a movie night, school lunchbox fun, or a festive dinner party. Serve alongside some roasted sweet potato wedges or apple slices to keep the fall vibes going strong.
Mini Pizzas are all about having fun with food, and the possibilities are endless when you let creativity lead the way.
Conclusion: Why Mini Pizzas Are the Perfect Spooky Snack
Mini Pizzas are more than just a quick and tasty bite — they’re a full experience packed with creativity, seasonal charm, and family-friendly fun. With just a few simple ingredients like English muffins, colorful veggies, and your favorite cheeses, you can whip up a themed treat that delights both kids and adults.
They’re easy to prep, super customizable, and a fantastic way to encourage kids to participate in the kitchen while sneaking in nutritious vegetables. Whether you’re hosting a party, planning a school lunchbox surprise, or just looking for a cozy dinner idea that celebrates the season, these spooky little pizzas deliver both flavor and festive vibes.


