If you love homemade bread and the comforting aroma of herbs and fresh-baked loaves, this Sweet Potato Sage Artisan Bread Recipe will feel like home in your kitchen. Blending the earthiness of sweet potato with the woodsy fragrance of sage, this bread is a flavorful twist on traditional artisan loaves. Whether you’re an experienced home baker or just getting started, this recipe is approachable, wholesome, and full of rustic charm.
In this article, we’ll explore the step-by-step process to create this golden, crusty loaf with a soft, airy interior. You’ll learn how to prepare the dough, the importance of using fresh herbs, proofing techniques, baking methods, and storage tips. From understanding ingredient roles to folding and scoring, each part of this guide is crafted to help you bake bread like a pro.
Understanding the Ingredients in Sweet Potato Sage Artisan Bread
Why Sweet Potato Makes a Difference in Artisan Bread
Sweet potato is more than just a colorful addition. It enhances the bread with subtle sweetness and moisture while contributing to a tender crumb and longer shelf life. Mashed sweet potatoes are naturally rich in fiber, vitamins A and C, and add a beautiful golden hue to your loaf.
When mashed and cooled properly, sweet potatoes integrate seamlessly into dough without overpowering the other ingredients. This creates a well-balanced flavor profile and improves hydration levels in your recipe, helping you achieve a soft, fluffy texture with a crisp crust.
The Aromatic Role of Sage in Flavor and Texture
Fresh sage brings earthy, slightly peppery notes to this artisan bread. Its bold aroma pairs naturally with the subtle sweetness of sweet potato. The herb complements savory dishes beautifully, making this bread a perfect companion to soups, salads, and stews.
Chopped finely, sage infuses the dough with fragrance that intensifies during baking. If fresh sage isn’t available, dried sage can be substituted at a reduced quantity since its flavor is more concentrated. Rosemary and thyme also work well as alternatives, but the pairing of sage and sweet potato creates a unique herbal richness that defines this loaf.
Additional Supporting Ingredients and Their Purpose
- All-purpose or bread flour: Acts as the structural base of the dough, developing gluten for elasticity and rise.
- Active dry yeast: Facilitates fermentation and causes the dough to expand by producing carbon dioxide.
- Kosher salt: Enhances flavor and strengthens gluten development.
- Extra-virgin olive oil: Adds softness, moisture, and flavor while helping the crust brown.
- Water (room temperature): Activates the yeast and hydrates the flour, ensuring an even mix.
Each ingredient plays a critical role in producing a well-balanced artisan loaf that’s both visually appealing and richly flavored.
Print
Sweet Potato Sage Artisan Bread Recipe
- Total Time: 12 hours (including rise)
- Yield: 1 artisan loaf
- Diet: Vegetarian
Description
This Sweet Potato Sage Artisan Bread recipe creates a rustic, flavorful loaf with a soft crumb and crisp crust. Infused with fresh sage and subtle sweetness from mashed sweet potatoes, it’s perfect for both beginners and artisan bread lovers.
Ingredients
1¼ cups water (room temperature, about 70°F/21°C)
1¼ teaspoons active dry yeast
3 cups bread or all-purpose flour, plus more for dusting
1½ tablespoons fresh sage leaves, finely chopped
1 teaspoon kosher salt
1 cup mashed sweet potato (about 200g), cooled
1 tablespoon extra-virgin olive oil
Instructions
1. Add yeast to the water and let it sit for 10-15 minutes until foamy.
2. In a large bowl, whisk flour, sage, and salt together.
3. Add mashed sweet potato and mix to distribute evenly.
4. Pour in yeast mixture and olive oil. Mix until a sticky dough forms.
5. Cover and let the dough rise in a warm place for 8–10 hours until doubled in size.
6. Turn dough onto a floured surface and gently fold into a round loaf.
7. Place seam side up in a floured proofing bowl. Cover and refrigerate for 1 to 48 hours.
8. Preheat oven to 450°F (232°C) with Dutch oven inside.
9. Invert dough onto parchment paper, seam side down. Score the top.
10. Transfer to Dutch oven, cover, and bake for 30 minutes. Uncover and bake 15–20 minutes more.
11. Remove and cool on a wire rack for at least 1 hour before slicing.
Notes
Mashed sweet potato can be made by baking or microwaving whole sweet potatoes until soft, then mashing after peeling.
Dried herbs can be used if fresh sage is unavailable. Try rosemary or thyme for variation.
For sweeter bread, substitute sage with cinnamon.
The dough can be refrigerated for up to 48 hours before baking.
Store bread at room temperature for 2–3 days or freeze sliced for up to 1 month.
- Prep Time: 20 minutes
- Cook Time: 50 minutes
- Method: Baking
- Cuisine: American
Mixing and Hydration Techniques for Perfect Dough Development
Step-by-Step: Bringing the Dough Together
Creating artisan dough begins with combining the right ingredients in the correct sequence. To start, dissolve the active dry yeast in lukewarm water (around 70°F or 21°C). Let it rest for 10 to 15 minutes until it becomes frothy. This ensures the yeast is alive and active, which is key for a good rise.
In a large mixing bowl, whisk together your flour, finely chopped fresh sage, and kosher salt. These dry ingredients provide the foundation for your dough. Once mixed, add the mashed and cooled sweet potato, breaking it up with a fork to ensure even distribution through the flour mixture. The sweet potato shouldn’t clump together but rather coat lightly.
Now, pour in the activated yeast mixture and olive oil. Use a rubber spatula or your hand to incorporate all the ingredients into a rough, sticky dough. Don’t worry if it seems messy or stringy at first—this is expected with high-hydration doughs and gives the bread its chewy texture later.
Understanding Dough Hydration and Texture
Hydration refers to the ratio of water to flour in your dough. This sweet potato sage bread is considered a high-hydration dough, meaning it contains a relatively large amount of water, including the natural moisture from the sweet potato. The higher hydration level creates an open crumb and chewy interior but makes the dough feel wetter and stickier during handling.
The dough should be moist, slightly sticky, and elastic. Avoid over-mixing or adding too much extra flour, which can stiffen the dough and compromise its light texture. Artisan bread benefits from gentle handling that preserves the dough’s natural airiness and elasticity.
A helpful tool here is a dough scraper, which allows you to move and fold sticky dough without tearing it. If you don’t have one, floured hands and a firm spatula will do the job just as well.
Bulk Fermentation and Proper Proofing for Artisan Bread
The Importance of the Bulk Rise
After your dough is fully mixed, it’s time for bulk fermentation, also known as the first rise. This is where the magic starts to happen. Place your dough in a lightly greased or floured mixing bowl and cover it with a lid or clean towel. Let it rest in a warm, draft-free space for 8 to 10 hours, or until it has doubled in size.
Ideal fermentation temperature ranges between 70°F to 75°F (21°C to 24°C). If your kitchen is cooler—say in the high 60s—the rise may take a bit longer, and that’s okay. The slow fermentation process improves flavor, texture, and digestibility. The yeast works alongside natural enzymes to break down the flour’s proteins and starches into more flavorful compounds.
You’ll know the dough is ready when it has visibly expanded, looks airy, and jiggles slightly when you shake the bowl. Don’t rush this step. Patience during bulk fermentation yields that open crumb structure artisan bread is famous for.
Shaping the Dough for Artisan Structure
Once your dough has doubled in volume, transfer it gently onto a floured surface. Use floured hands or a dough scraper to help release it from the bowl without tearing the structure. The dough will still be soft and slightly sticky.
To shape the dough, fold it over itself several times, turning as you go, to form a soft, round loaf. You’re creating surface tension while keeping air pockets intact. Once shaped, place the dough seam side up into a proofing bowl (or a clean bowl lined with a floured towel). This step is essential for setting the loaf’s final form.
Dust the top with flour, cover it, and refrigerate it for at least 1 hour, or up to 48 hours. This final proof in the fridge helps enhance flavor while firming the dough, making it easier to score and bake. The cold also slows fermentation without halting it, improving crust color and overall quality.
This long, cold proofing step gives the loaf an edge in both taste and appearance. It’s a defining feature in artisan bread making and one of the secrets to that rich, complex flavor.
PART 4: Scoring and Baking Sweet Potato Sage Bread for the Perfect Crust and Crumb
The Art and Function of Scoring the Loaf
Scoring is more than decorative—it’s essential to control how your bread expands in the oven. Once the dough has completed its cold proofing phase, gently invert it onto a piece of parchment paper, seam side down. This will be the top of your loaf.
Use a razor blade or sharp knife to score the dough. A simple single slash down the center is enough, but feel free to try creative patterns as long as the cuts are about ¼-inch deep. These incisions guide steam release and help prevent the crust from tearing in unexpected places during baking.
Handle the dough gently during this phase. Cold proofing makes it easier to manage, but overhandling can deflate your dough and reduce oven spring.
Baking with a Dutch Oven for Artisan Results
Preheat your oven to 450°F (232°C) with your 3-quart Dutch oven inside. This step is critical. The Dutch oven creates a steamy environment that allows your bread to rise fully before the crust sets, mimicking a professional steam-injected bread oven.
Once your oven is fully preheated, carefully remove the Dutch oven and transfer the parchment with your dough into it. Be cautious with the hot pot. Cover and bake for 30 minutes. During this time, the dough expands, the crust begins to form, and the interior bakes evenly thanks to trapped steam.
After 30 minutes, remove the lid and bake uncovered for 15 to 20 more minutes. This last phase allows the crust to develop a beautiful golden-brown color and a satisfying crunch.
When your bread is done, it will sound hollow when tapped on top and feel light for its size. Using the parchment edges, lift the loaf out and transfer it to a wire rack to cool for at least an hour before slicing.
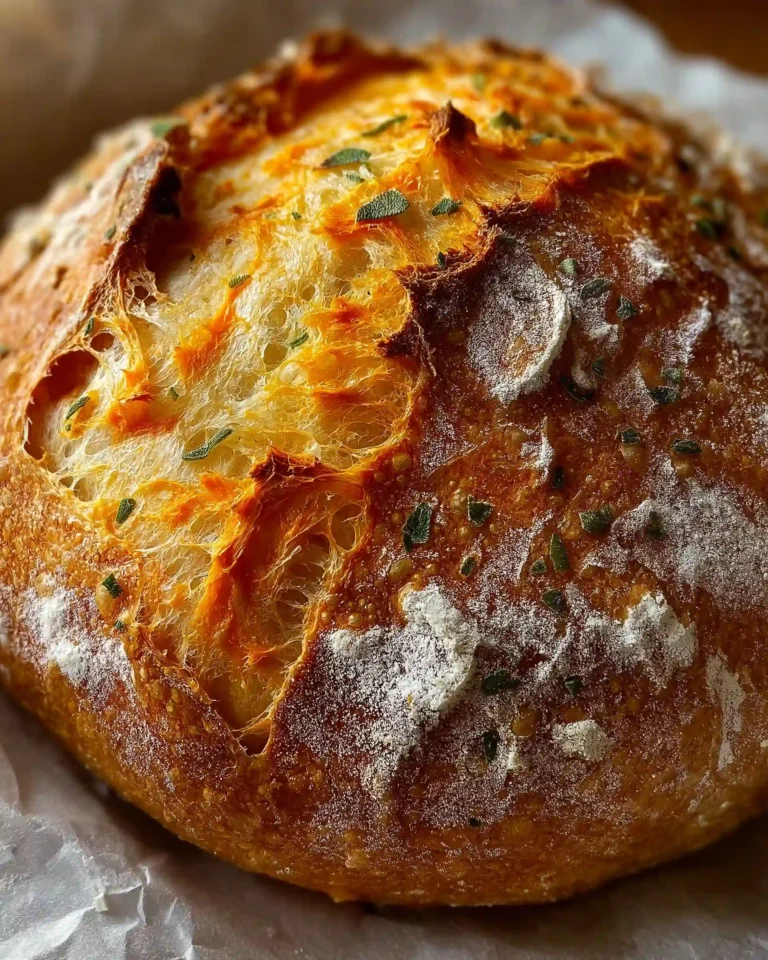
Achieving the Ideal Crust and Crumb
Baking with steam and scoring properly helps you achieve the perfect artisan balance: a crisp, crackly crust and a soft, open crumb. The sweet potato contributes a slight chewiness and a rich color, while the sage leaves speckle the crumb with pockets of herbal aroma.
Letting the bread cool before slicing is essential. Cutting too soon can make the crumb gummy and ruin the structure you’ve worked hard to create.
Storing and Reheating Sweet Potato Sage Bread the Right Way
Best Practices for Bread Storage
Once your freshly baked sweet potato sage artisan bread has cooled, storing it properly is key to preserving its texture and flavor. Unlike store-bought bread loaded with preservatives, this homemade loaf has a shorter shelf life but far superior taste and quality.
For short-term storage, place the loaf in a paper bag or wrap it in a clean kitchen towel. This allows the crust to stay crisp for up to 2 to 3 days while keeping the interior soft. Avoid sealing it in plastic if you want to maintain that rustic crunch on the outside.
If you do need to extend its shelf life, wrap the bread tightly in plastic wrap or foil and store it in the refrigerator. Keep in mind, refrigeration can dry out the crumb slightly, so it’s best used for longer storage only when needed.
Freezing for Extended Freshness
To preserve your loaf beyond a few days, freezing is the best option. Slice the bread before freezing so you can take out individual pieces as needed. Stack the slices between pieces of parchment paper, then seal tightly in a zip-top freezer bag or wrap it well in plastic wrap and foil.
When stored properly in the freezer, this artisan bread will stay fresh for up to 1 month. The sweet potato in the dough helps retain moisture even after freezing, which means you won’t lose quality upon reheating.
How to Reheat Without Ruining the Texture
To revive frozen or chilled bread, remove the desired number of slices or the whole loaf and let it come to room temperature. If you’re in a hurry, pop the slices in the toaster or oven at 300°F (150°C) for 8 to 10 minutes. For whole loaves, heat at 350°F (177°C) for 15 to 20 minutes covered in foil, then uncover for the last 5 minutes to refresh the crust.
Avoid using the microwave. While it can warm the bread, it tends to make the crust rubbery and the crumb soggy. Reheating in the oven or toaster preserves the artisan texture and returns the bread to its near-original quality.
Flavor Variations and Expert Tips for Mastering Artisan Bread
Creative Additions to Customize Your Loaf
While this sweet potato sage artisan bread is perfect as-is, you can easily adjust the recipe to create exciting variations while maintaining its artisan essence.
Here are a few ideas:
- Switch the herbs: If you’re out of sage, try rosemary or thyme. These herbs offer a similar earthy tone and pair just as well with sweet potato.
- Go sweet: For a sweeter version, replace sage with cinnamon and add a tablespoon of maple syrup or honey to the mix. This transforms your bread into a perfect breakfast loaf.
- Add seeds: Try mixing in pumpkin seeds, sunflower seeds, or chia seeds for added texture and nutrition. Sprinkle some on top before baking for extra crunch.
- Use whole wheat flour: Swap out up to 1 cup of the all-purpose flour for whole wheat flour to give the bread a nuttier flavor and boost the fiber content.
These small changes can turn one base recipe into multiple versions suited for any taste or occasion.
Expert Tips for Artisan Bread Success
Mastering artisan bread takes time, practice, and a little experimentation. Here are expert-level tips that elevate your bread-making experience:
- Use a digital scale: Measuring ingredients by weight, especially flour, improves accuracy and consistency every time.
- Hydrate properly: Don’t be afraid of a sticky dough. High hydration is what gives artisan bread its light crumb and airy texture.
- Proof with patience: Letting your dough ferment slowly and fully is essential. Rushing this step will flatten your flavor and structure.
- Don’t skip the rest: Always allow your bread to cool fully before slicing. This preserves the crumb and enhances the final flavor.
- Practice scoring: Clean cuts allow controlled expansion in the oven. Use a sharp blade and try different patterns to see what you like best.
- Control your environment: If your kitchen is cold, try placing your dough in a turned-off oven with the light on to encourage rising.
Artisan bread making is both a science and an art. Trust your senses, follow these techniques, and don’t be discouraged by early trials. Even an imperfect loaf can still be delicious and satisfying.
Conclusion: Bake a Loaf That Feeds Both Body and Soul
Baking a sweet potato sage artisan bread is more than just a kitchen task, it’s a sensory journey that combines nutrition, creativity, and comfort. With its golden crust, tender crumb, and rich, herb-infused aroma, this bread is a wholesome and flavorful alternative to conventional loaves. Whether enjoyed fresh from the oven, toasted with a spread, or paired with your favorite warm meal, it delivers a rustic charm and earthy satisfaction that’s hard to beat.
From selecting the best ingredients to perfecting fermentation and mastering the bake, each step in this process helps you build confidence and skill. And once you’ve tasted the subtle sweetness of sweet potato blended with fresh sage, you’ll understand why this loaf has earned a place among the most beloved homemade breads.
This is a recipe you’ll come back to again and again—tweaking it with herbs or seeds, experimenting with proof times, or sharing it with those you love. That’s the heart of artisan baking: personal, rewarding, and always full of flavor.


