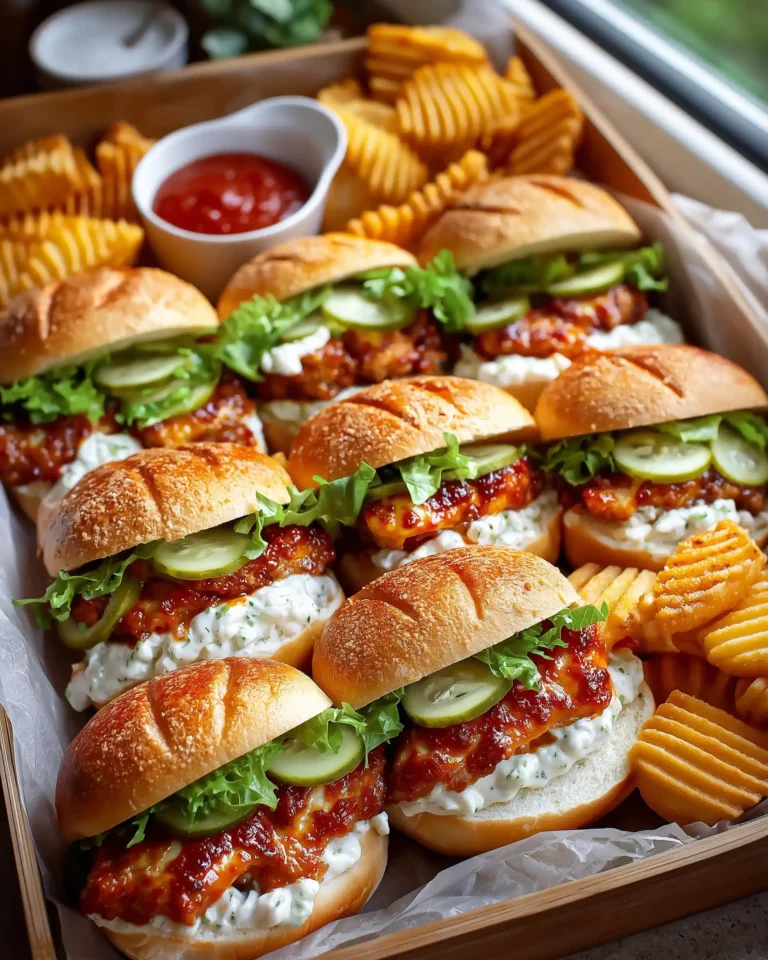
If you’re craving a bold, flavor-packed snack that’s crispy, creamy, cheesy, and just the right amount of spicy, look no further than this Cheesy Dynamite Chicken Buns recipe. These soft homemade buns are brushed with milk, topped with a savory Parmesan crust, and packed full of juicy, crunchy, saucy chicken with a kick of sambal oelek. This street-style creation is not only mouthwatering but also incredibly fun to make at home. Perfect for family gatherings, weekend snacks, or party platters, these buns bring together comforting dough with an explosion of flavor in every bite.
In this article, we’ll walk through every step of creating these buns from scratch — from the soft, fluffy dough and cheesy topping to the perfectly seasoned chicken and fiery sauce. We’ll also dive into common troubleshooting tips, flavor variations, and preparation tips to ensure you nail the perfect bun every time. Whether you’re a beginner or a confident home cook, you’ll find this guide easy to follow and deliciously rewarding.
Preparing the Perfect Dough for Cheesy Dynamite Chicken Buns
Why the Dough Matters
The foundation of any great bun lies in its dough. For this recipe, the dough is soft, rich, and slightly sweet — designed to complement the boldness of the chicken and sauce without overpowering them. The right balance of ingredients and technique ensures a soft, airy interior with a slightly crisp crust that holds up beautifully to the filling.
Print
Cheesy Dynamite Chicken Buns Recipe
- Total Time: 2 hours 45 minutes
- Yield: 14 buns
Description
Soft, cheesy buns filled with spicy fried chicken tossed in a creamy dynamite sauce. A perfect homemade street-style snack packed with bold flavor.
Ingredients
For the Dough:
75 ml water
200 ml milk
15 g honey
9 g instant yeast
1 egg
30 ml sunflower oil
600 g flour
8 g salt
25 g butter
For the Chicken:
700 g chicken filet
5 g salt
3 g onion powder
3 g garlic powder
4 g cayenne powder
1.5 g black pepper powder
15 g sambal oelek
10 ml soy sauce
1 egg
Cornstarch Coating:
150 g cornstarch
2 g salt
1.5 g black pepper powder
3 g onion powder
Cheesy Topping:
40 g Parmesan cheese
2 g cayenne powder
1.5 g onion powder
1 g black pepper powder
Sauce:
120 g mayonnaise
75 g chili sauce
20 g sambal oelek
Extra:
Milk for brushing
Instructions
1. Combine lukewarm water, milk, honey, and yeast. Let sit for 5 minutes.
2. Add egg and oil, then mix in flour, salt, and butter. Knead for 10–12 minutes until smooth.
3. Cover and let the dough rise for 1 hour until doubled.
4. Mix Parmesan, cayenne, onion powder, and black pepper. Set aside.
5. Chop chicken and mix with all marinade ingredients. Chill for 1 hour.
6. Divide dough into 14 balls, roll each into a rectangle, fold, brush with milk, and dip in cheese mix.
7. Place on parchment-lined tray, slash tops, and let rise 30 minutes.
8. Bake at 200°C (392°F) for 12–15 minutes until golden.
9. Mix cornstarch coating, coat chicken, and fry in sunflower oil at 175°C (350°F) until crispy.
10. Mix sauce ingredients in a bowl.
11. Toss fried chicken in sauce.
12. Slice buns and fill with chicken, veggies, and extra sauce.
Notes
Use a thermometer to monitor oil temperature for perfect frying.
Let the dough fully rise to get soft, fluffy buns.
Chilling the marinated chicken overnight enhances flavor.
Adjust sambal to control spiciness.
Serve warm for best texture and flavor.
- Prep Time: 2 hours 30 minutes
- Cook Time: 15 minutes
- Category: Breakfast
- Method: Baking, Frying
- Cuisine: Fusion
Ingredients Breakdown and Their Roles
- Water & Milk (Lukewarm): Helps activate the yeast and provides moisture. Lukewarm temperatures (around 37-40°C or 98-104°F) are ideal to promote yeast activity without killing it.
- Honey: Adds a hint of sweetness and enhances browning during baking.
- Instant Yeast: Drives the fermentation process, causing the dough to rise and become fluffy.
- Egg & Sunflower Oil: Enrich the dough, making it more tender and flavorful.
- Flour: Provides structure. Using all-purpose flour gives the best texture.
- Salt: Enhances flavor and controls yeast activity.
- Butter: Adds richness and softness to the crumb.
Step-by-Step Dough Preparation
- Activate the Yeast
In a bowl, combine lukewarm water, milk, honey, and yeast. Mix well and let it sit for about 5 minutes until frothy. This indicates the yeast is active. - Mix Wet Ingredients
Add a beaten egg and sunflower oil to the yeast mixture. Stir until smooth. - Incorporate Dry Ingredients
Add flour and salt gradually while mixing. Add the butter last, kneading it into the dough. - Kneading
Knead the dough for about 10–12 minutes by hand, or 8–10 minutes if using a stand mixer. The dough should be elastic and smooth but not sticky. - First Rise
Place the dough in a greased bowl, cover with a damp cloth, and let it rise in a warm spot for 1 hour or until it doubles in size. This fermentation process builds flavor and texture.
Tips for Dough Success
- Avoid hot liquids as they can kill the yeast. Stick to lukewarm.
- Don’t rush the rise. Time is key for good flavor.
- A well-kneaded dough should stretch without tearing.
Crafting the Cheesy Topping and Shaping the Buns
Creating the Flavorful Parmesan Topping
The cheesy crust on these buns is what gives them their irresistible golden finish and signature savory bite. The topping is a carefully blended mix of cheese and spices that crisps up during baking and adds both texture and taste.
Ingredients:
- 40 g Parmesan cheese (grated finely)
- 2 g cayenne powder
- 1.5 g onion powder
- 1 g black pepper powder
Preparation Steps:
- Combine Topping Ingredients
In a small bowl, mix the Parmesan cheese, cayenne powder, onion powder, and black pepper. Stir until well-blended. - Set Aside
Keep the mixture in a dry, covered container until you’re ready to assemble the buns. This helps the flavors meld and keeps moisture out.
Why It Works:
The Parmesan crisps up beautifully in the oven, while the cayenne and onion powder give it a subtle heat and depth. This topping not only adds flavor but also signals a deliciously seasoned bite even before you taste it.
Dividing and Shaping the Dough
After the first rise, your dough should be soft, pillowy, and doubled in size — ready for shaping.
Steps to Shape the Dough:
- Deflate and Divide
Punch down the dough gently to release air. Divide it into 14 equal portions, around 70 g each. - Form into Balls
Shape each piece into a smooth round ball using your palm and a clean surface. - Roll and Fold
Roll each dough ball into a rectangle about 15 x 13 cm (roughly 6 x 5 inches). Fold it in half widthwise so the seam is underneath. - Brush and Dip
Lightly brush the top of each bun with milk. This helps the topping stick. Dip the brushed side into the prepared cheese mixture. - Final Proof
Place the buns cheese-side up on a parchment-lined baking sheet. Use a sharp knife or blade to score shallow slashes across the tops. Cover loosely with a cloth and let them rise again for about 30 minutes until puffy.
Baking the Buns
Once your buns are beautifully risen:
- Preheat Oven to 200°C (392°F).
- Bake for 12–15 Minutes
Bake until golden brown and firm to the touch. Keep a close eye near the end, as oven temps may vary. - Cool Slightly
Let the buns rest on a wire rack for 5 minutes before slicing or filling.
Texture and Appearance
You’ll notice the buns have a soft, fluffy interior, with a crisp, savory top layer from the cheese mix. This balance of textures makes them a perfect vessel for the bold chicken filling.
Preparing the Crispy Dynamite Chicken Filling
Why the Chicken Makes or Breaks It
The heart of these Cheesy Dynamite Chicken Buns is the fiery, juicy chicken. Marinated with bold spices and coated in a crisp crust, each bite delivers a perfect mix of crunch and heat, balanced with a tender interior. This filling isn’t just spicy, it’s layered with umami, smokiness, and deep flavor that elevates every bite of your homemade bun.
Ingredients for the Chicken Mixture
- 700 g chicken filet (boneless, skinless)
- 5 g salt
- 3 g onion powder
- 3 g garlic powder
- 4 g cayenne powder
- 1.5 g black pepper powder
- 15 g sambal oelek
- 10 ml soy sauce
- 1 egg (beaten)
Marination Process
- Cut the Chicken
Chop the chicken into small, bite-sized chunks or thin strips. Smaller pieces cook faster and fit better inside the buns. - Mix the Marinade
In a bowl, combine the salt, onion powder, garlic powder, cayenne powder, black pepper, sambal oelek, soy sauce, and beaten egg. Stir until everything is fully incorporated. - Coat the Chicken
Add the chicken to the marinade. Toss to coat evenly, making sure every piece is covered. - Chill to Marinate
Cover the bowl and refrigerate for at least 1 hour. For a deeper flavor, marinate overnight if time allows.
Pro Tip:
Letting the chicken rest allows the spices to penetrate, leading to a more flavorful and juicy result. Even just an hour makes a noticeable difference.
Prepping the Cornstarch Coating
Ingredients for Coating:
- 150 g cornstarch
- 2 g salt
- 1.5 g black pepper powder
- 3 g onion powder
- Combine in a Bowl
Mix the cornstarch with the salt, black pepper, and onion powder. Stir well to distribute the seasonings evenly. - Coat the Chicken
Take each marinated chicken piece and dredge it in the cornstarch mixture. Shake off the excess and place them on a tray lined with parchment paper.
Frying the Chicken to Golden Perfection
- Heat the Oil
Pour a thin layer of sunflower oil into a non-stick skillet. Heat over medium until it reaches 175°C (350°F). Use a kitchen thermometer for accuracy. - Fry in Batches
Carefully place the coated chicken into the oil without overcrowding. Fry until golden brown and cooked through, about 3–5 minutes per batch. - Drain
Remove and place on paper towels to soak up excess oil.
The Result
The fried chicken pieces are crunchy on the outside and juicy on the inside, infused with just the right amount of heat. These nuggets of flavor are now ready to be coated in the spicy creamy sauce and loaded into your cheesy buns.
Mixing the Dynamite Sauce and Assembling the Buns
The Sauce That Ties It All Together
No dynamite chicken bun is complete without its bold, creamy, spicy sauce. This sauce brings a perfect fusion of richness from mayonnaise, heat from sambal oelek, and sweetness from chili sauce. It coats the crispy chicken perfectly, turning each bite into a flavor bomb.
Sauce Ingredients:
- 120 g mayonnaise
- 75 g chili sauce
- 20 g sambal oelek
Making the Sauce
- Combine in a Bowl
In a medium bowl, mix the mayonnaise, chili sauce, and sambal oelek. - Whisk Until Smooth
Use a whisk or spoon to stir the ingredients until fully blended and creamy. - Taste and Adjust
If you prefer less heat, reduce the sambal. For more kick, add extra or sprinkle in a touch of cayenne powder.
Pro Tip:
Add a splash of lime juice if you like a hint of freshness to cut through the creaminess.
Coating the Chicken
Once your chicken is fried and slightly cooled:
- Toss with Sauce
Place the fried chicken pieces into the bowl of sauce. Use tongs or a spoon to gently toss until each piece is coated. - Let It Sit Briefly
Let the chicken sit for a few minutes in the sauce so it absorbs flavor without becoming soggy.
Final Assembly: Bringing It All Together
Now that your components are ready — fresh buns, crispy chicken, and spicy sauce — it’s time to assemble the perfect cheesy dynamite chicken buns.
- Slice the Buns
Take a cooled bun and carefully slice it open lengthwise, leaving a hinge so it holds together. - Add Chicken Filling
Load the inside with saucy chicken. Make sure every bun gets a generous portion. - Add Optional Fresh Veggies
For freshness and crunch, feel free to add some lettuce, shredded cabbage, or thinly sliced cucumber. These help balance the rich flavors. - Drizzle Extra Sauce
Top with a bit more sauce for that extra creamy finish. - Serve Warm
The buns are best enjoyed fresh and warm, while the chicken is still crispy and the sauce melty.
Texture Explosion in Every Bite
You get a soft, warm bun with a cheesy crust, crispy fried chicken inside, and a spicy, creamy sauce dripping over the edges — everything you’d want in one unforgettable bite.
Tips for Success and Common Mistakes to Avoid
Master the Dough with These Tips
The dough is a crucial element of the Cheesy Dynamite Chicken Buns. Even the most flavorful filling won’t shine if your bun is dry or dense.
- Use Lukewarm Liquid Only
Too hot, and you’ll kill the yeast. Aim for 37°C to 40°C (98°F to 104°F). It should feel warm, not hot, to the touch. - Don’t Rush the Kneading
Under-kneading leads to flat, heavy buns. Knead for 10–12 minutes manually, or 8–10 minutes in a stand mixer. The dough should be soft, stretchy, and smooth. - First Rise Is Essential
Let the dough double in size before shaping. Skipping this step can result in tough or underdeveloped buns. - Weigh Your Dough Balls
For even baking and uniform buns, weigh the dough to get 14 pieces around 70 g each.
Mistakes to Avoid During Frying
Crispy chicken is key, but frying errors can ruin texture or flavor.
- Skipping the Thermometer
Too hot? The outside burns before the inside cooks. Too cool? The chicken soaks in oil and gets soggy. Maintain 175°C (350°F) for the best results. - Overcrowding the Pan
Frying too many pieces at once lowers the oil temperature fast. Always fry in batches for even golden crusts. - Skipping the Cornstarch Coating
This step creates the signature crunch. Don’t substitute flour, as it won’t deliver the same crisp texture.
Saucing and Assembling Tips
- Don’t Over-Sauce
Too much sauce can make the buns soggy. Coat the chicken evenly, then drizzle a bit more after assembling if needed. - Add Veggies Last
If you’re adding lettuce or cabbage, do so right before serving to maintain freshness and crunch. - Serve Immediately
These buns taste best warm and fresh. The contrast between hot chicken, creamy sauce, and soft buns is what makes them shine.
Storage & Reheating
- Unfilled Buns
Store in an airtight container at room temp for up to 2 days or freeze for up to a month. Reheat in the oven at 180°C (350°F) for 5–7 minutes. - Filled Buns
Best enjoyed fresh. If you must store, keep refrigerated for up to 1 day. Reheat briefly in a warm oven to maintain texture.
Variations, Customizations, and Serving Ideas
Flavor Variations to Spice It Up
The Cheesy Dynamite Chicken Buns are incredibly versatile. You can adjust the spice levels or modify components to suit your preferences without losing the bold flavor they’re known for.
Milder Version for Kids
- Reduce the Heat
Cut down the sambal oelek in both the chicken marinade and the sauce by half or more. - Swap Cayenne for Paprika
This gives color and flavor without the spice.
Extra-Spicy Twist for Heat Lovers
- Add Fresh Chili
Finely diced green chilies or chili flakes can be mixed into the chicken marinade. - Spicy Topping Mix
Include extra cayenne powder or a pinch of crushed red pepper in the Parmesan topping for added kick.
Herb-Infused Dough
- Mix in Herbs
Add dried oregano, parsley, or rosemary to the dough for an aromatic twist. - Garlic Butter Finish
Brush baked buns with garlic-infused melted butter for extra flavor.
Customizing the Filling
These buns offer a lot of room to explore.
Add Veggies Inside
- Thinly sliced cucumbers, shredded carrots, or cabbage add crunch and freshness.
- Lightly pickled onions give a tangy contrast to the richness of the chicken and sauce.
Cheese Boost
- Place a slice of mozzarella or cheddar inside before adding the chicken to make the filling even more indulgent.
- Sprinkle shredded cheese over the chicken before closing the bun.
Creative Serving Ideas
Whether you’re serving them at home or a party, here are a few ways to make your cheesy buns shine:
Game-Day Snack Platter
- Serve mini versions with toothpicks.
- Provide small ramekins of extra sauce on the side for dipping.
Meal Prep Lunches
- Wrap buns in parchment for an easy lunchbox filler.
- Include a fresh slaw on the side to balance the richness.
Buffet or Brunch Table
- Present the buns warm on a tray, stacked or layered with parchment paper dividers.
- Offer different sauces or toppings like creamy garlic dip or a tangy herb yogurt sauce.
Portion Flexibility
Although the recipe makes 14 full-size buns, you can easily halve it for a smaller batch, or divide the dough into smaller balls to make bite-sized sliders perfect for events and gatherings.


