Making your own hamburger buns at home is a game-changer. Whether you’re preparing for a summer cookout, a family dinner, or simply looking to elevate your burger night, this homemade hamburger buns recipe delivers soft, golden, perfectly risen buns every time. They’re buttery, slightly sweet, and topped with sesame seeds for that iconic finish. Plus, making them from scratch lets you control every ingredient, ensuring better taste and freshness than store-bought options.
This article will walk you through everything you need to know about crafting the ultimate hamburger buns. We’ll begin with the key ingredients and what makes them work so well together, then move step-by-step through the mixing, shaping, and baking process. By the end, you’ll be able to confidently bake buns that rival any bakery or gourmet restaurant. Let’s dive in.
Ingredients That Make the Perfect Hamburger Buns
Understanding the Role of Each Ingredient
The secret to creating fluffy, flavorful hamburger buns starts with the ingredients. Each component contributes to the structure, taste, and texture of the final product. Here’s how each one works its magic:
- Active Dry Yeast (0.25 ounce packet)
This is the engine of the dough. It helps the dough rise by producing carbon dioxide during fermentation, giving the buns their airy texture. Make sure the yeast is fresh and active. - All-Purpose Flour (1 pound, divided)
This forms the structure of the buns. It contains just the right amount of protein to create a tender crumb while still holding the dough together. - Warm Water (1 cup, at 105°F/41°C)
Activates the yeast. The water should be warm to the touch but not hot, or it could kill the yeast. - Eggs (2 large, divided)
One egg is mixed into the dough, enriching it with fat and protein for a soft texture. The second egg, combined with milk, is used as an egg wash to give the buns a shiny, golden top. - Butter (3 tablespoons, melted)
Adds richness and a soft, melt-in-your-mouth crumb. Melted butter incorporates more evenly into the dough. - White Sugar (3 tablespoons)
Feeds the yeast and adds a touch of sweetness, which enhances the flavor and encourages browning during baking. - Salt (1 ¼ teaspoons)
Essential for flavor. It also helps control yeast activity so the dough doesn’t rise too quickly. - Olive Oil (1 teaspoon)
Used to coat the dough before the first rise. It prevents drying and adds a hint of richness. - Milk (1 tablespoon)
Combined with the second egg, it helps form a glossy crust on the buns after baking. - Sesame Seeds (1 teaspoon or as needed)
A classic burger bun topper. These add a nutty flavor and a professional touch.
Ingredient Preparation Tips
- Use a kitchen thermometer to check your water temperature before adding it to the yeast.
- Crack eggs into a separate bowl before adding to your dough to avoid shell fragments.
- Sift your flour if it seems clumpy. This ensures even mixing and a smoother dough.
With all your ingredients measured and ready, you’re all set to begin the bun-making journey. In the next section, we’ll cover mixing and kneading the dough for the perfect structure and texture.
Print
Homemade Hamburger Buns Recipe
- Total Time: 3 hours
- Yield: 8 buns
- Diet: Vegetarian
Description
Soft, fluffy, and buttery homemade hamburger buns with sesame seeds. Perfect for burgers, sandwiches, and sliders.
Ingredients
1 (.25 ounce) package active dry yeast (such as Fleischmann’s ActiveDry Yeast)
1 pound all-purpose flour, or as needed – divided
1 cup warm water (105°F / 41°C)
2 large eggs, divided
3 tablespoons butter, melted
3 tablespoons white sugar
1 ¼ teaspoons salt
1 teaspoon olive oil
1 tablespoon milk
1 teaspoon sesame seeds, or as needed
Instructions
1. Place yeast into bowl of a stand mixer. Whisk in 1/2 cup flour and warm water until smooth. Let sit for 10 to 15 minutes until foamy.
2. Whisk 1 egg, melted butter, sugar, and salt into the yeast mixture. Stir in remaining flour (about 3 cups).
3. Attach dough hook and knead dough on low speed for 5 to 6 minutes until soft and sticky. Scrape sides if needed.
4. Transfer to floured surface. Dough should be elastic but not sticky to fingers. Shape into a smooth round ball.
5. Wipe mixer bowl clean, add olive oil, and coat dough. Cover with foil and let rise in warm place until doubled, about 2 hours.
6. Line baking sheet with silicone mat or parchment paper.
7. Transfer dough to floured surface. Pat into a 5×10-inch rectangle, about 1/2 inch thick.
8. Cut into 8 equal pieces. Shape each into a ball, tucking ends underneath.
9. Gently flatten into 1/2-inch-thick discs. Arrange on prepared baking sheet, 1/2 inch apart. Lightly dust with flour. Cover loosely with plastic wrap. Let rise for 1 hour.
10. Preheat oven to 375°F (190°C). Beat remaining egg with milk and gently brush tops. Sprinkle with sesame seeds.
11. Bake 15 to 17 minutes until lightly browned. Cool completely, tear apart, and slice to serve.
Notes
Avoid over-kneading the dough or overproofing. Room temperature and yeast freshness are key to proper rising. These buns freeze well when wrapped tightly. Reheat by warming in the oven at low heat.
- Prep Time: 20 minutes
- Cook Time: 17 minutes
- Category: Bread
- Method: Oven
- Cuisine: American
Mixing and Kneading the Dough for Soft, Airy Hamburger Buns
Activating the Yeast for Maximum Rise
The first real step in this hamburger buns recipe is proofing the yeast. This is crucial because active dry yeast needs to be awakened in warm water before it can do its job in the dough.
Start by adding the packet of active dry yeast into the bowl of a stand mixer. Then whisk in ½ cup of the flour and the warm water (around 105°F or 41°C). Stir it until smooth. Let this mixture sit undisturbed for about 10 to 15 minutes. When the surface becomes foamy and bubbly, you’ll know the yeast is alive and active.
If you don’t see foam, the yeast may be expired or the water may have been too hot or cold. In that case, start again with a new batch.
Incorporating the Wet and Dry Ingredients
Once your yeast mixture is active, it’s time to enrich the dough. Whisk in one large egg, the melted butter, sugar, and salt until well combined. This creates a rich, flavorful base.
Now, gradually add in the remaining flour, about 3 cups. This step is where your dough begins to take shape. Use a spoon to stir until a sticky, shaggy dough forms. Don’t worry if it looks messy at first—that’s normal.
Kneading with a Dough Hook for Proper Texture
Attach the dough hook to your stand mixer and knead the dough on low speed for about 5 to 6 minutes. As it mixes, the gluten structure starts to form, which gives the buns their stretch and soft interior.
You’ll notice the dough is soft and sticky. That’s exactly what you want. But if it clings heavily to the sides or your spatula, add just a small sprinkle of flour—enough to get it to pull away cleanly.
Use your spatula to scrape the sides occasionally and test the texture by poking the dough. If a large amount sticks to your fingers or tool, continue kneading a bit longer or add a tablespoon of flour at a time until it becomes pliable.
Forming the Initial Dough Ball
Once the kneading is done, transfer the dough onto a lightly floured surface. It should be sticky but not too wet, and it should hold together well.
With floured hands, gently form the dough into a round shape by folding the edges under to create surface tension on top. This round shape is important as it will help the dough rise evenly during the next step.
Coating and Preparing for the First Rise
Before letting the dough rise, clean out the stand mixer bowl and drizzle it with a teaspoon of olive oil. Place the dough back in the bowl and turn it around a few times so the surface is evenly coated in oil. This keeps it from drying out.
Cover the bowl loosely with aluminum foil and place it in a warm, draft-free spot. Let it rise until it doubles in size, which should take about two hours. The dough should look smooth and puffed, ready for shaping.
Shaping the Dough into Classic Hamburger Buns
Flattening and Measuring the Dough
Once the dough has doubled in size, gently punch it down to release excess gas. Transfer it onto a lightly floured surface. You’ll notice the dough is soft, stretchy, and still slightly sticky—exactly what we want at this stage.
Start by gently pressing the dough flat to remove any large air bubbles. Shape it into a slightly rounded rectangle, approximately 5 inches by 10 inches and about ½ inch thick. Use your hands to gently pat it into this shape, but avoid overworking it. Working the dough too much at this point can toughen the final texture of the buns.
Dividing the Dough Evenly
Now cut the rectangle into eight equal pieces. The best way to do this is to cut the dough in half lengthwise, then cut each half into four equal pieces. This ensures each bun is about the same size, which helps them bake evenly.
If you have a kitchen scale, this is the perfect time to use it. Weigh each piece of dough and adjust slightly so they’re uniform. Consistency in size leads to consistency in texture and bake.
Forming Round, Smooth Dough Balls
Take each piece and gently tuck the edges underneath to form a round shape. Use your palms to shape and smooth the dough balls, maintaining a taut surface on the top. This surface tension helps the buns hold their shape and rise well.
Be gentle here—handling the dough too roughly can push out air and prevent a light, fluffy result. Once all eight pieces are shaped, it’s time to form them into discs.
Flattening for the Bun Shape
Lightly flatten each round using your hands. The goal is to shape them into discs about ½ inch thick. Don’t press too hard—just enough to spread the dough without deflating it completely.
This shaping step creates that iconic hamburger bun profile. They’ll puff up more during the second rise and in the oven, so resist the urge to make them too thick.
Arranging for the Final Rise
Line a large baking sheet with a silicone mat or parchment paper. Arrange the buns about ½ inch apart from each other. It’s okay if they touch slightly during the final rise and baking process. This actually helps create soft sides and keeps them from spreading too much.
Lightly dust the tops of the buns with flour. This prevents sticking when you cover them. Then, gently drape a piece of plastic wrap over the buns. Don’t seal it tightly—just lay it loosely to avoid pressing down on the dough.
Let the buns rise a second time in a warm place until they double in size. This will take about 1 hour. By the end of this rise, the buns should look pillowy and soft, ready for baking.
Egg Wash, Sesame Seeds, and Baking the Hamburger Buns
Making the Perfect Egg Wash
As the dough finishes its second rise, preheat your oven to 375°F (190°C). Getting the oven hot in advance ensures the buns bake evenly from the moment they go in.
Meanwhile, it’s time to prepare the egg wash. In a small bowl, crack the remaining egg and add one tablespoon of milk. Use a fork to whisk the mixture until it’s fully combined and smooth. This egg wash will give the buns their shiny, golden crust and help the sesame seeds stick.
Handle the risen dough gently. You don’t want to deflate the buns right before baking. Using a pastry brush, lightly and carefully apply the egg wash to the tops of the buns. Don’t press down—just glide the brush over the surface. Cover every top evenly, but avoid letting it drip down the sides, as that can cause uneven browning.
Sprinkling with Sesame Seeds
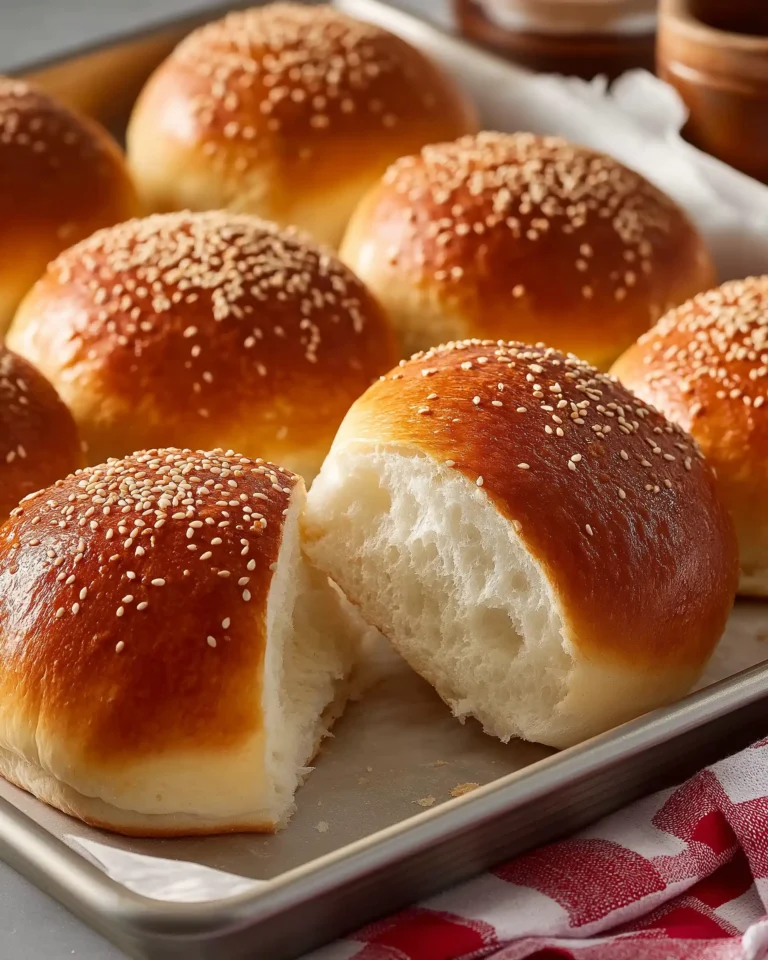
Immediately after brushing each bun, sprinkle sesame seeds on top. Use about a teaspoon in total—just enough to add flavor and a decorative finish without overwhelming the bun.
Sesame seeds not only enhance appearance but also add a delicate crunch and nuttiness that balances the soft texture inside. If you’re not a fan of sesame, you can leave them off, but traditionally, they complete the burger bun look.
Baking to a Golden Finish
Place the baking sheet into your preheated oven. Bake the buns for 15 to 17 minutes, or until the tops are lightly browned and they sound hollow when gently tapped. Keep an eye on them around the 14-minute mark to avoid overbaking. The tops should turn a beautiful golden color, thanks to the egg wash.
Because the buns are placed close together, they may touch during baking and stick slightly. That’s perfectly fine. This actually helps the sides stay soft and gives that fresh, tear-apart bakery look.
Cooling for the Best Texture
Once the buns are baked, remove the tray from the oven and place it on a wire rack. Let the buns cool completely before slicing or serving. Cooling helps the structure set, and slicing while warm could make them gummy inside.
After they’ve cooled, gently pull the buns apart if they’ve baked together. Use a serrated knife to slice them in half crosswise. Now, your hamburger buns are ready to serve with your favorite fillings.
Storing, Freezing, and Reheating Homemade Hamburger Buns
How to Store Fresh Hamburger Buns
Once your hamburger buns have completely cooled, proper storage is key to maintaining their freshness and softness. If you plan to eat them within 2 to 3 days, place the buns in an airtight container or zip-top plastic bag. Store them at room temperature away from direct sunlight and heat sources.
Avoid refrigerating the buns, as this can dry them out faster. Room temperature is ideal for keeping them soft and moist in the short term.
To prevent the tops from sticking to each other or the container, you can layer parchment or wax paper between the buns. This is especially useful if your batch includes sesame seeds, which can stick and pull off during stacking.
Freezing Buns for Longer Shelf Life
Homemade hamburger buns freeze beautifully and can last up to 2 months in the freezer without losing flavor or texture. To freeze them:
- Make sure they’re completely cooled.
- Wrap each bun individually in plastic wrap or parchment paper.
- Place the wrapped buns into a freezer-safe zip-top bag or airtight container.
Label the bag with the date so you know how long they’ve been stored. Freezing prevents mold and maintains the integrity of your work for future meals.
Reheating for That Just-Baked Feel
When it’s time to use the frozen buns, you’ve got a few options for reheating:
- Room Temperature Thawing: Remove the buns from the freezer and let them thaw in the wrapper for about 1 to 2 hours. This is the most natural method and preserves texture.
- Oven Reheating: Preheat your oven to 325°F. Place the buns on a baking sheet and warm them for 8 to 10 minutes. Cover with foil to prevent over-browning.
- Microwave Softening: If you’re in a hurry, wrap a bun in a slightly damp paper towel and microwave for about 10 to 15 seconds. Be careful not to overheat, as this can make them chewy.
Pro Tips for the Best Bun Experience
- Slice buns before freezing to make toasting easier later.
- For extra softness, brush the buns lightly with melted butter after reheating.
- To refresh buns that feel slightly dry, wrap in foil and place in a warm oven for a few minutes.
Creative Ways to Use Homemade Hamburger Buns
Beyond the Burger: Delicious Serving Ideas
Homemade hamburger buns are incredibly versatile and work well in many dishes beyond traditional burgers. With their soft interior and slightly crisp top, they can complement a wide variety of meals.
Here are some popular and tasty ways to use them:
- Grilled Chicken Sandwiches
These buns are perfect for holding grilled or baked chicken breasts. Add lettuce, tomato, and your favorite sauce for a complete meal. - Veggie Burgers and Plant-Based Options
Whether you’re serving black bean patties, portobello mushrooms, or lentil-based burgers, these buns support them without overpowering the flavor. - Pulled Meat Sandwiches (non-pork)
Shredded chicken or turkey tossed in a tangy sauce pairs beautifully with the fluffy texture of homemade buns. - Breakfast Sandwiches
Toast a bun and add scrambled eggs, cheese, and sautéed veggies. It’s a hearty way to start the day. - Mini Sliders
Make smaller versions by dividing the dough into more pieces before shaping. These work great for parties or appetizer platters.
Kids’ Lunches and Snack Ideas
Homemade hamburger buns can easily become the base of a healthy school lunch or afternoon snack:
- Mini Sandwiches with Cheese and Lettuce
Cut the buns in halves or quarters and fill with kid-friendly options like cream cheese, turkey slices, or fresh vegetables. - Mini Pizza Buns
Slice the buns open, spread with tomato sauce, sprinkle with shredded cheese, and bake for a few minutes for a quick, bun-based pizza. - Simple Butter and Honey Buns
Warm them slightly and serve with butter and a drizzle of honey for a sweet, satisfying treat.
Entertaining with Style
For gatherings and family dinners, these buns offer a homemade touch that’s always impressive:
- Make-Your-Own Burger Bars
Set out a tray of fresh buns with various fillings, cheeses, and toppings. Let guests build their own sandwiches. - Stuffed Buns
Hollow out the center and fill with savory mixtures like sautéed veggies and cheese or seasoned ground meat for a twist on the traditional bun.
Homemade hamburger buns elevate any meal they’re part of. Their flavor, texture, and versatility ensure they’re never just a background item—they’re a highlight.
Conclusion: Your Go-To Hamburger Buns Recipe for Every Occasion
Homemade hamburger buns aren’t just a kitchen project—they’re a way to transform everyday meals into something truly special. With this detailed hamburger buns recipe, you’ve now got the techniques and confidence to make buns that are fluffy, golden, and irresistibly good every time. From selecting your ingredients and kneading the dough to shaping and baking to perfection, each step brings you closer to a final product that rivals anything found in stores or restaurants.
Not only do these buns elevate burgers, but they also serve as the foundation for sandwiches, breakfast options, and creative snacks. With smart storage and reheating tips, they’re easy to prepare ahead for gatherings, lunches, or weeknight dinners. Whether you’re hosting friends or feeding your family, fresh-baked hamburger buns made from scratch add that unmistakable homemade warmth to every plate.


