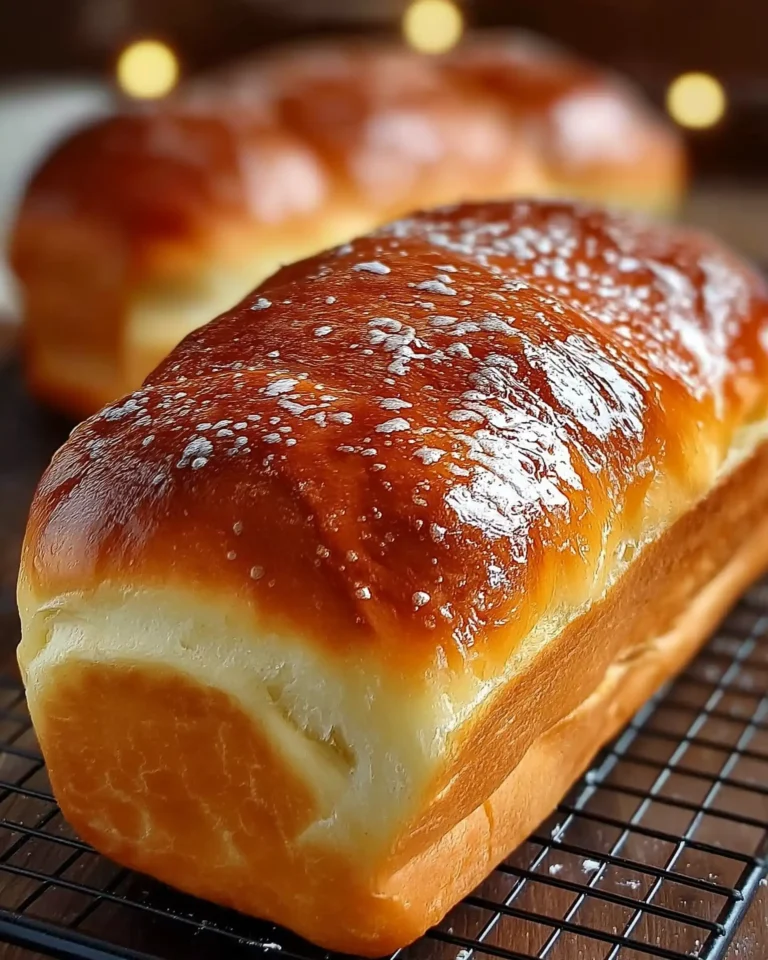
Nothing beats the smell of freshly baked bread wafting through your kitchen, especially when it’s rich, tender, and lightly sweet like sweet milk bread. This delightful recipe brings together simple pantry staples to create soft, fluffy loaves that are perfect for breakfast, brunch, or a cozy afternoon snack. Whether you’re a seasoned home baker or new to bread-making, this step-by-step guide will help you master the art of sweet milk bread using either a stand mixer or your hands.
We’ll explore the essential ingredients, techniques for kneading and shaping, and expert tips to help your bread come out perfect every time. You’ll also learn how to customize your loaf, how to troubleshoot common issues, and how to make this bread last longer while maintaining its signature pillowy texture.
Key Ingredients for the Perfect Sweet Milk Bread
Understanding the Role of Bread Flour in Sweet Milk Bread
Bread flour is the foundation of this recipe. It has a higher protein content than all-purpose flour, usually around 12% to 14%, which helps develop strong gluten strands. These strands are crucial for giving your sweet milk bread its signature chewy interior and lofty rise. For this recipe, you’ll need six to six and a half cups of bread flour. Make sure to sift it for better mixing and aeration.
Why Sugar Is More Than Just Sweetness
Using one full cup of sugar might seem like a lot, but in sweet milk bread, it does more than sweeten. Sugar acts as food for the yeast, helping the dough rise faster and better. It also tenderizes the bread crumb and promotes a lovely golden-brown crust during baking.
The Magic of Yeast and How to Proof It Right
Yeast is the leavening agent that makes the dough rise. This recipe calls for two tablespoons of active dry yeast. To activate it properly, dissolve it in a warm cup of water with a bit of sugar and let it sit for five minutes until it becomes frothy. This process is called proofing, and it’s a critical first step to ensure the yeast is alive and ready to do its job.
Eggs and Milk: Enriching the Dough
Two eggs and one cup of milk are used to enrich the dough, giving it a soft, tender texture and deeper flavor. Eggs also add color to the crumb and help in binding the dough, while milk adds moisture and a slightly sweet undertone. Use room-temperature eggs and warm milk for best results.
The Secret Helpers: Vitamin C Powder, Salt, and Butter
Vitamin C powder, or an alternative like apple cider vinegar, acts as a natural dough conditioner. It strengthens the gluten and helps preserve the bread. A teaspoon of salt balances the sweetness, and three tablespoons of butter provide moisture, flavor, and richness that makes each bite melt in your mouth.
Print
Sweet Milk Bread Recipe
- Total Time: 2 hours 10 minutes
- Yield: 4 loaves
Description
Soft, fluffy, and lightly sweet, this homemade Sweet Milk Bread is perfect for breakfast, brunch, or a snack. Made with pantry staples, it’s an easy bread recipe you’ll bake again and again.
Ingredients
6 to 6.5 cups bread flour
1 cup sugar
½ teaspoon vitamin C powder or vinegar
1 teaspoon salt
3 tablespoons butter (melted)
2 tablespoons active dry yeast
1 cup warm water
1 cup warm milk
2 large eggs
Instructions
1. Dissolve the yeast and 2 teaspoons sugar in warm water. Let it sit for 5 minutes until frothy.
2. In a large bowl, combine bread flour, remaining sugar, and salt. Mix well.
3. Make a well in the center. Add yeast mixture, eggs, milk, melted butter, and vinegar.
4. Mix until a sticky dough forms.
5. Knead on a floured surface for 10 minutes until dough is smooth and elastic.
6. Place in a greased bowl, cover, and let rise in a warm place for 1 hour or until doubled in size.
7. Punch down the dough gently. Divide into four equal parts.
8. Shape each piece into a loaf or roll into rectangles and then into loaves.
9. Place in greased loaf pans. Cover and let rise for 30 minutes.
10. Bake at 350°F (180°C) for 20 to 25 minutes, or until golden and a toothpick comes out clean.
11. Cool for a few minutes, then remove from pans and place on a wire rack.
12. Brush with melted butter while warm for a soft and shiny crust.
Notes
You can replace vitamin C powder with apple cider vinegar.
Adding butter helps improve flavor, texture, and moisture.
For an extra soft crust, create steam in the oven while baking.
This recipe yields four standard-sized loaves.
- Prep Time: 20 minutes
- Cook Time: 20 minutes
- Category: Bread
- Method: Baking
- Cuisine: Global
Step-by-Step Instructions for Making Sweet Milk Bread
Preparing the Yeast Mixture for an Ideal Rise
Start with proofing the yeast. In a small bowl, dissolve two tablespoons of yeast and two teaspoons of sugar in one cup of warm water. The water should be warm to the touch but not hot, around 105°F to 110°F. Stir gently and let it sit undisturbed for about five minutes. When the yeast becomes frothy and bubbly, it’s ready to use. If it doesn’t foam, the yeast may be inactive, and you’ll need to start over with fresh yeast.
Mixing the Dough Without a Stand Mixer
In a large mixing bowl, combine the bread flour, sugar, and salt. Mix them thoroughly. Create a well in the center of the flour mixture and pour in the proofed yeast, eggs, warm milk, melted butter, and your acidifier—either vitamin C powder or apple cider vinegar. Mix the ingredients with your hands until a shaggy, sticky dough forms.
Transfer the dough onto a floured surface. Begin kneading, adding flour little by little to prevent sticking. Knead for about 10 minutes. The dough should gradually become smooth, stretchy, and slightly tacky but not overly sticky. Once it’s elastic, transfer it back into the bowl, lightly coat it with oil, cover it with a damp cloth, and let it rise in a warm place for one hour or until doubled in size.
Mixing Dough Using a Stand Mixer
For a quicker and less messy process, the stand mixer method is equally effective. Start by adding the proofed yeast, flour, sugar, eggs, milk, salt, and vitamin C powder (or vinegar) into the mixer bowl. Using the dough hook attachment, mix on medium speed for about 4 to 5 minutes. The dough should begin to pull away from the sides.
At this point, add the softened butter and continue mixing for another 2 to 3 minutes until the dough becomes elastic and smooth. Once the dough is ready, follow the same rising step by placing it in a lightly greased bowl, covering it, and letting it rise until doubled in size.
First Rise and Dough Shaping
After the first rise, gently punch down the dough to release any trapped air. Turn it out onto a lightly floured surface and divide it into four equal parts. Each part will become a loaf. You can shape each one by flattening it into a rectangle, then rolling it tightly from the shorter end, similar to how you roll a mat. This creates a nice even shape and helps with the final texture.
Preparing Loaf Pans and Second Proofing
Grease four loaf pans with a light coating of oil and dust them with flour or use a non-stick spray. Place each shaped loaf inside the pans. Cover with a cloth and let them rise for another 30 minutes. This second proofing is essential for lightness and fluffiness.
Baking to Golden Perfection
Preheat your oven to 350°F during the second rise. For an extra rise and crust softness, you can place a shallow tray of water at the bottom of the oven to create steam. Once the loaves have risen, bake them for 20 to 25 minutes. The tops should be a light golden brown, and a toothpick inserted into the center should come out clean.
Let the loaves cool in the pans for a few minutes, then transfer them to a wire rack to finish cooling. For a shiny, tender crust, brush the tops with a bit of melted butter right after baking.
Troubleshooting and Expert Tips for Perfect Sweet Milk Bread
Why Didn’t My Dough Rise Properly?
If your sweet milk bread dough doesn’t rise as expected, don’t panic. One of the most common causes is inactive yeast. Always check the expiration date on your yeast and ensure it foams during proofing. Also, the temperature of the water matters. Too hot, and it kills the yeast; too cold, and it won’t activate. Room temperature or slightly warm environments help dough rise effectively, so place your covered dough in a draft-free area like inside your oven with the light on.
Another possible reason is adding salt directly on top of yeast. Salt can inhibit yeast activity if not properly mixed into the flour first. So make sure your salt is well combined with the dry ingredients before adding wet elements.
Dough Too Sticky or Too Dry?
Sweet milk bread dough is supposed to be soft and slightly sticky, but not so much that you can’t work with it. If it’s too wet, sprinkle in small amounts of bread flour while kneading. If the dough feels dry or tears easily, it may need more liquid or fat. Always aim for a smooth, elastic dough that stretches slightly without breaking apart.
Humidity and flour brand can also affect texture. Some flours absorb more moisture than others. Adjusting with small amounts of water or flour can help create a perfect balance.
Tips for a Soft, Fluffy Texture Every Time
- Steam the Oven: Placing a shallow pan of water in the oven during baking adds steam, helping the bread rise well and form a soft crust. This also delays the formation of a hard crust, allowing more oven spring.
- Don’t Skip the Second Proof: That extra 30 minutes of rising in the loaf pans is crucial. It allows the dough to expand again and produces an airy texture.
- Avoid Overmixing or Underkneading: Too much kneading breaks down the dough’s structure, while too little won’t develop the gluten properly. Knead until the dough becomes smooth and elastic.
- Butter the Top After Baking: Brushing melted butter on the warm loaves not only gives them a glossy finish but also softens the crust, making the bread more tender.
- Use Room Temperature Ingredients: Cold eggs or milk can slow down the yeast’s action. Allow them to come to room temperature before adding them to the mixture.
Common Baking Errors and How to Avoid Them
- Dense or Gummy Bread: This usually happens when the dough hasn’t risen enough or the oven temperature is too low. Make sure your dough doubles in size during both rise periods, and preheat the oven fully before baking.
- Uneven Loaves: To keep the loaf shapes even, ensure each portion is measured and shaped similarly. Using a scale can help divide dough evenly.
- Cracked Crusts: If the top of your loaf cracks while baking, it’s likely due to under-proofing or dry dough. A good second rise and covering the dough during proofing can solve this issue.
Customizing Your Sweet Milk Bread with Flavors and Add-ins
Enhancing the Flavor with Simple Ingredients
One of the best things about sweet milk bread is how easily it adapts to new flavors while keeping its fluffy, light base. If you want a more aromatic loaf, try adding a teaspoon of vanilla extract or a pinch of cinnamon to the dough. These warm, subtle notes pair beautifully with the slight sweetness of the bread without overpowering the original flavor.
For a citrus twist, add some finely grated lemon or orange zest. This works especially well if you’re serving the bread for brunch or with tea. The bright notes from the zest add freshness and a mild tang, creating a perfect balance against the creamy richness of milk and eggs.
Add-ins for Texture and Variety
To introduce texture and make the bread more interesting, you can fold in small quantities of raisins, chopped nuts, or dried cranberries after the first rise. Don’t add them during the initial kneading phase or you risk overworking the dough and crushing your add-ins.
Here’s a quick guide to adding extras:
| Add-in | Quantity per loaf | Notes |
|---|---|---|
| Raisins | ¼ cup | Soak in warm water for 5 minutes first. |
| Chopped walnuts | ¼ cup | Lightly toast for better flavor. |
| Dried cranberries | ¼ cup | Unsweetened is best for balance. |
| Grated coconut | 2 tbsp | Adds tropical sweetness and moisture. |
These add-ins work best when you knead them in gently just before shaping the dough into loaves. Be sure they’re evenly distributed, so every slice has the same delightful bite.
Creating Beautiful Swirls or Layers
If you’d like to add a swirl of flavor inside the bread, try this method before rolling the dough into a loaf shape. Roll out each piece into a rectangle, spread a thin layer of softened butter, and dust it with cinnamon-sugar or cocoa powder. Then, roll the dough tightly into a loaf. This method creates pretty layers and adds a surprise flavor burst with each bite.
For visual variety, you can also braid your dough instead of rolling it. Divide each dough portion into three strands, braid them like you would hair, then place the braid into the loaf pan. Braided loaves not only look elegant but also bake with a slightly crispier crust.
Tips for Balanced Flavor Combinations
- If adding sweet ingredients like chocolate chips or raisins, consider reducing the sugar slightly in the base recipe to keep the sweetness balanced.
- When using moisture-heavy ingredients like fresh fruit, pat them dry first to prevent the dough from becoming soggy.
- For layered loaves with fillings, roll the dough tightly to avoid large air pockets inside the baked bread.
Storing, Freezing, and Reheating Sweet Milk Bread
How to Keep Sweet Milk Bread Fresh
Sweet milk bread tastes best fresh out of the oven, but if stored correctly, it can stay soft for several days. To keep it fresh at room temperature, allow the loaves to cool completely on a wire rack before storing. Once cooled, wrap each loaf tightly in plastic wrap or place it in an airtight bread container.
Avoid storing bread in the refrigerator, as it tends to dry it out quickly. Instead, keep your wrapped loaf at room temperature in a cool, dry area, away from direct sunlight or heat. Properly stored, sweet milk bread will maintain its softness for up to 4 days.
If you notice the crust beginning to harden slightly after a day or two, a quick warm-up in the microwave or oven can bring back its tender texture.
Freezing for Longer Shelf Life
To enjoy your sweet milk bread over time, freezing is an excellent option. Follow these steps:
- Let the bread cool completely.
- Wrap it tightly in plastic wrap or aluminum foil.
- Place the wrapped loaf in a heavy-duty freezer bag, removing as much air as possible.
Label the bag with the date. Sweet milk bread can be frozen for up to 3 months without losing flavor or texture.
For individual portions, slice the bread before freezing. This allows you to take out only what you need without defrosting the entire loaf. Simply place slices between layers of wax paper before freezing so they don’t stick together.
How to Reheat Without Drying It Out
When you’re ready to enjoy your frozen bread, there are two effective reheating methods:
For Whole Loaves: Remove from the freezer, unwrap, and let the bread thaw at room temperature for 1 to 2 hours. Then warm it in a 300°F oven for about 8–10 minutes to restore softness.
For Slices: Pop individual slices into the microwave for 10–15 seconds or into a toaster. To prevent the microwave from drying the bread out, wrap the slice in a damp paper towel.
How to Tell If the Bread Has Gone Bad
Bread that has gone stale will become tough or dry. If you spot any mold, even a small amount, discard the entire loaf immediately. Mold can spread invisibly inside the bread even if you don’t see it on the surface.
Keeping your bread in clean storage containers and handling it with clean, dry hands will help extend its freshness.
Serving Suggestions and Perfect Pairings for Sweet Milk Bread
The Best Ways to Serve Sweet Milk Bread
Sweet milk bread is versatile, making it suitable for nearly any meal. Thanks to its soft, tender crumb and slightly sweet flavor, it pairs well with both simple spreads and more elaborate toppings.
For breakfast, slice and toast the bread, then serve with butter, honey, or fruit preserves. The warm, rich flavor of the bread complements naturally sweet or tangy spreads. Add a sprinkle of cinnamon for a comforting morning treat.
At brunch, sweet milk bread works beautifully in French toast. Dip thick slices in a mixture of eggs and milk, cook on a skillet until golden brown, and serve with fresh fruit or a drizzle of maple syrup. The bread’s structure holds up well to soaking without becoming soggy.
As a snack or light dessert, try lightly toasting a slice and topping it with ricotta cheese and a drizzle of honey. The contrast of creamy and sweet textures creates an irresistible bite.
Savory Pairings That Work
Although the bread leans sweet, it also complements mild savory flavors. Serve it alongside scrambled or poached eggs for a balanced breakfast plate. Pair it with mild cheeses like mozzarella or cream cheese to add creaminess without overpowering the flavor of the bread.
Sweet milk bread can even be turned into small sandwiches. Its pillowy texture is ideal for delicate fillings like egg salad, cucumber and cream cheese, or roasted chicken breast. Just avoid overly moist or acidic fillings to prevent the bread from breaking down.
Creative Ways to Use Leftover Bread
If you have extra slices that are a day or two old, don’t let them go to waste. Here are a few delicious ways to transform them:
- Bread Pudding: Cube the bread, mix with eggs, milk, sugar, and vanilla, then bake until golden.
- Croutons: Cut into cubes, toss with oil and herbs, then bake for a crunchy salad topping.
- Breadcrumbs: Dry out the bread completely and blend into fine crumbs for use in cooking.
- Mini Sandwich Bites: Cut slices into small squares, toast, and top with spreads for finger food.
Best Times to Serve Sweet Milk Bread
This bread is perfect for:
- Morning breakfasts with coffee or tea
- Brunch spreads with sweet and savory dishes
- Afternoon snacks or light desserts
- Picnics or lunchboxes as sandwich bread
- Holiday gatherings as part of a bread basket
No matter how you serve it, sweet milk bread is a crowd-pleaser that adds warmth and comfort to any meal.
Conclusion
Sweet milk bread is more than just a loaf — it’s a comforting, versatile staple that brings warmth and satisfaction to any table. With its soft, fluffy crumb and lightly sweet flavor, it’s ideal for breakfast, brunch, snacks, or even as the base for sandwiches and desserts.
This recipe uses simple, pantry-friendly ingredients, making it easy to prepare at home whether you’re using a stand mixer or mixing by hand. By following proper kneading, proofing, and baking techniques, anyone can create bakery-quality bread in their own kitchen.
With the ability to customize with flavors, store for days, and pair with both sweet and savory dishes, sweet milk bread easily becomes a go-to favorite for families, gatherings, and everyday meals. Bake it once, and you’ll find yourself returning to this recipe again and again.


