There’s something truly magical about the aroma of freshly baked bread wafting through your kitchen. Rustic Italian crusty bread is one of those timeless comfort foods that not only fills your home with warmth but also connects you to a rich tradition of Italian baking. Simple, wholesome, and naturally satisfying, this bread has stood the test of time for its crisp golden crust and soft, chewy interior.
In this article, we’ll explore everything from what makes rustic Italian crusty bread so unique to the exact steps and secrets behind achieving that perfect rise and crunch at home. Whether you’re a first-time baker or looking to elevate your bread-making skills, you’ll find practical techniques and a deeper appreciation for this beloved staple. We’ll also delve into the importance of ingredients, how to handle dough properly, the role of steam, and how to troubleshoot common issues. Let’s start with the basics—understanding what makes this bread so special.
What Makes Rustic Italian Crusty Bread Unique
A Glimpse into Italian Bread Traditions
Italian bread is more than just a meal component, it’s a cultural symbol. Rustic crusty bread, or pane rustico, is a traditional Italian loaf that’s meant to be shared at the table. It has roots in countryside kitchens where humble ingredients created the foundation for nourishing, slow-prepared meals. This bread is valued not just for its flavor, but for its simplicity. No fancy tools or hard-to-find ingredients—just flour, salt, yeast, and water.
What sets it apart from other loaves is its thin, crispy crust and open, airy crumb. The goal is a loaf that sings when you tap the crust, with a soft interior that’s perfect for dipping into olive oil or pairing with hearty dishes. But unlike sourdoughs that require long fermentation, this version can be prepared and baked within just a few hours.
Key Characteristics of a Rustic Italian Crusty Bread
To bake a truly authentic rustic Italian loaf, there are a few non-negotiables. First, the crust must have a deep, golden hue and crunch that holds up to slicing without crumbling. This is achieved through high heat and the presence of steam in the oven during baking. Inside, the bread should be moist and elastic, with irregular holes that speak to proper fermentation and minimal handling.
Let’s break down the main qualities:
- Crisp crust: Thanks to the moisture from the oven steam and high baking temperatures, this bread has a satisfying snap when sliced.
- Light, open crumb: Unlike dense sandwich loaves, rustic bread should have an irregular and airy structure inside.
- Simple ingredients: Just flour, salt, yeast, and water—no sugar, oils, or dairy are necessary.
- Naturally leavened feel: Although we use instant yeast for convenience, the result mimics the depth of flavor you get from longer fermented doughs.
Why It’s Perfect for Every Home Baker
The beauty of this recipe lies in its approachability. With only four ingredients and a few hours of time, even novice bakers can produce a loaf that looks and tastes like it came from a professional bakery. There’s no need for a bread machine or fancy mixer, although using one can help make things easier. Whether you use a stand mixer or mix by hand, the outcome is consistently delicious.
Plus, this bread fits well into various dietary lifestyles. It’s plant-based, clean, and completely free from additives or preservatives. And the method leaves room for small mistakes-it’s forgiving and adaptable.
Now that we’ve covered why this bread holds such a special place in Italian kitchens, let’s look at the ingredients and what role each one plays in creating this crusty masterpiece.
Print
Rustic Italian Crusty Bread
- Total Time: 45 minutes
- Yield: 1 loaf (8 servings)
- Diet: Vegan
Description
Rustic Italian crusty bread with a crisp, golden crust and soft, airy interior made using only 4 ingredients—simple, authentic, and baked to perfection.
Ingredients
3.25 cups all-purpose flour
1 tsp sea salt
1.5 cups warm water
2 tsp instant yeast (or active dry yeast)
Instructions
1. In a large bowl, combine flour, yeast, and salt. Mix well.
2. Add warm water and stir until a sticky dough forms.
3. Cover with plastic wrap and a towel. Let rise at room temperature for 2 to 3 hours.
4. Lightly flour your counter and turn the dough out. With floured hands, fold it into a ball.
5. Carve an X or slits into the top of the dough.
6. Place the dough on parchment or a floured pizza peel. Let it rest while preheating the oven.
7. Preheat oven to 450°F with a pizza stone inside. Add a bowl with 2 inches of water to the bottom rack.
8. Slide the dough onto the hot stone. Bake 30 to 45 minutes until golden and cooked through.
9. Transfer to a wire rack and let cool completely before slicing.
Notes
Do not knead the dough after rising.
Use semolina or cornmeal to prevent sticking on the pizza stone.
For a crispier crust, allow bread to cool inside the oven with the door slightly open.
- Prep Time: 5 minutes
- Cook Time: 40 minutes
- Category: Bread
- Method: Baking
- Cuisine: Italian
Understanding the Role of Ingredients in Rustic Italian Crusty Bread
All-Purpose Flour – The Foundation of Structure
The main component of rustic Italian crusty bread is all-purpose flour. This humble ingredient plays a crucial role in shaping the texture, rise, and bite of the final loaf. Though bread flour has a higher protein content, all-purpose flour creates a softer and more tender crumb while still allowing for a strong gluten network to form. It’s accessible, affordable, and perfect for achieving that balance between chew and softness.
When mixed with water and kneaded—or in this case, gently folded—the proteins in the flour form gluten strands. These strands trap air bubbles produced by the yeast, giving the bread its lift and open structure. Always sift your flour if needed to ensure there are no lumps, and keep a bit extra on hand for dusting during the shaping process.
Sea Salt – More Than Just Flavor
Salt doesn’t just season the dough—it controls yeast activity and strengthens the gluten structure. Sea salt, in particular, adds a touch of minerality that enhances the flavor without overwhelming the palate. It’s essential to add salt at the right time when mixing your dry ingredients, so it evenly disperses throughout the flour.
Too much salt can slow down fermentation, while too little can lead to bland bread. The 1 teaspoon used in this recipe is just enough to bring out the natural flavor of the wheat and balance the subtle yeastiness in the loaf.
Warm Water – The Activator
Water is the lifeline of any bread recipe. In rustic Italian crusty bread, warm water activates the yeast and hydrates the flour, initiating gluten development. The water temperature should be around 100°F to 110°F—warm to the touch, but not hot. If it’s too cool, the yeast will work slowly. Too hot, and you risk killing the yeast.
The hydration level of this dough is quite high, meaning it’s a wetter dough. This higher hydration helps create that sought-after open crumb and chewy bite. Don’t worry if the dough feels sticky—that’s exactly what you want.
Instant Yeast – Quick and Reliable Leavening
Yeast is the magic behind the rise. This recipe uses instant yeast, which doesn’t require proofing in water beforehand. It blends straight into the dry ingredients and gets to work as soon as water is added. Instant yeast works faster and more predictably than active dry yeast, making it ideal for same-day baking.
Two teaspoons might seem like a lot, but because the fermentation time is relatively short, we need that boost to get a proper rise in just a few hours. The yeast feeds on the flour’s natural sugars and releases carbon dioxide, which expands the dough and gives the bread its height and lightness.
Optional Additions You Don’t Need
One of the greatest strengths of rustic Italian crusty bread is that it doesn’t rely on any extra enrichments. You won’t find oils, dairy, or sweeteners in a traditional version. These additions may soften the crust or change the flavor, but they’re not necessary here. The focus is on simplicity, purity, and technique.
This basic recipe offers the perfect blank canvas for natural flavors to shine. By using only four essential ingredients, you’re letting quality and tradition speak for themselves.
Mastering the Dough Mixing and First Rise
Mixing the Dough – Getting It Just Right
Creating a perfect rustic Italian crusty bread dough starts with proper mixing. This step is often underestimated, but it sets the foundation for everything that follows. Whether you’re using a stand mixer or mixing by hand, the goal is to combine the ingredients until a shaggy, sticky dough forms.
In a large mixing bowl, add the 3.25 cups of all-purpose flour, 2 teaspoons of instant yeast, and 1 teaspoon of sea salt. Stir these dry ingredients together to ensure even distribution—this prevents the yeast or salt from clumping in one area.
Next, pour in 1.5 cups of warm water. Use a spatula or the paddle attachment of your mixer to blend the mixture. You’re not kneading at this stage, just combining. The dough should pull together loosely and feel sticky to the touch. If you’re tempted to add more flour, resist. This dough is meant to be slightly wet. That extra moisture is key to developing the bread’s open crumb and chewy texture.
Why Stickiness Is a Good Thing
It’s normal for new bakers to be concerned when the dough sticks to everything—hands, spatula, bowl—but this is a sign of high hydration, not a mistake. Sticky dough traps more air, leading to a lighter loaf. If it’s sticking excessively, lightly dust your hands with flour, but avoid over-handling or over-dusting the dough, which can make it dry and dense.
The beauty of this rustic recipe is its no-knead nature. Unlike traditional loaves that require long kneading for gluten development, this dough does its work through a long rest, or “autolyse,” which naturally builds strength and structure.
The First Rise – Letting the Dough Work Its Magic
Once the dough is mixed, cover the bowl loosely with plastic wrap and a clean tea towel. Place it somewhere draft-free at room temperature, and let it rise undisturbed for 2 to 3 hours. During this time, the yeast activates and begins fermenting the dough, producing gas bubbles that will cause the dough to double in size.
Don’t rush this step. Time and temperature are crucial. A slow, room-temperature rise helps enhance the flavor and develop that beautiful open crumb. The dough should be noticeably puffed and jiggly when ready. If your kitchen is cool, it might take closer to 3 hours. Warmer spaces will speed it up.
How to Know It’s Ready
You’ll know your dough has risen enough when it’s doubled in volume and looks airy and soft. If you gently press a floured finger into the surface, it should spring back slowly. If it snaps back quickly, it needs more time. If it collapses, it’s over-proofed. With practice, you’ll learn to recognize the signs of a perfectly proofed dough.
Avoid moving the dough too much at this stage. You want to preserve the gas bubbles and delicate structure that have developed. The less you touch, the better.
In the next part, we’ll walk through the shaping process and how to prepare your dough for its final transformation in the oven.
Shaping the Dough and Preparing for the Bake
Handling the Dough – Be Gentle
After the first rise, your dough should be soft, airy, and doubled in size. This is the moment when the transformation begins. You’ll want to handle the dough with care to avoid deflating those precious air pockets that give rustic Italian crusty bread its signature texture.
Begin by lightly flouring your countertop. Use your hands to gently coax the dough out of the bowl—it will be sticky, and that’s perfectly fine. Sprinkle a little flour on your hands if needed, but avoid adding too much to the dough itself. The key is to keep things light and minimal.
Folding Instead of Kneading
Resist the urge to knead the dough at this point. Instead, you’ll fold the dough onto itself. Pull one edge of the dough toward the center, then repeat with the other sides until you’ve shaped a round, smooth ball. This gentle folding builds strength without pushing out all the gas inside. It’s a technique that’s both simple and incredibly effective for rustic bread.
Place the dough seam-side down on a lightly floured surface. Let it rest while the oven preheats, giving it a second chance to rise slightly and relax before baking.
Scoring the Top – For Looks and Function
Scoring the bread is more than just decoration. Making a few shallow cuts on top of the dough with a sharp knife or lame allows steam to escape during baking and controls how the bread expands. Without it, the bread might burst unpredictably in the oven.
You can go with a classic “X” shape or make a few parallel cuts across the top. Either way, keep it simple and shallow—just enough to guide the expansion without collapsing the loaf.
Resting While the Oven Preheats
Now comes a critical step in creating that crusty exterior. While the dough rests, preheat your oven to 450°F. This should take about 45 minutes, and during that time you’ll want to heat your pizza stone or baking steel on the middle rack. If you don’t have one, a heavy baking sheet turned upside-down will work in a pinch.
Meanwhile, prepare an oven-safe bowl with 2 inches of water and place it on the bottom rack of your oven. This creates steam, which is essential for forming a crisp, golden crust. Without moisture, the outer layer would bake too quickly and harden before the inside is fully cooked.
While your oven heats, let the dough continue to relax and rise slightly. This brief rest is sometimes called “bench proofing,” and it helps ensure a better oven spring—the term for the initial rise during baking.
Transferring the Dough to Bake
When the oven is fully preheated, it’s time to bake. Carefully sprinkle the hot pizza stone with semolina flour or cornmeal to prevent sticking. Then, using a pizza peel, parchment paper, or even a stiff piece of cardboard, slide your loaf onto the hot surface.
You’ll hear a satisfying sizzle as the bottom makes contact with the hot stone. Quickly close the oven door to trap the steam and heat inside. From here, your dough will transform into a rustic masterpiece over the next 30 to 45 minutes.
Baking Techniques and How to Get That Perfect Crust
The Importance of Steam in Crust Formation
Creating a crusty loaf isn’t just about high heat—it’s also about moisture at the right moment. The steam in your oven plays a critical role in this. By placing a bowl of water on the bottom rack, you’re adding humidity that delays the crust from forming too early. This gives the bread time to rise fully before the outer layer hardens.
As the dough bakes, the outer starches gelatinize in the presence of moisture, then dry out and crisp up beautifully as the water evaporates. This results in a crust that’s crisp and deeply golden, with that satisfying crackle when you tap it.
Time and Temperature – The Baking Balance
Rustic Italian crusty bread requires a high baking temperature of 450°F to develop the proper texture. Bake your loaf directly on a preheated pizza stone or steel for 30 to 45 minutes. This wide window allows for flexibility depending on your oven and the size of your dough.
Keep an eye on the color. You want a deep golden-brown crust, but not burnt. If you’re unsure, you can use a thermometer to check the internal temperature. The bread is fully baked when it reaches 200°F to 210°F at the center.
For a more artisan finish, leave the oven door slightly open in the last few minutes to help dry out the crust even further. Alternatively, once baking is complete, you can turn the oven off, crack the door, and let the bread cool slowly inside.
How to Know When It’s Ready
Several signs indicate your bread is fully baked and ready to come out of the oven:
- Color: The crust should be a rich, even brown.
- Sound: Tap the bottom of the loaf—it should sound hollow.
- Feel: The loaf should feel firm and light for its size.
Avoid cutting the bread right away. As tempting as it is, the cooling stage is just as crucial as baking. Letting the loaf rest allows moisture to redistribute, so you don’t end up with a gummy crumb.
Cooling for Best Results
Once out of the oven, transfer your loaf to a cooling rack. This allows air to circulate around the bread, keeping the bottom from getting soggy. Let it cool for at least 1 hour before slicing.
If you prefer a crunchier crust, you can leave the bread to cool inside the oven with the door ajar. The residual heat will continue to firm up the crust while avoiding excess moisture from lingering inside.
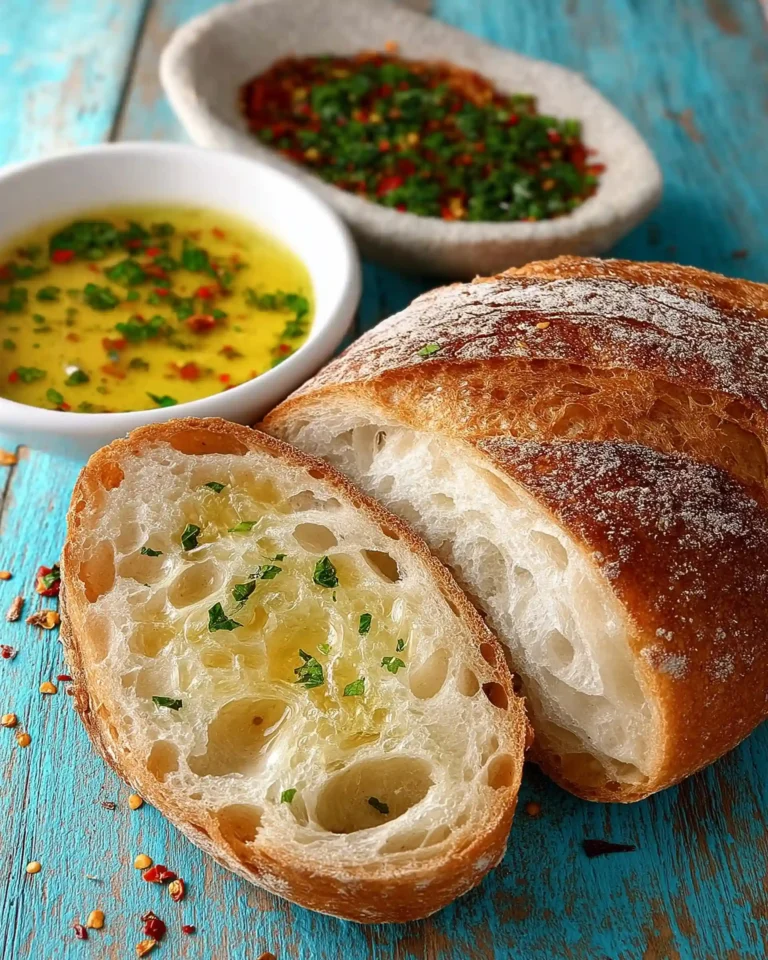
Patience pays off here. A well-cooled loaf is easier to slice and holds its texture better. Once it’s fully cooled, you’ll get clean cuts, perfect for sandwiches, toasts, or enjoying on its own with a drizzle of olive oil.
Storing, Serving, and Troubleshooting Your Rustic Italian Crusty Bread
Storing Your Bread – Keeping It Fresh and Crusty
You’ve just baked the perfect loaf—crisp on the outside, tender inside—and now you want to enjoy it over several days without losing that quality. The good news is, rustic Italian crusty bread stores surprisingly well if handled properly.
To maintain the crisp crust, never store the bread in plastic. Instead, keep it in a paper bag, bread box, or loosely wrapped in a clean kitchen towel. This allows the bread to breathe and prevents the crust from becoming soggy. You can store it at room temperature for up to 2 to 3 days this way.
After the second day, if you still have leftovers, consider freezing them. To freeze, slice the bread first, then wrap the slices tightly in parchment paper and store them in a freezer-safe bag. When you’re ready to eat, simply toast the slices directly from frozen or warm them in a low oven.
Avoid refrigerating your bread. The cold temperature accelerates the staling process and dries out the crumb, even if the crust appears intact.
Best Ways to Serve Rustic Italian Bread
Rustic Italian crusty bread is incredibly versatile. Its hearty texture and deep flavor make it suitable for just about any meal. Here are some serving ideas:
- Toasted with olive oil and garlic for a simple and satisfying starter
- Alongside soups or stews, where it holds up well to dipping without falling apart
- As a base for bruschetta, topped with tomatoes, herbs, or roasted vegetables
- Grilled as crostini for a crunchy snack with dips or spreads
- Used for hearty sandwiches—its structure is sturdy enough for thick fillings
This bread doesn’t need much to shine. Often, a piece served plain is enough to appreciate its texture and aroma. Serve it warm for extra comfort or room temperature to highlight its naturally chewy crumb.
Common Problems and How to Fix Them
Problem: Dough is too sticky to handle.
Solution: Sticky dough is normal for rustic bread. Lightly flour your hands and work surface, but avoid adding excess flour to the dough itself. Use a dough scraper if needed.
Problem: Bread didn’t rise much during baking.
Solution: This could mean the dough didn’t proof long enough or the oven wasn’t fully preheated. Be sure to give the dough 2–3 hours to rise, and let your pizza stone heat for at least 45 minutes before baking.
Problem: Crust is too hard.
Solution: A hard crust can result from overbaking or lack of moisture in the oven. Always add a bowl of water for steam, and don’t bake beyond 45 minutes unless needed. Let the loaf rest before slicing to soften the crust slightly.
Problem: Crumb is dense and tight.
Solution: Dense crumb usually means overhandling or under-proofing. Next time, be gentler during shaping and ensure your dough has doubled in size before baking.
Problem: Bottom crust is burnt.
Solution: This could happen if the pizza stone is too close to the heat source. Try moving your stone up one rack level or using parchment paper to buffer direct heat.
By identifying these issues early, you can make small adjustments that lead to huge improvements. Bread baking is part science, part art—but with every loaf, you’ll gain more confidence and skill.
Conclusion
Rustic Italian crusty bread is a celebration of simplicity, tradition, and comfort. With just four basic ingredients—flour, water, yeast, and salt—you can create a loaf that rivals artisan bakery bread. Its thin, crackly crust and soft, chewy crumb are a testament to the power of time, technique, and high heat, not complexity or additives.
This bread requires patience, not perfection. Its naturally sticky dough and hands-off method may seem intimidating at first, but every fold and rise is part of the process that builds flavor and structure. Whether you’re baking for a weeknight dinner or preparing something special for family, rustic Italian crusty bread delivers a satisfying and soulful result every time.
From mixing and proofing to scoring and baking with steam, each step contributes to that iconic look and feel that makes this loaf so beloved. And once baked, it becomes the heart of the table—ideal for dipping, serving alongside hearty meals, or enjoying fresh out of the oven.
Now that you’ve learned the process in depth, you’re ready to make this classic a part of your home kitchen. With practice, you’ll discover just how rewarding it is to turn a few simple ingredients into something extraordinary. Keep baking, keep learning, and enjoy every slice.


