Introduction
There’s something incredibly satisfying about pulling a hot, golden loaf of homemade bread out of the oven. If you’ve ever been intimidated by the idea of baking bread from scratch, you’re not alone. But with this Dutch oven no knead bread recipe, there’s no need for fancy techniques, kneading, or special tools beyond a Dutch oven and a few basic kitchen staples. This easy and foolproof method has earned its place in countless kitchens, and it’s perfect for both beginners and seasoned bakers alike.
In this article, we’ll walk you through the exact step-by-step method to make a beautifully crusty, flavorful loaf using minimal ingredients and effort. We’ll cover the science behind the process, troubleshooting common issues, and provide helpful tips to take your bread from good to bakery-quality great. From prepping the dough to understanding the importance of rise times and oven temperature, everything you need to succeed with this bread is right here.
Understanding the Basics of Dutch Oven No Knead Bread
What Is No Knead Bread and Why Does It Work?
No knead bread is exactly what it sounds like – bread that doesn’t require the labor-intensive kneading process. Instead of developing gluten through physical kneading, it relies on a long fermentation time to achieve a chewy texture and airy interior. The yeast works slowly to break down the flour, forming a delicate gluten structure naturally. This creates a moist, flavorful crumb and that signature crunchy crust that rivals artisan bakery loaves.
The no knead technique revolutionized home baking because it allows anyone, regardless of experience, to bake high-quality bread with almost no effort. All you need is patience during the resting time.
Why Use a Dutch Oven for Bread Baking?
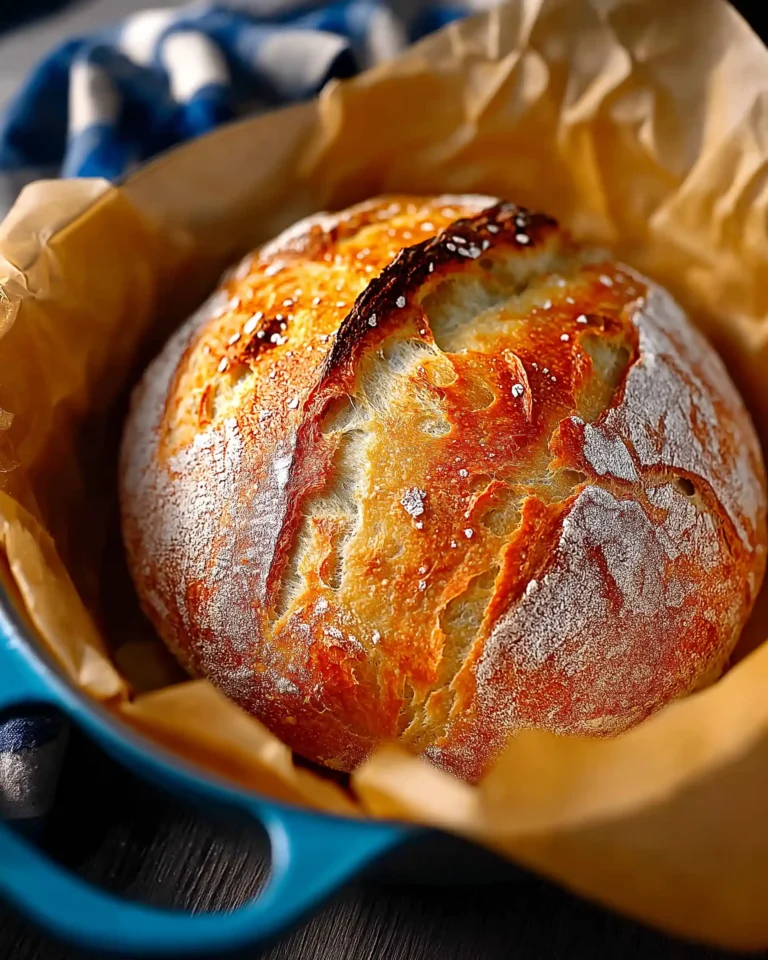
A Dutch oven plays a crucial role in achieving the ideal crust and texture. The thick, heavy walls of the pot retain heat extremely well and create a mini steam oven that traps moisture during baking. This steam helps the crust develop a deep, golden color while keeping the inside soft and airy.
When the lid is removed during the final stage of baking, the outer crust crisps up to perfection. The result is a rustic, bakery-style loaf with no professional equipment required.
Key Ingredients You’ll Need
Let’s break down what goes into this Dutch oven no knead bread recipe and why each element matters:
- Warm Water (1 1/2 cups, about 100°F): Activates the yeast and hydrates the flour. The temperature is important — too hot and it kills the yeast, too cold and it won’t activate.
- Active Dry or Instant Yeast (2.25 tsp): Responsible for fermentation, rise, and flavor.
- Fine Grain Salt (1.5 tsp): Balances flavor and strengthens gluten structure.
- All-Purpose or Bread Flour (3 1/4 cups): Provides the protein and starches that form the dough structure. Bread flour has more protein for stronger gluten, but AP flour also works beautifully.
Essential Equipment Overview
- Dutch Oven (5.5 qt or 6 qt): Keeps the baking environment hot and steamy.
- Silicone Spatula: Helpful for stirring the sticky dough and shaping it before baking.
- Parchment Paper: Prevents sticking and makes transferring the dough into the Dutch oven much easier.
- Thermometer (Optional): Ensures water is the right temperature to activate yeast effectively.
Dutch Oven No Knead Bread Recipe
- Total Time: 2 hours 45 minutes
- Yield: 8 servings
Description
Crusty on the outside, soft on the inside – this Dutch oven no knead bread is an easy, foolproof recipe that’s perfect for beginners.
Ingredients
1 1/2 cups warm water (about 100°F)
1 packet (2.25 tsp) active dry or instant yeast
1 ½ teaspoons fine grain salt (or up to 2 tsp if desired)
3 1/4 cups all-purpose flour or bread flour (plus more for dusting)
Instructions
1. In a large bowl, whisk together warm water, yeast, and salt until mostly dissolved.
2. Add flour all at once and mix until a sticky dough forms.
3. Cover bowl with towel and let rise 2–3 hours in a warm place until doubled in size.
4. Dust parchment paper with flour and gently scrape dough onto it.
5. Fold edges of dough inwards, then flip loaf seam-side down.
6. Optional: Score the top with a sharp knife or blade.
7. Preheat Dutch oven at 450°F for 30–45 minutes with lid on.
8. Carefully place dough with parchment into the Dutch oven.
9. Cover and bake for 35 minutes (40 if cold dough).
10. Uncover and bake another 5–10 minutes until golden brown.
11. Remove from pot, let cool 30–60 minutes before slicing.
Notes
Let the bread cool fully before slicing to avoid a gummy texture.
You can refrigerate the dough for up to 7 days to enhance flavor.
Use high-quality parchment paper to prevent sticking.
Avoid using iodized salt for best yeast performance.
- Prep Time: 5 minutes
- Cook Time: 40 minutes
- Category: Bread
- Method: Baking
- Cuisine: American
Step-by-Step Preparation and First Rise
Step 1: Mixing the Dough – It’s Easier Than You Think
Begin by grabbing a large mixing bowl. Pour in 1 1/2 cups of warm water at around 100°F. It’s important to get the water temperature right. Too hot, and you’ll kill the yeast. Too cold, and the yeast won’t activate. If you don’t have a thermometer, aim for water that feels like a warm bath.
Add one packet of yeast (2.25 teaspoons) and 1 ½ teaspoons of fine grain salt. Use a whisk to stir everything together until it’s fully or mostly dissolved. At this point, the mixture should smell yeasty and slightly earthy.
Now, add 3 1/4 cups of all-purpose or bread flour to the liquid. Stir everything together with a wooden spoon or silicone spatula. It will form a very sticky, shaggy dough — that’s exactly what you want. There’s no need to knead, punch, or work it hard. You’re just combining everything until it’s evenly mixed.
If the dough seems too wet, add 1-2 tablespoons of flour at a time until it looks more like a thick, sticky paste. If it feels dry, add a splash of water. The key is to trust the process and aim for a dough that’s sticky and loose but holds together.
Step 2: Letting the Dough Rise – Patience Pays Off
Once the dough is mixed, cover the bowl with a clean kitchen towel or loosely fitted lid. Leave it in a warm spot for 2 to 3 hours. The dough should double in size during this period.
If your kitchen is cool, try preheating your oven for a minute or two, then turning it off and placing the bowl inside. This creates a slightly warm environment that encourages the yeast to do its job. If it’s summer, you can place the bowl outside in the shade for a cozy rise.
During this rise, the yeast feeds on the flour and produces gas. That gas creates the air pockets that give the bread its light, airy texture. You’ll notice bubbles forming on the surface — a great sign of fermentation in action.
Troubleshooting the First Rise
- Dough Not Rising? Your yeast may be expired or the water may have been too hot or cold. Next time, test your yeast by mixing it with warm water and a pinch of sugar. If it foams after 5 minutes, it’s good.
- Dough Too Wet or Dry? This can happen due to the flour type or how it’s measured. If needed, adjust by adding small amounts of flour or water.
Pro Tip: Refrigerate for Better Flavor
If you’re not planning to bake the bread right away, you can place the dough in the fridge after the initial rise. Loosely cover the bowl so gases can escape. The dough can stay refrigerated for up to 7 days, and the flavor gets better the longer it sits, taking on a mild sourdough-like tang.
Optional Dough Storage Table
| Storage Time | Taste Impact | Handling Ease | Rise Time Adjustments |
|---|---|---|---|
| 0 Hours | Mild flavor | Sticky | No change |
| 12–24 Hours | More developed | Less sticky | +5 minutes covered |
| 2–3 Days | Slightly tangy | Easier to shape | +10 minutes covered |
| 5–7 Days | Sourdough tang | Very manageable | +10–15 minutes covered |
Shaping the Loaf and Preheating the Dutch Oven
Step 3: Prepare the Surface and Shape the Dough
After the dough has doubled in size and is full of air bubbles, it’s time to shape it into a loaf. Start by dusting a large piece of parchment paper with flour. This will prevent sticking and make it easy to transfer the dough into the Dutch oven later.
Using a silicone spatula, gently scrape the dough out of the bowl onto the parchment paper. Try not to deflate it too much — those air bubbles are what create the beautiful crumb inside the bread.
To shape the dough, fold the outer edges in toward the center, turning it slightly as you go. This will help build surface tension and give the loaf some structure. Don’t worry about making it perfect. Whether your Dutch oven is round or oval, shape the dough to fit. For a round pot, form a circle. For an oval pot, aim for an elongated shape.
Once shaped, flip the loaf over so the seam side is down and the smooth, floured side is on top. This flipping motion helps center the dough on the parchment and sets the stage for an even rise in the oven.
Step 4: Optional Scoring for Better Rise and Aesthetic
If desired, use a sharp knife or razor blade to score the top of the loaf with a few shallow cuts. A simple cross or a few diagonal lines will allow the bread to expand without cracking unpredictably. These slashes act like expansion joints, directing where the steam escapes and the crust splits.
Step 5: Preheat the Dutch Oven – Hot and Ready
Place your Dutch oven with the lid on into a cold oven, then set the temperature to 450°F. Allow it to preheat for at least 30 to 45 minutes. This ensures that the pot is thoroughly heated and ready to give your loaf the initial blast of heat it needs for a good oven spring.
If your Dutch oven is enameled, check with the manufacturer. While most high-quality brands can be preheated, some suggest skipping this step to avoid enamel damage. If you’re unsure or cautious, skip the preheat and increase the bake time by about 5 to 10 minutes with the lid on.
Dutch Oven Sizes and Alternatives
| Dutch Oven Size | Best Use For |
|---|---|
| 5.5 qt Oval | Longer, oval-shaped loaves |
| 6 qt Round | Standard round artisan loaves |
| 4 qt | Smaller loaves or half batches |
If you don’t have a Dutch oven, you can use a cast iron skillet or a baking sheet, but be sure to add steam to your oven. Place a pan of hot water on the bottom rack as you bake to mimic the Dutch oven’s steam environment.
Step 6: Transfer the Dough to the Dutch Oven
Once your Dutch oven is hot and ready, carefully remove it from the oven and take off the lid. Grab the edges of the parchment paper and gently lower the dough into the hot pot.
Be cautious, as the pot and lid are extremely hot. Use oven mitts or thick kitchen towels to avoid burns. Once the dough is inside, place the lid back on and slide it into the oven. You’re now ready for the bake.
The Bake – Covered and Uncovered Stages for Crust Perfection
Step 7: The Covered Bake – Locking in Steam for Artisan Crust
With your shaped dough safely placed in the hot Dutch oven, it’s time to bake. Start by baking the bread covered for 35 minutes at 450°F. This initial covered phase is where the magic happens. The steam trapped inside the pot keeps the dough moist, allowing it to expand fully and preventing the crust from setting too early.
If your dough was refrigerated before baking, increase this covered baking time to 40 or even 45 minutes. Cold dough takes slightly longer to warm up and rise in the oven, so giving it that extra time ensures it bakes through evenly.
During this stage, your loaf will experience what’s called oven spring — a final burst of rising that happens as the yeast finishes its work and the internal steam pushes outward, creating those airy pockets and open crumb.
Step 8: The Uncovered Bake – Browning and Crisping the Crust
Once the initial bake is complete, carefully remove the Dutch oven lid. At this point, your loaf should look fully risen but pale in color. Now comes the finishing touch.
Continue baking the loaf uncovered for 5 to 10 more minutes, depending on your desired crust color. For a deeper, golden-brown hue with extra crunch, leave it in closer to 10 minutes. Keep a close eye to avoid burning, as ovens vary.
If you notice the bottom getting too dark or tough, try placing a baking sheet on the lower oven rack the next time you bake. It will deflect some of the direct heat and prevent over-browning on the base of the loaf.
What to Watch For: Visual Cues of Doneness
A well-baked loaf should have:
- A deep golden crust
- A hollow sound when tapped on the bottom
- Slightly blistered surface (optional, but adds great texture)
If you’re unsure, you can also insert a thermometer into the center of the loaf. The internal temperature should read around 200–210°F when fully baked.
Step 9: Cooling – Resist the Urge to Slice Too Soon
When your bread looks and smells amazing, it’s tempting to slice into it immediately. But resist the urge. Let the loaf cool on a wire rack or cutting board for at least 30 minutes, ideally up to an hour.
Cutting it too soon can lead to a gummy texture inside because the steam hasn’t finished escaping. A longer cooling time also allows the structure to firm up and gives you clean, even slices.
Cooling Time Tips
| Cooling Time | Texture Outcome |
|---|---|
| 10 minutes | Slightly gummy interior |
| 30 minutes | Better texture |
| 1 hour | Ideal, slice cleanly |
Once cooled, your Dutch oven no knead bread is ready to be sliced, served, and enjoyed. You’ve just baked a rustic loaf that looks as good as it tastes — all with minimal effort and maximum payoff.
Storing and Freezing Your Bread the Right Way
Step 10: Storing Fresh Bread – Keep It Crusty and Soft Inside
Once your beautiful loaf has cooled completely, it’s time to think about storage. Homemade bread doesn’t contain preservatives, so it won’t stay fresh as long as store-bought loaves. However, with the right method, you can enjoy it over several days without losing that delightful crust and soft crumb.
For short-term storage (up to 3 days), keep the loaf at room temperature. Avoid storing it in plastic, as this traps moisture and causes the crust to soften. Instead, wrap it in a clean kitchen towel, or place it in a paper bag, then tuck it into a bread box or container with some airflow.
If the crust becomes too hard after a day or two, you can revive it by popping the bread in a 350°F oven for 5–10 minutes. This refreshes the crust beautifully without drying out the center.
Best Storage Methods for Different Durations
| Storage Method | Duration | Pros | Cons |
|---|---|---|---|
| Kitchen Towel + Bread Box | 1–3 days | Preserves crust, breathable | May dry out over time |
| Paper Bag | 1–2 days | Simple and crust-friendly | Loses freshness faster |
| Plastic Bag (not ideal) | 2–3 days | Keeps inside soft | Ruins crust |
Step 11: Freezing for Long-Term Enjoyment
If you’ve made more bread than you can eat within a few days, freezing is your best friend. You can freeze either whole loaves or individual slices, depending on how you plan to use them.
To freeze a whole loaf, let it cool completely, then wrap it tightly in plastic wrap, followed by a layer of aluminum foil. You can also place it in a zip-top freezer bag for extra protection. To thaw, let it sit at room temperature still wrapped, then reheat in the oven to crisp up the crust.
To freeze slices, cut the bread only after it’s cooled thoroughly. Place parchment paper between slices so they don’t stick, and store them in a zip-top freezer bag. This makes it easy to pull out one or two slices at a time for toast or sandwiches.
Freezing Tips to Maintain Freshness
| Freezing Method | Duration | Best For |
|---|---|---|
| Whole Loaf | 1–2 months | Reheating full loaf later |
| Sliced Bread | 1 month | Quick single servings |
Always allow frozen bread to come to room temperature before slicing or reheating. For an extra touch, reheat slices directly in a toaster or 350°F oven for 5 minutes.
Now that you know how to make, bake, and store your Dutch oven no knead bread, let’s add in some variations and bonus tips for personalizing your loaves.
Variations, Flavor Add-ins, and Troubleshooting Tips
Step 12: Flavor Variations – Elevate Your Loaf with Simple Add-Ins
One of the best parts about making Dutch oven no knead bread is how easily you can personalize it. With just a few tweaks, you can turn a simple loaf into a showstopper. Try mixing in flavor-packed ingredients right after combining the basic dough, before the first rise.
Here are some popular and delicious ideas:
- Fresh herbs: Add 2 teaspoons of chopped rosemary, thyme, or chives.
- Roasted garlic: Mash and mix in 2–3 roasted garlic cloves for deep flavor.
- Cheese: Grated Parmesan (Cabot Parmesan cheese or Tillamook brand) or cheddar adds a savory punch. Try ½ to 1 cup.
- Seeds: Add sunflower seeds, flax, sesame, or poppy seeds to the dough and sprinkle some on top before baking for texture and visual appeal.
- Dried fruit & nuts: Combine dried cranberries and chopped walnuts for a rustic, slightly sweet loaf.
- Olives: Slice and fold in black or green olives for a Mediterranean twist.
These ingredients blend naturally into the dough during the rise, enhancing both flavor and aroma without altering the baking process.
Flavor Add-In Guide
| Add-In | Suggested Amount | Notes |
|---|---|---|
| Fresh Herbs | 1–2 tsp | Chop finely for even distribution |
| Garlic (roasted) | 2–3 cloves | Mash before adding to dough |
| Grated Cheese | ½–1 cup | Mix in after dry ingredients |
| Dried Fruit | ½ cup | Great with nuts or cinnamon |
| Chopped Nuts | ¼–½ cup | Toast for extra flavor |
| Olives | ⅓ cup | Drain and chop before adding |
Step 13: Common Troubleshooting Issues and Fixes
Bread baking isn’t always perfect, but small tweaks can make a big difference. Here’s how to handle common problems that may arise with your Dutch oven no knead bread:
1. Dough Didn’t Rise:
- Likely Cause: Old or expired yeast, water too hot, or room too cold.
- Fix: Test yeast next time by dissolving it in warm water with sugar. Ensure room temperature is warm enough or use the oven trick for proofing.
2. Dough Too Wet or Dry:
- Likely Cause: Measurement inconsistencies, humidity, or flour type.
- Fix: Add a tablespoon of flour or water at a time until the texture resembles sticky, pliable dough.
3. Bread Too Gummy Inside:
- Likely Cause: Sliced too early after baking.
- Fix: Let bread cool for at least 30 minutes, preferably an hour, to avoid steam-retained gumminess.
4. Crust Too Hard or Bottom Too Tough:
- Likely Cause: Overbaking or too much direct heat.
- Fix: Use a baking sheet under the Dutch oven next time or reduce uncovered baking time slightly.
5. Sticking to Parchment Paper:
- Likely Cause: Low-quality parchment or high moisture dough.
- Fix: Lightly oil the parchment or use higher-rated parchment paper. Crumpling the paper beforehand also helps it mold to the pot shape.
6. Bread Too Flat After Baking:
- Likely Cause: Over-proofed dough or handled too roughly.
- Fix: Avoid letting it rise too long, and be gentle when shaping to preserve air bubbles.
High Altitude Adjustments
If you live at a high elevation, your dough may dry out faster or rise too quickly. Adjust by:
- Adding 1–2 teaspoons extra water.
- Keeping the towel slightly damp during the rise to prevent drying.
- Baking a few minutes less, as things bake faster at higher elevations.
Whether you’re baking your first loaf or experimenting with flavor combinations, understanding how to work with your dough ensures success.


