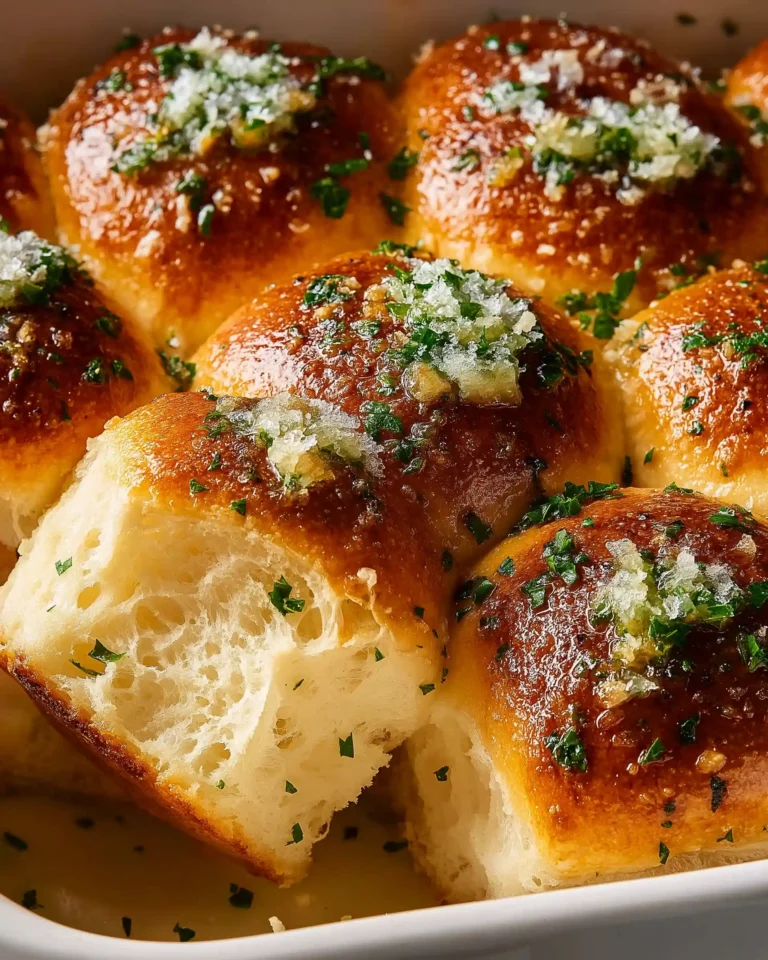
Garlic Butter Bread Rolls are the kind of side dish that steals the spotlight. Imagine warm, pillowy rolls, infused with fragrant garlic butter, finished with a light brush of parsley and flaky sea salt. These rolls are soft on the inside, golden on the outside, and packed with flavor in every bite. Whether you’re preparing a holiday feast, a casual dinner, or a simple lunch, these homemade garlic butter rolls will become a staple on your table.
In this article, we’ll walk through everything you need to know to perfect Garlic Butter Bread Rolls at home, from the key ingredients and equipment, to expert techniques for kneading, shaping, baking, and storing. You’ll also learn pro tips for flavor enhancement, reheating, and making ahead, all with a clear focus on easy readability and USA-based home cooks. Let’s get into it.
Ingredients and Tools for Perfect Garlic Butter Bread Rolls
Understand the Core Ingredients
Every great bread roll starts with the right blend of ingredients. For this recipe, each element is chosen with purpose:
- Unsalted Butter: Used both in the dough and for the garlic topping, butter adds richness and softness. Unsalted butter allows for precise control over salt content.
- Minced Garlic: Fresh garlic is key. It’s sautéed slightly to mellow its bite, releasing aromatic oils that flavor the dough and the buttery finish.
- All-Purpose Flour: Make sure to measure correctly. Spoon and level it to avoid dense rolls. For even more accuracy, use a kitchen scale.
- Chopped Fresh Parsley: Added to both the dough and the garlic butter topping, it introduces a bright, fresh flavor and a pop of color.
- Granulated Sugar: Helps to feed the yeast and promote a golden crust.
- Instant Yeast: The key to a reliable rise. No need to activate it separately, saving time and steps.
- Fine Sea Salt: Enhances all other flavors. Don’t substitute with coarse or iodized salt, as it may affect the outcome.
- Milk (Whole or 2%): Warmed to 110°F to help activate the yeast. Milk creates a tender crumb and adds subtle sweetness.
- Egg (Room Temperature): Adds richness, structure, and a slight chew.
- Beaten Egg (for brushing tops): Gives a golden, glossy finish.
For the garlic butter that tops the rolls, you’ll need more butter, garlic, parsley, and flaky sea salt to finish. These final touches elevate the flavor and texture, making the rolls irresistible.
Equipment Checklist
- 9×13 Baking Pan: The size and shape matter. This pan gives the rolls enough space to rise and bake evenly without spreading too much.
- Stand Mixer with Dough Hook: Saves time and effort during kneading, and provides consistent results.
- Kitchen Scale: Optional, but highly recommended for evenly-sized rolls.
- Pastry Brush: Essential for applying egg wash and garlic butter smoothly.
Each tool contributes to the final texture and appearance of your bread rolls. Keeping these on hand makes the process smoother and more enjoyable.
Print
Garlic Butter Bread Rolls
- Total Time: 1 hour 50 minutes
- Yield: 12 rolls
Description
Soft, golden, and brushed with homemade garlic butter, these Garlic Butter Bread Rolls are the perfect side for any meal. Fluffy on the inside, buttery and flavorful on top.
Ingredients
4 1/2 tablespoons unsalted butter
2 tablespoons minced garlic
3 1/2 cups + 1 tablespoon all-purpose flour
3 tablespoons chopped fresh parsley
1 tablespoon granulated sugar
2 1/4 teaspoons instant yeast
1 teaspoon fine sea salt
1 cup whole or 2% milk, warmed to 110°F
1 large egg, room temperature
1 beaten egg (for brushing the tops)
For the Garlic Butter:
2 tablespoons unsalted butter
1 tablespoon minced garlic
1 tablespoon chopped fresh parsley
flaky sea salt for finishing
Instructions
1. Lightly butter the bottom and sides of a 9×13-inch pan and set aside.
2. In a small pot, melt butter and add minced garlic. Cook for 1–2 minutes until fragrant. Set aside to cool.
3. In a stand mixer, combine flour, parsley, sugar, yeast, and salt. Add milk, egg, and the garlic butter mixture. Knead on low with a dough hook for 10–12 minutes until smooth and tacky. Add more flour if too sticky.
4. Divide dough into 12 equal parts (67g each). Shape into balls, pinch the bottoms, and place in the prepared pan.
5. Cover and let rise in a warm place until doubled in size, about 1–2 hours.
6. Preheat oven to 350°F (180°C). Brush rolls with beaten egg.
7. Bake for 20–30 minutes until golden brown.
8. Meanwhile, prepare garlic butter topping. Melt butter, add garlic, cook for 1–2 minutes, then stir in parsley.
9. Immediately brush baked rolls with garlic butter and sprinkle with flaky sea salt. Serve warm.
Notes
Measure flour using the spoon-and-level method for accuracy. For best results, use a kitchen scale.
If using active dry yeast, activate in warm milk with sugar before combining with other ingredients.
Make ahead by shaping rolls, covering tightly, and refrigerating overnight. Let rise before baking.
Rolls stay fresh for 2–3 days in an airtight container at room temperature.
Freeze fully baked and cooled rolls for up to 1 month.
Reheat rolls in the oven at 350°F covered with foil or microwave for 20–30 seconds.
- Prep Time: 1 hour 30 minutes
- Cook Time: 20 minutes
- Category: Bread
- Method: Baking
- Cuisine: American
Mixing and Kneading the Dough Like a Pro
How to Combine Ingredients for Optimal Texture
Once your ingredients are ready and your garlic butter is lightly sautéed and cooling, it’s time to build the base of your Garlic Butter Bread Rolls. In the stand mixer bowl, combine the dry ingredients first: all-purpose flour, chopped parsley, sugar, instant yeast, and sea salt. Mixing these dry ingredients ensures even distribution and helps prevent clumping later.
Next, add the warmed milk, room-temperature egg, and the cooled garlic butter mixture. These wet ingredients should be gently poured in to avoid shocking the yeast with sudden cold temperatures. The warm milk activates the yeast while the egg and butter create a rich, soft dough.
Start the mixer on low speed using the dough hook attachment. Let it knead for about 10 to 12 minutes, or until the dough becomes smooth and tacky but not overly sticky. If it clings too much to the bowl or your fingers, sprinkle in extra flour one tablespoon at a time.
Pro Tips for Smooth, Elastic Dough
Working with bread dough can be intimidating, but a few simple tricks make a big difference:
- Touch Test: A properly kneaded dough should feel soft and slightly tacky. When you press it lightly, it should spring back.
- Windowpane Test: Pinch off a small piece and gently stretch it. If you can pull it thin enough to see light through without it tearing, the gluten is developed and the dough is ready.
- Avoid Over-Flouring: Adding too much flour can make the rolls dense and dry. Only add enough to bring the dough together and stop excessive sticking.
If you’re kneading by hand, expect to work for 12–15 minutes. Use the heel of your palm to stretch and fold the dough until it’s silky and elastic.
Once kneaded, let the dough rest briefly (about 5 minutes) before shaping. This relaxes the gluten and makes it easier to portion and form uniform rolls.
Up next, we’ll move into shaping and the first rise, where your dough transforms into soft, pillowy portions of flavor.
Shaping and Proofing Garlic Butter Bread Rolls
How to Divide and Shape the Dough Evenly
Now that your dough is soft, elastic, and ready, it’s time to shape it into perfect portions. First, transfer the dough to a lightly floured surface. Use a kitchen scale for accuracy and divide the dough into 12 equal pieces, each weighing about 67 grams. This ensures your rolls bake evenly and look uniform.
To shape each piece, cup your hand over the dough and roll it gently in a circular motion. This movement tightens the surface and creates a smooth, round top. Be sure to pinch the seams underneath to seal the bottom of each roll. This prevents them from opening during baking and helps them hold their round shape.
Proofing the Dough for a Fluffy Finish
Once shaped, place the dough balls into your prepared 9×13 buttered pan. Arrange them evenly, leaving a bit of space between each one. Cover the pan with plastic wrap or a clean kitchen towel and let the rolls rise in a warm, draft-free place until they double in size. This usually takes 1 to 2 hours depending on the room temperature.
Key tips for a successful rise:
- Don’t rush the proofing. Under-proofed rolls will be dense and tight.
- Watch the dough, not the clock. Check that the rolls have expanded and become puffy.
- Avoid over-proofing, which can cause rolls to collapse after baking. A gentle poke with your fingertip should leave a slight dent that slowly bounces back.
This step is crucial for creating light, airy bread rolls with a delicate crumb. Once risen, the rolls are nearly ready to bake. Up next, we’ll go over how to bake them to golden perfection and apply that rich egg wash for a beautiful finish.
Baking Garlic Butter Bread Rolls to Golden Perfection
Applying the Egg Wash for a Glossy Crust
Once your rolls have doubled in size and are pillowy soft to the touch, it’s time to bake. But before sliding them into the oven, brush the tops with a beaten egg. This step adds a beautiful golden sheen to the surface and gives your rolls that bakery-style finish. Make sure to coat the tops evenly, but avoid letting the egg drip down the sides too much, as that can cause uneven browning.
Use a soft pastry brush for the egg wash and gently apply it over each roll. This small detail makes a huge difference in appearance and texture.
Baking Time and Temperature
Preheat your oven to 350°F (180°C) and place the rolls on the center rack. Bake for 20 to 30 minutes, or until the tops are golden brown and the edges are lightly crisp.
A few signs your rolls are fully baked:
- The tops are a deep golden brown.
- They sound hollow when tapped.
- An instant-read thermometer inserted into the center of a roll reads 190°F to 200°F.
If your oven tends to run hot, check the rolls at the 18-minute mark to avoid overbaking. Every oven is different, so keep a close eye during the final minutes.
Avoiding Common Baking Mistakes
- Uneven Browning: Rotate the pan halfway through the bake for even heat distribution.
- Dry Rolls: Don’t overbake. Once the tops are golden, start testing for doneness.
- Collapsed Tops: This can happen if your rolls are under-proofed or your oven was not preheated properly.
Once the rolls are golden and done, remove them from the oven immediately. Now comes the best part — brushing them with warm, fragrant garlic butter. That’s what we’ll cover in the next section.
Finishing with Garlic Butter for Irresistible Flavor
Making the Garlic Butter Topping
While the rolls are baking, prepare the garlic butter that gives this recipe its signature flavor. In a small saucepan, melt 2 tablespoons of unsalted butter over medium heat. Add 1 tablespoon of freshly minced garlic and let it cook for 1 to 2 minutes, just until fragrant. Be careful not to brown the garlic, as it can turn bitter quickly.
Once the garlic is softened and aromatic, remove the pan from heat. Stir in 1 tablespoon of chopped fresh parsley for a bright, herbaceous note. The warmth of the butter will carry the flavors beautifully, making it the perfect finish for your fresh rolls.
Brushing and Seasoning the Rolls
As soon as the rolls come out of the oven, brush them immediately with the warm garlic butter mixture. The hot rolls will absorb the butter better at this stage, allowing the flavors to soak into the crust.
Tips for the final touch:
- Use a generous amount of butter on each roll.
- Focus on coating the tops evenly while allowing a little butter to drip down the sides for extra flavor.
- Finish by sprinkling flaky sea salt on top. This adds a subtle crunch and enhances the garlic and butter flavors.
The combination of garlic, butter, and fresh parsley gives these rolls their standout flavor — rich, savory, and totally irresistible. Serve them warm, and they’ll be the first thing to disappear from the table.
Storing, Freezing, and Reheating Garlic Butter Bread Rolls
How to Store Fresh Rolls Without Losing Softness
Garlic Butter Bread Rolls are best enjoyed fresh from the oven, but with the right storage method, you can keep them soft and flavorful for a few days. Let the rolls cool completely before storing to prevent excess moisture buildup, which can lead to sogginess.
Place the cooled rolls in an airtight container or a zip-top bag and store them at room temperature for up to 3 days. Avoid refrigerating them, as cold air dries out bread quickly.
To maintain the best texture:
- Line the container with a paper towel to absorb excess moisture.
- Keep them in a cool, dry area away from direct sunlight or heat sources.
Freezing for Longer Shelf Life
To enjoy these garlic rolls beyond a few days, freezing is a great option. After the rolls are fully baked and completely cooled, remove them from the baking pan and transfer them to a freezer-safe container or bag. They can be frozen for up to one month.
When you’re ready to serve:
- Thaw the rolls at room temperature for a few hours or overnight in the fridge.
- Reheat in the oven, covered in foil, at 350°F until warmed through — usually about 10 minutes.
- Brush again with fresh garlic butter if desired, to revive that fresh-baked flavor.
Reheating for That Fresh-Out-of-the-Oven Taste
The best way to serve these rolls is warm. To reheat:
- Oven Method: Cover with foil and bake at 350°F for 10–12 minutes.
- Microwave Method: Wrap one or two rolls in a damp paper towel and microwave for 20 to 30 seconds.
Avoid overheating, especially in the microwave, to prevent drying out the bread. Adding a touch of butter after reheating can help bring back the richness and softness.
Conclusion: The Magic of Homemade Garlic Butter Bread Rolls
Making Garlic Butter Bread Rolls from scratch might seem like a project, but it’s worth every minute. The combination of soft, fluffy dough and rich garlic butter turns this simple side dish into the star of the table. Whether you’re preparing them for a holiday, a casual gathering, or simply because you crave something warm and comforting, these rolls deliver every time.
The recipe is flexible, freezer-friendly, and great for beginners and seasoned bakers alike. From measuring flour with care to mastering the perfect rise and finish, every detail contributes to rolls that are golden, flavorful, and deeply satisfying.


